Removal Procedure
Caution: Unless directed otherwise, the ignition and start switch must be in the OFF or LOCK position, and all electrical loads must be OFF before servicing
any electrical component. Disconnect the negative battery cable to prevent an electrical spark should a tool or equipment come in contact with an exposed electrical terminal. Failure to follow these precautions may result in personal injury and/or damage to
the vehicle or its components.
- Disconnect
the negative battery cable.
- Unlatch the folding top. Refer to
Power Folding Top Operation
.
- Remove the left and right quarter trim panels. Refer to
Rear Quarter Trim Panel Replacement
in Interior Trim.

- Remove the headliner.
Refer to
Folding Top Headlining Trim Panel Replacement
.
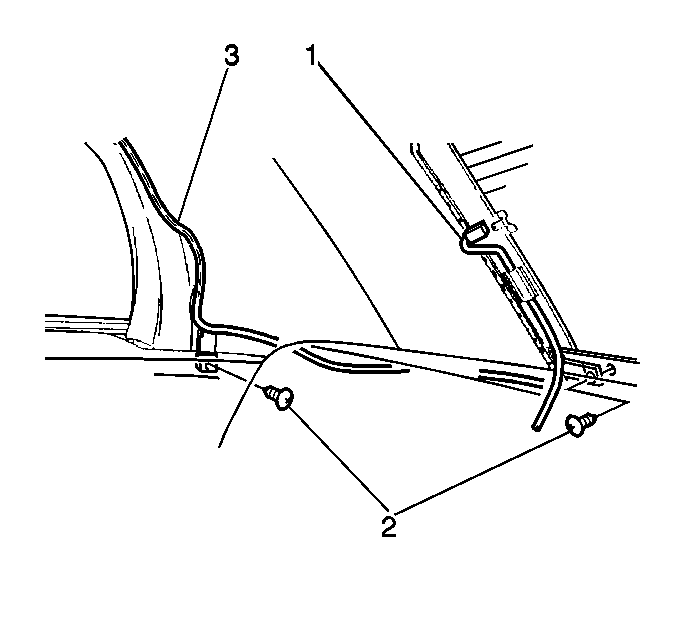
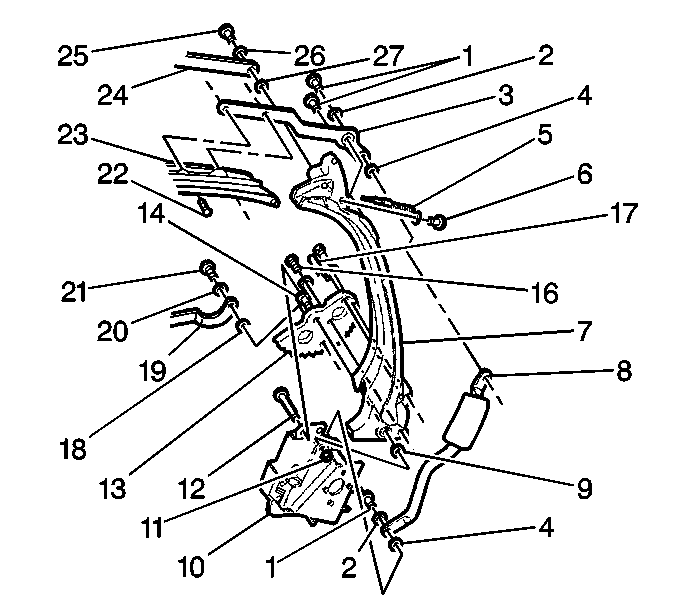
- Disconnect the heated backlite wire leads (1).

- Remove the bolt (21),
washer (20), and bushing from the quarter window drive links and the
spur gears (13).
- Carefully grasp and lower the quarter windows.
- Disconnect the connectors on the drive motor wire harness.
Note the wire harness routing.
- Remove the retainers.
- Fold the closeout panel trim forward.
- Remove the back belt molding. Refer to
Back Belt Outer Molding Replacement
.
- Remove the right and the left quarter panel belt outer molding.
Refer to
Quarter Panel Belt Outer Molding Replacement
.

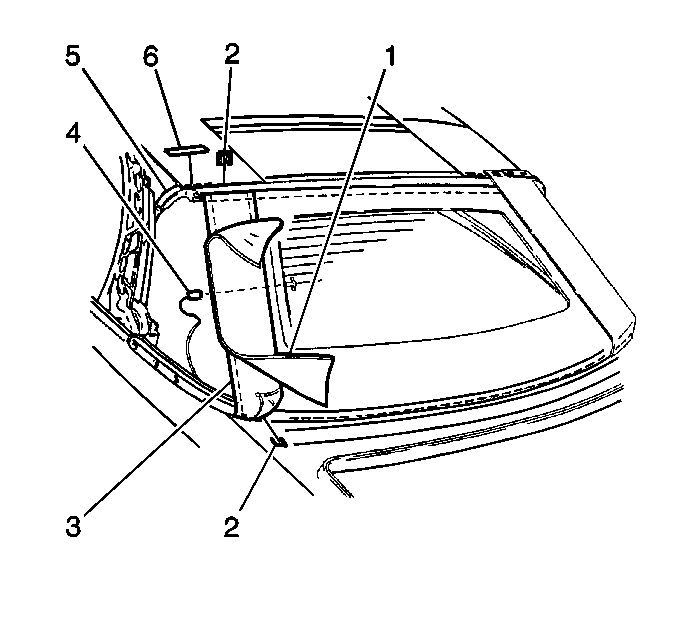
- Remove the staples (2)
that retain the following components to the quarter belt tackstrip:
Caution: Eye protection must be worn when drilling rivets to reduce
the chance of personal injury.
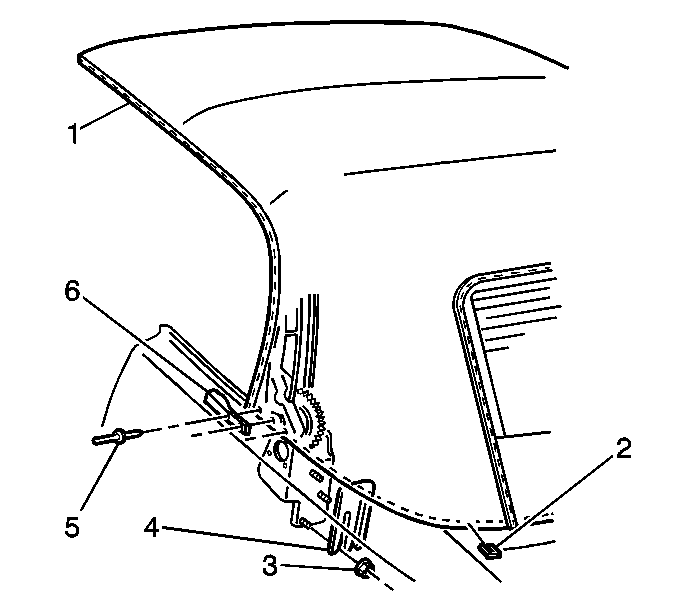
- Remove the rivets (5) that retain the topstack cover to the quarter
belt flange:
| 14.1. | Punch out a center pin. |
| 14.2. | Drill out the rivets. |
- Remove the nutwashers (3) that retain the main pivot bracket
assembly to the mounting bracket.
Note and retain the shims (4).
- With the help of an assistant, lift the topstack assembly complete
from the vehicle.
Installation Procedure
Important:
| • | As the topstack is lowered into position, guide the quarter window
drive links into the main pivot bracket in order to avoid trapping the links. |
| • | Unfold the topstack or place the topstack in the up position during
installation in order to allow access to the main pivot bracket area. |
- With the help of an assistant, position the topstack assembly to the
vehicle.
Align the main pivot bracket dowel pins with holes in the mounting brackets.

- If the shims (4)
were removed, install the shims in the proper location between the mounting
brackets and the main pivot bracket.
Notice: Use the correct fastener in the correct location. Replacement fasteners
must be the correct part number for that application. Fasteners requiring
replacement or fasteners requiring the use of thread locking compound or sealant
are identified in the service procedure. Do not use paints, lubricants, or
corrosion inhibitors on fasteners or fastener joint surfaces unless specified.
These coatings affect fastener torque and joint clamping force and may damage
the fastener. Use the correct tightening sequence and specifications when
installing fasteners in order to avoid damage to parts and systems.
- Install the nutwashers (3)
that retain the main pivot bracket assembly to the mounting bracket.
Tighten
Tighten the nutwashers (3) to 23 N·m (17 lb ft).
- Connect the connectors on the drive motor wire harness to the
body wire harness.
Note the motor wire harness routing.
- Connect the negative battery cable.

- Install the backlite assembly (4)
to the tackstrip:
| | Important: The No. 1 bow must remain seated on the blocks while stapling
the backlite and the staypads.
|
| 6.1. | Position the No. 1 bow blocks between the windshield header and
the No. 1 bow. |
| 6.2. | Position the backlite support blocks on the rear seatback panel. |
| 6.3. | Add butyl tape to the quarter belt tackstrip as required in order
to ensure sealing of the backlite (3) and the topcover. |
| 6.4. | Pull the backlite lower valance taught. |
| 6.5. | Use stainless steel staples (2) in order to attach the
backlite lower valance to the tackstrip. |
| 6.6. | Pull the backlite water trap taught. |
| 6.7. | Use stainless steel staples (2) in order to attach the
backlite water trap to the tackstrip. |

- Connect the heated backlite
wire harness connectors (1).
- Install the topcover and the rear stay pads to the tackstrip and
quarter panel structure flange. Refer to steps 28-38 in
Folding Top Cover Replacement
.
- Cycle and latch the topstack to the windshield header.
- Inspect the topstack for proper operation and appearance.
- Install the left and the right quarter panel belt outer molding.
Refer to
Quarter Panel Belt Outer Molding Replacement
.
- Install the back belt molding. Refer to
Back Belt Outer Molding Replacement
.
- Use the retainers in order to install the closeout trim panel.

- Apply Loctite (P/N 242
or the equivalent) to the bolt threads.
- Carefully raise the quarter window glass.
- Install the drive links (14) to the spur gears.
- Install the bushing (18), the washer (20), and the
retaining bolt (21).
- Install the headliner. Refer to
Folding Top Headlining Trim Panel Replacement
- Install the retainers (2) in order to retain the headliner
to the quarter inner structure.
- Install the left and the right quarter trim panels. Refer to
Rear Quarter Trim Panel Replacement
in Interior Trim.


