Removal Procedure
- Unlatch the folding top from the windshield header in order to relieve topcover tension. Refer to Power Folding Top Operation .
- Remove the right and the left quarter trim panel. Refer to Rear Quarter Trim Panel Replacement in Interior Trim.
- Remove the No. 2 bow strap.
- Remove the headliner. Refer to Folding Top Headlining Trim Panel Replacement .
- Remove the topcover listing strips (1) from the No. 2 bow, and the No. 3 bow
- Remove the back belt molding. Refer to Back Belt Outer Molding Replacement .
- Remove the right and the left quarter panel belt outer molding. Refer to Quarter Panel Belt Outer Molding Replacement .
- Remove the rear spoiler on Pontiac vehicles only. Refer to Rear Spoiler Replacement in Body Rear End.
- Remove the staples that retain the topcover to the tackstrip.
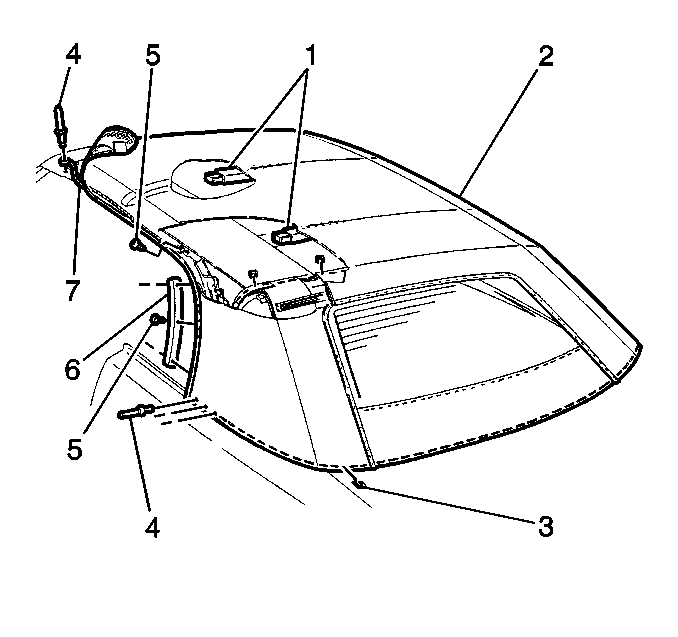
- Remove the rivets (4) that retain the topcover (2) to the body flange:
- Punch out the center pin.
- Drill out the rivet.
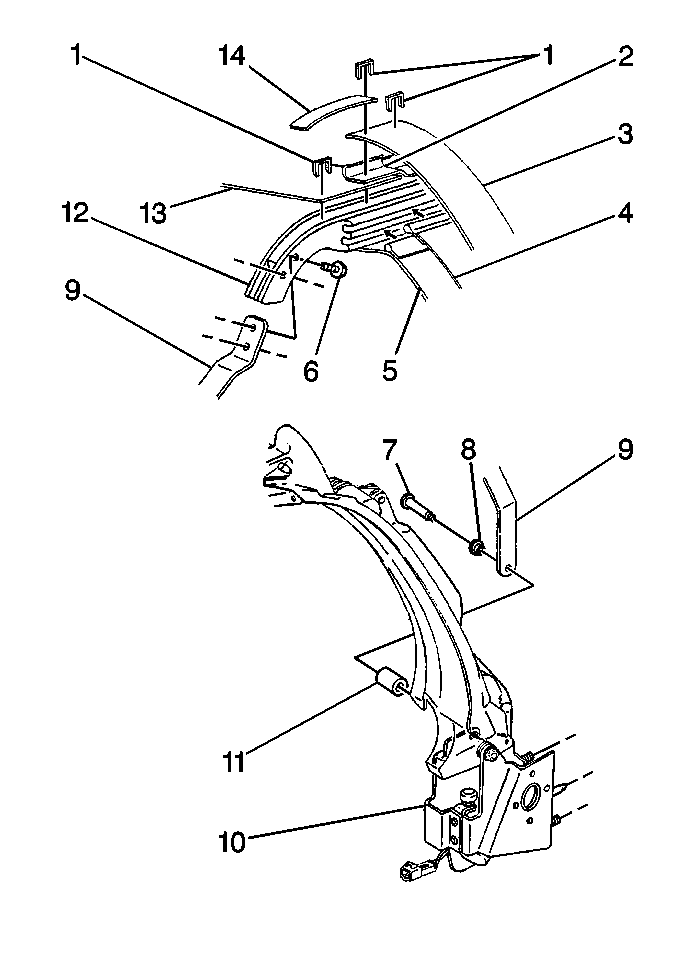
- Remove the velcro strips (14) from the No. 4 bow ends.
- Remove the staples (1) from the rear stay pads (3), and the topcover listing strip (2) at the No. 4 bow (8).
- Remove the following components:
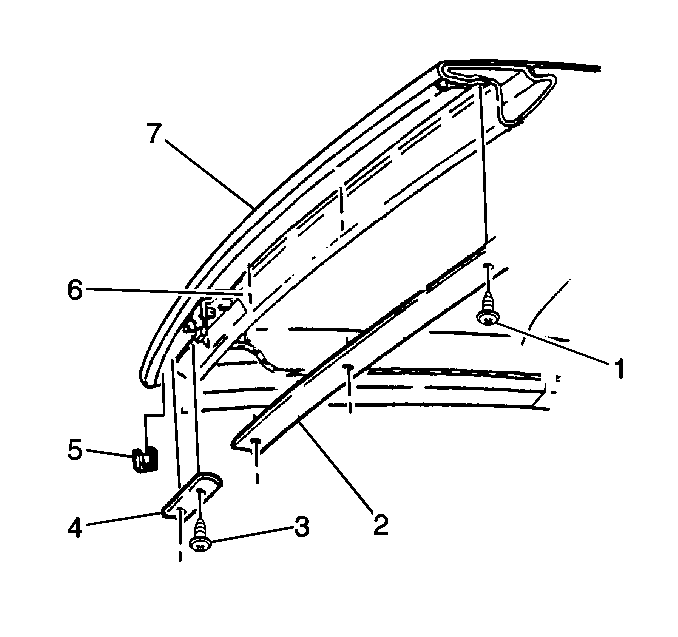
- Remove the screws (3)
- Remove the left and the right topcover retainers (4)
- Remove the screws (3) which retain the center topcover retainer.
- Remove the center topcover retainer (2)
- Remove the staples (5) from each side at the No. 1 bow (6).
- Carefully peel the topcover from the No. 1 bow (6).
- Perform the following steps in order to remove the rivet (4) that retains the side retainer cable (7) to the front rail:
- Remove the rear rail weather-strip and retainer. Refer to Folding Top Weatherstrip Replacement and Folding Top Weatherstrip Retainer Replacement .
- Carefully pull the headliner from the rear rail.
- Carefully peel the topcover (2) from the rear rail.
- Pull the side retainer cable (7) from the topcover pockets.
- Remove the topcover (2) from the vehicle.
Peel the retainer from the bow.

Caution: Eye protection must be worn when drilling rivets to reduce the chance of personal injury.


Caution: Eye protection must be worn when drilling rivets to reduce the chance of personal injury.
| 22.1. | Punch out the center pin. |
| 22.2. | Drill out the rivet. |
Installation Procedure
- Position the topcover (2) to the vehicle.
- Align the topcover strip 2 with the rear edge of the No. 4 bow tackstrip.
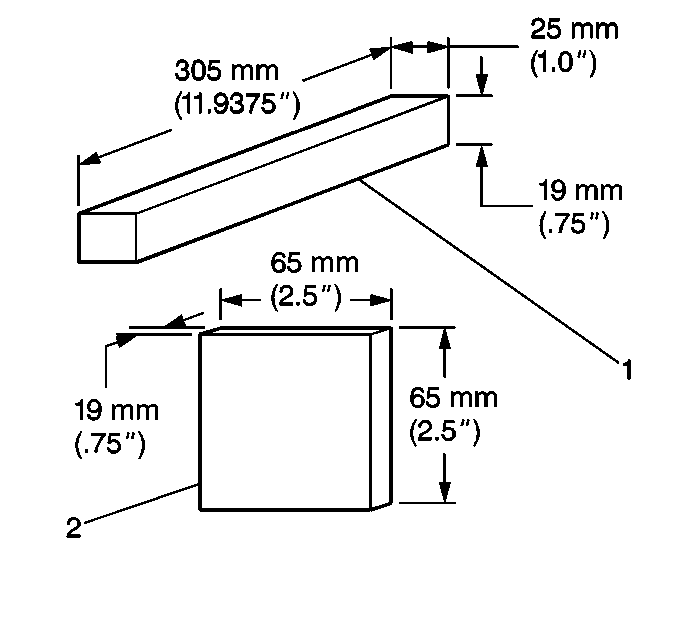
- Use the 2 spacers (1), and 2 No. 1 bow blocks (2) to achieve correct topcover tension:
- Align the topcover listing strip (2) center notch to the center hole in the No. 4 bow (12).
- Use stainless steel staples (1) in order to secure the listing strip (2) and the No. 4 bow.
- Attach a length of wire to the side retainer cable (7) in order to pull the cable through the topcover (2) pocket.
- Use rivets in order to secure the side retainer cable (7) to the front rails.
- Apply adhesive to the top cover material, and the rear rails.
- Install the top cover (2) to the rear rails.
- Position the wood spacers between the rear rails and the No. 4 bow (12).
- Latch the topstack to the windshield header.
- Align the topcover side flaps to the front of the No. 1 bow (6)
- Perform the following steps with the help of an aid:
- Remove the wood spacers.
- Unlatch the topstack.
- Lower the topstack to a suitable working height.
- Apply adhesive to the bottom side of the No. 1 bow (6), the inside of the topcover material, and the inside surface of the topcover flaps
- Secure the topcover to the No. 1 bow (6).
- Fold the topcover material under the front edge of the No. 1 bow (6).
- Raise the power folding top and latch the power folding top in order to test the topcover tension between the No. 1 bow (6), and the No. 4 bow (2).
- Unlatch the power folding top.
- Lower the topstack to a suitable working height.
- Use one stainless steel staple (5) per side in order to secure the topcover material and the flap to the No. 1 bow.
- Install the following components:
- Install the topcover center retainer (2).
- Install the topcover center retainer screws (3).
- Install the right and the left topcover retainers (4)
- Install the right and left topcover retainer screws (3).
- Use 2-sided tape in order to attach the topcover listing strips (1) to the No. 2 bow, and the No. 3 bow
- Trim the topcover listing strips (1) at the bow lower front edge.
- Position the wood spacers between the rear rail and the No. 4 bow (12).
- Inspect the backlite tension. Refer to Folding Top Rear Window Replacement as necessary.
- Unlatch the folding top from the windshield header.
- Position the No. 1 bow blocks between the header an the No. 1 bow (6) on the right and left sides.
- Add butyl tape to the quarter belt tackstrip as required in order to ensure sealing of the topcover sail panels.
- Perform the following steps in order to secure the rear stay pads:
- Attach velcro strips (14) over the rear stay pad staples at the ends of the No. 4 bow.
- Perform the following steps in order to secure the topcover:
- Remove the blocks, and the spacers
- Raise the power folding top.
- Latch the power folding top to the windshield header.
- Inspect for proper appearance and latching effort.
- Use an awl in order to locate and pierce the rivet holes when you pull the topcover material tight at the body flange.
- Use an aluminum rivet (4) in order to secure the topcover (2) to the body flange.
- Trim the topcover material to the lower edge of the tackstrip.
- Trim the power folding top cover material away from the back belt and quarter belt fastener holes.
- Install the headliner assembly. Refer to Folding Top Headlining Trim Panel Replacement .
- Install the rear rail weatherstrip retainers and weather-strips. Refer to Folding Top Weatherstrip Replacement and Folding Top Weatherstrip Retainer Replacement .
- Install the quarter panel belt outer moldings. Refer to Quarter Panel Belt Outer Molding Replacement .
- Install the back belt molding. Refer to Back Belt Outer Molding Replacement .
- Install the rear spoiler on Pontiac vehicles only. Refer to Rear Spoiler Replacement in Body Rear End.
- Install the No. 2 bow strap.
- Cycle the power folding top and inspect the power folding top for proper operation and appearance.
- Install the right and the left quarter trim panel. Refer to Rear Quarter Trim Panel Replacement in Interior Trim.


Important: Use 2 spacers and 2 bow blocks to help achieve correct topcover tension. These components must be fabricated from a suitable material by technician. Refer to Topcover Installation Spacers for component dimensions.

Important: Start stapling at the center. Work outward to each side while pulling the listing strip material tight.

Start at the bottom and work upward with the topcover welt turned slightly inward at the rear rail.

Important: Do not cycle the topstack while the wood spacers are in place.

| 13.1. | While pulling the topcover material forward, mark the front edge of the No. 1 bow on the topcover material. |
| 13.2. | Repeat the above step for the right and the left sides near the seams. |
Verify that the reference marks align with the front edge of the bow, and the folding side flaps under the bow ends
Notice: Use the correct fastener in the correct location. Replacement fasteners must be the correct part number for that application. Fasteners requiring replacement or fasteners requiring the use of thread locking compound or sealant are identified in the service procedure. Do not use paints, lubricants, or corrosion inhibitors on fasteners or fastener joint surfaces unless specified. These coatings affect fastener torque and joint clamping force and may damage the fastener. Use the correct tightening sequence and specifications when installing fasteners in order to avoid damage to parts and systems.
Tighten
Tighten the screws to 2 N·m (18 lb in).
Tighten
Tighten the screws to 2 N·m (18 lb in).


Important:
| • | The No. 1 bow must remain seated on blocks while stapling the staypads and the topcover. |
| • | Pulling the staypads and the topcover too tight may affect the topstack pull-down and the latching effort. |
| 36.1. | While you pull the rear stay pads (3) tight, align the stay pad inner edge with the backlite welt stitching. |
| 36.2. | Use divergent stainless steel staples (1) in order to staple the stay pads to the No. 4 bow tackstrip. |

| 38.1. | Pull the topcover sail panel taught and staple the topcover sail panel material using stainless steel staples (3). |
Start at the front of the tackstrip and stop at the corner seams.
| 38.2. | Perform the above step starting at the backlite opening and working outward to the corner seam. |
