Antilock Brake System Automated Bleed Procedure With Pressure

Notice: Use only DOT 3 brake fluid from a clean, sealed container. Do not use any fluid
from a container which is wet with water. Do not use DOT 5 silicone fluid.
Notice: Pressure bleeding equipment must be of the diaphragm type. It must have a rubber
diaphragm between the air supply and the brake fluid to prevent air, moisture, and
other contaminants from entering the hydraulic system.
Important: Prior to bleeding the rear brakes, the rear displacement cylinder pistons must
be returned to the top most position or HOME. To return the pistons to home (top most
position), use the PDT, or equivalent to perform SPECIAL TEST, RUN ABS MOTORS, PISTON
UP-HOME. This test will run the piston to the top of their travel.

- Clean brake fluid reservoir cap and area around
cap. Remove cap.
- Fill the master cylinder reservoir with clean brake fluid and keep reservoir
at least one half full during the bleed operation.
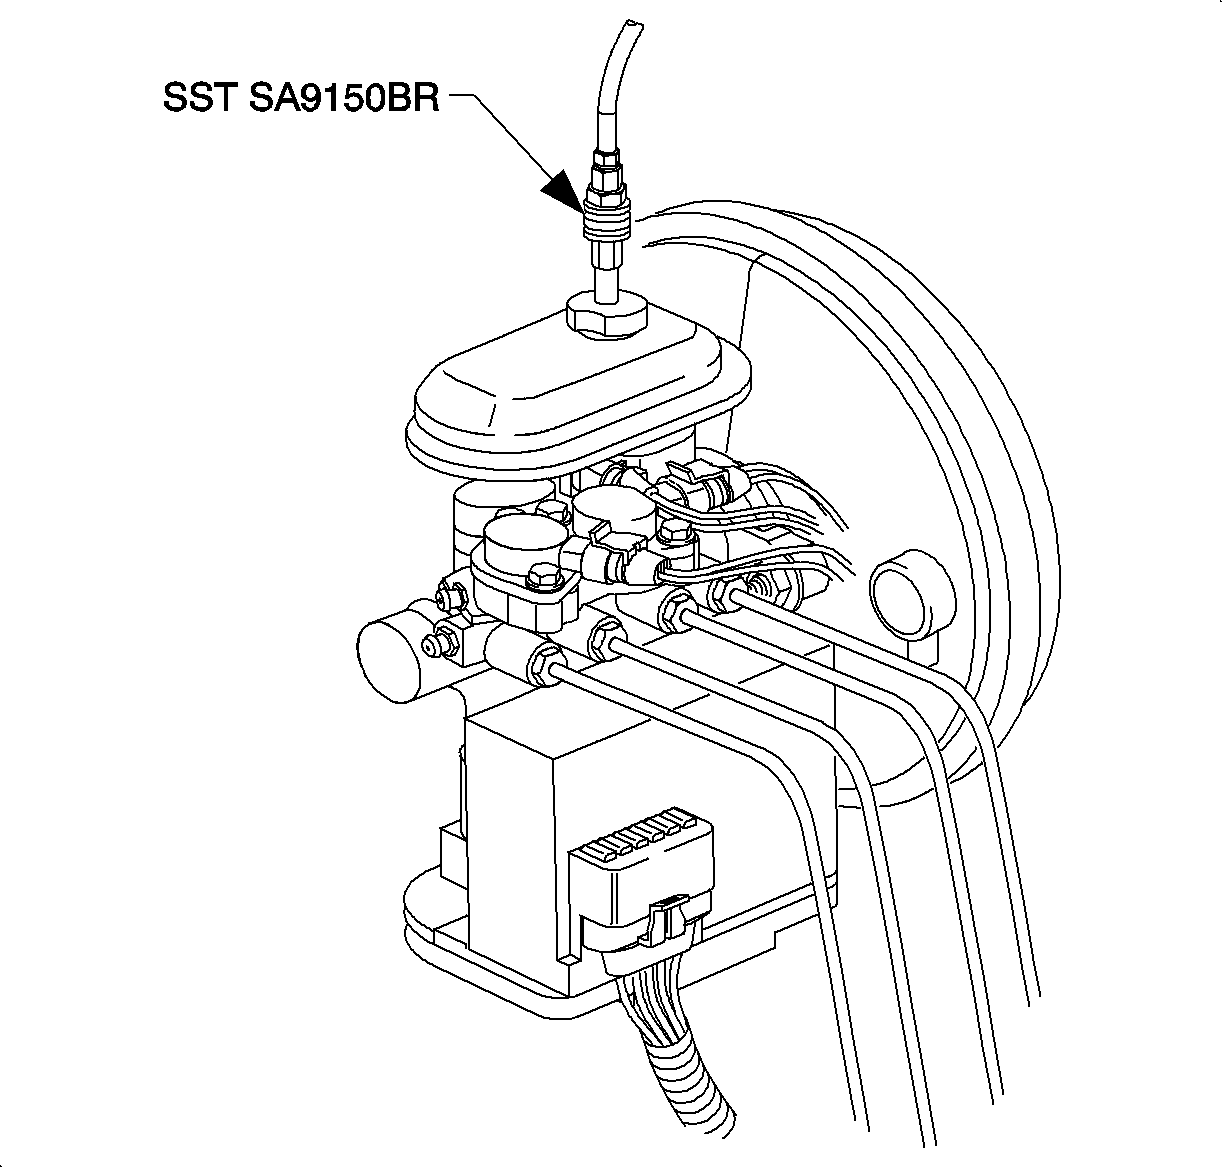
- Install the bleeder adaptor SA9150BR (or equivalent) to the brake fluid
reservoir.
- Connect pressure bleeder to adapter.
- Charge pressure bleeder equipment to 207-242 kPa (30-35 psi).

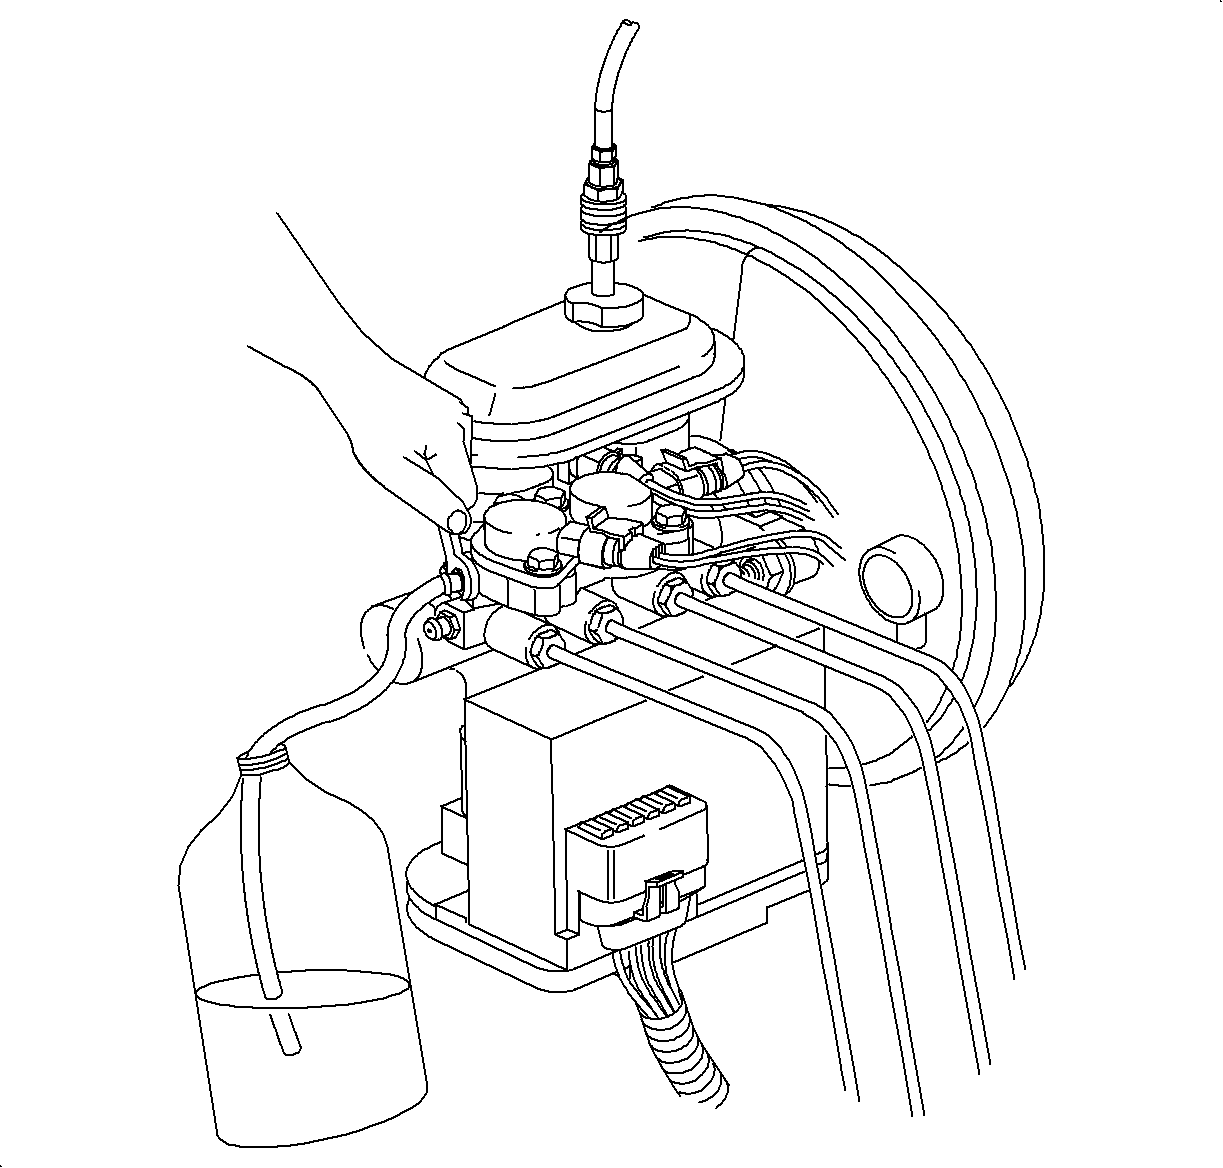
- Bleed brake modulator assembly:
| 6.1. | Attach a transparent tube over the rear modulator assembly bleeder valve
and allow the tube to hang submerged in a clean container partially filled with brake
fluid. |
| 6.2. | Slowly open bleeder valve 1/2 to 3/4 turn and allow fluid to flow until
no air is seen in the fluid. |
| 6.3. | Close the bleeder valve. |
Tighten:
7 N·m (62 lb in)
| 6.4. | Repeat steps 6.1 to 6.3 for the front modulator assembly bleeder valve. |

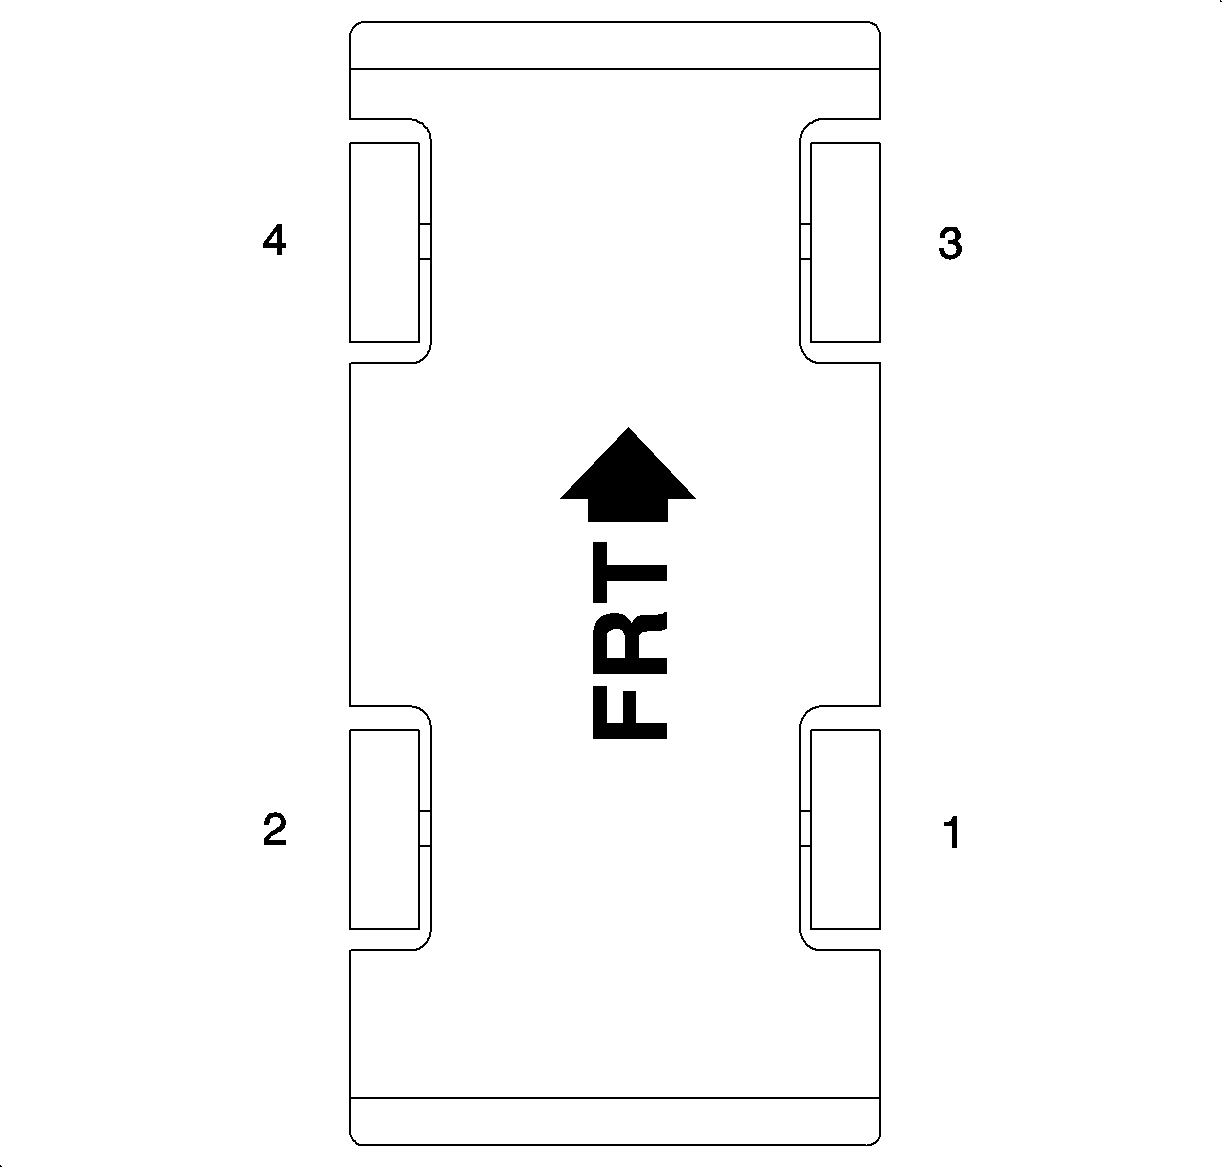
- Bleed the calipers (and wheel cylinders if vehicle
has rear drum brakes) in the following order.
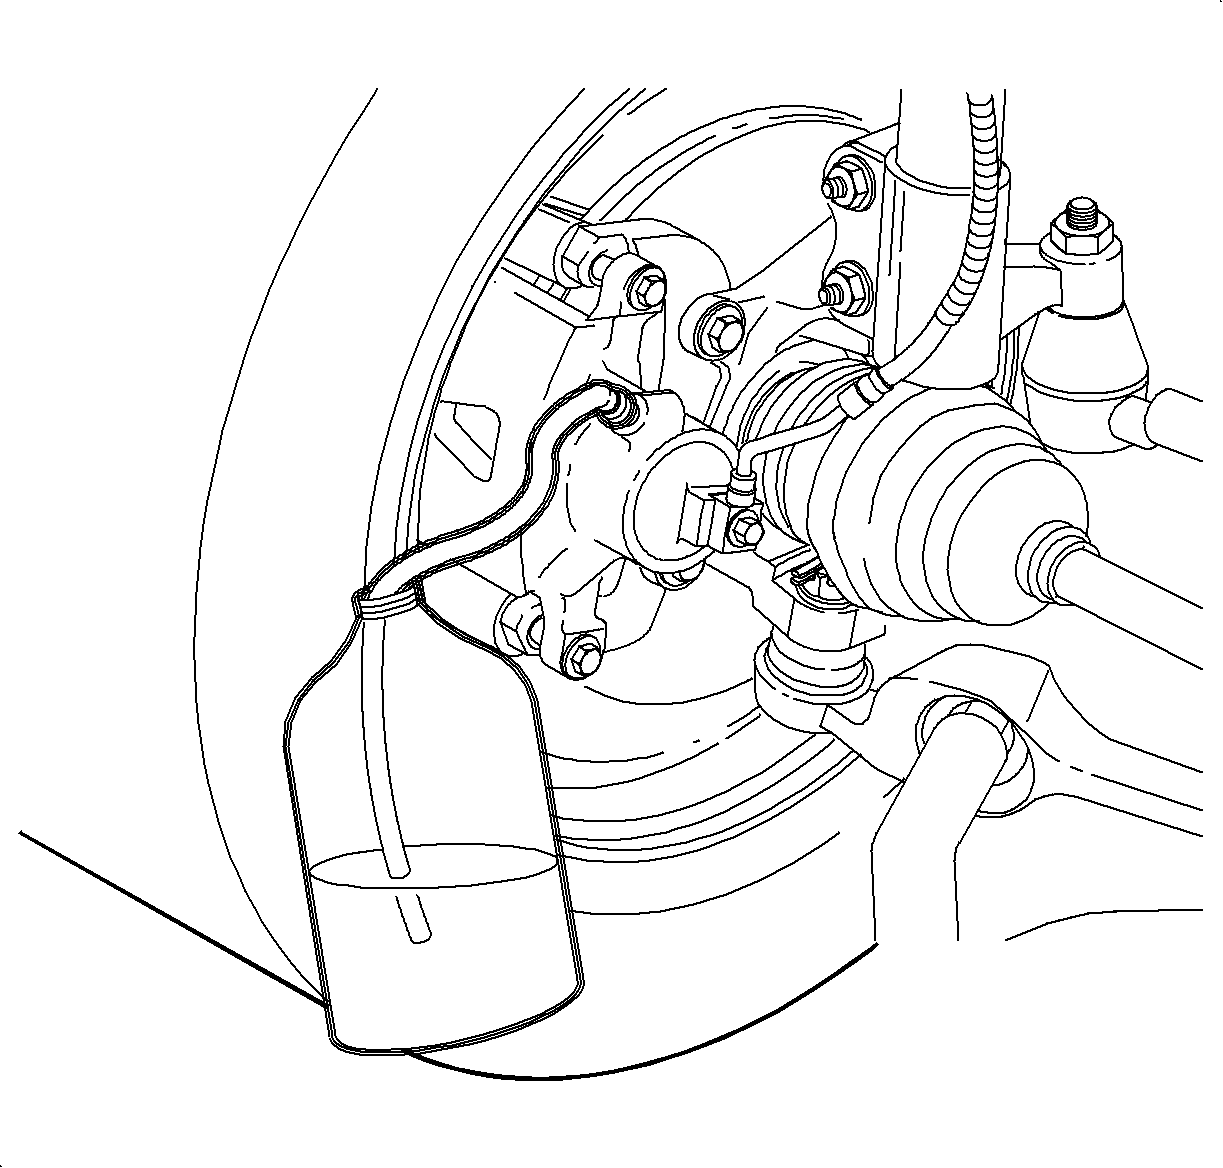
| 7.1. | Attach a transparent tube over the caliper assembly bleeder valve and
allow the tube to hang submerged in a clean container partially filled with brake
fluid. |
| 7.2. | Open bleeder valve 1/2 to 3/4 turn and allow fluid to flow until no air
is seen in the fluid. |
| 7.3. | Close bleeder valve. |
Tighten:
11 N·m (97 lb in)
Tighten:
7.5 N·m (66 lb in)
| | Important: To assist in freeing entrapped air, tap lightly on caliper casting with a rubber
mallet.
|
| 7.4. | Repeat step 7.1 through 7.3 for each wheel in the order specified above, until
no air is present in any brake lines. |
- Check the brake pedal for firm constant feel and travel both with the
engine Off (ignition On) and with the engine running.
If pedal feel is firm and constant and travel is not excessive, go to step 9.
If pedal feel is not firm and constant or travel is excessive.
| 8.1. | Use PDT, or equivalent to RUN ABS MOTORS, PISTONS UP-HOME and PISTONS
DOWN-REL two times. |
| 8.2. | Use scan tool, home pistons. |
| 8.3. | Start engine and let it run for two seconds after the ABS light goes out. |
| 8.5. | Repeat steps 8.3 and 8.4 nine more times. |
| 8.6. | Bleed entire brake system again. |
- Check for leaks with engine running and brakes applied.
- Road test the vehicle.
| 10.1. | Make several normal (non-ABS) stops from a moderate speed. |
| 10.2. | Make one to two ABS stops from a higher speed at approximately 80 km/h
(50 mph). |
- After road testing the vehicle, it is recommended that the system be bled
again following the steps 1 through 7 and then inspected again. If after inspection
the pedal feels firm and constant and pedal travel is not excessive, system is properly
bled.
Antilock Brake System Automated Bleed Procedure Without Pressure
Tools Required
| • | Delco Supreme II (or equivalent) DOT 3 Brake Fluid |
| • | Plastic Bleeder Bottle (equipped with hose to recover brake fluid) |
Important: If a pressure bleeder is not available, a manual pedal method can be used with
the aid of an assistant. The manual pedal method will consist of the assistant opening
and closing bleeder screws or actuating the brake pedal. The manual pedal method will
still require the use of a Scan tool to properly bleed the brake system.
The alternate automated brake bleed procedure is used on DBC7 ABS systems. This
procedure uses a Scan tool to cycle the solenoid valves and run the pump in order
to purge air from the secondary circuits. The automated bleed procedure opens the
secondary circuits, then allows trapped air in the brake pressure modulator valve
(BPMV) to flow outwards to the individual corners, where the air is purged from
the system.
Important: The alternate automated brake bleed procedure is required when one of the following
has occurred:
| • | Valve assembly removal or replacement |
| • | Manual bleed of calipers and wheel cylinders does not obtain desired pedal
height or travel |
| • | Master cylinder removal or replacement |
| • | Extreme loss of brake fluid |
| • | Air ingestion is suspected. |
Preliminary Inspection and Setup Procedure
- Inspect the battery for full charge. Charge the battery or repair the
charging system if the battery is not fully charged.
- Connect a scan tool to DLC connector. Check and repair current or history
DTCs prior to performing any brake system bleeding.
- Inspect for visual damage or leaks, repair as needed.
- Fill the master cylinder reservoir with clean brake fluid. Keep the reservoir
at least half full during the entire bleed procedure.
Important: Use only DOT 3 brake fluid. Brake fluid is corrosive. Take care not to
allow brake fluid to contact any painted surfaces. Wipe off and clean painted surface
immediately if contact is made.
- Turn the ignition switch to RUN, with the engine OFF.
- Raise the vehicle on a suitable support.
- Connect the scan tool and establish communication with ABS system by following
these steps:
| 7.2. | Select the appropriate model year |
| 7.3. | Select SATURN (not passenger car) |
The ABS braking is not available when ABS/TCS lamps are illuminated statement
will appear on the screen.
| 7.7. | Select SPECIAL FUNCTIONS |
| 7.8. | Select AUTOMATED BLEED |
The Connect Required Brake Bleed Equipment statement will appear the on screen.
Disregard the statement for this alternate automated bleed procedure.
Alternate Automated Bleed Procedure
- With the bleeder screws in the closed position, Select CONTINUE to start
the bleed procedure.
The first part of the automated bleed procedure will cycle the pump for 60 seconds.
After cycling the pump, the scan tool will go into a cool-down mode for 180 seconds,
a 3 minute timer will be displayed. The automated bleed procedure will not
continue until the timer has expired, and it cannot be overridden.
Important: For the following steps, the assistant should be applying and holding the brake
pedal, or opening and closing the designated bleeder screw when appropriate.
- The scan tool will instruct to open the right rear bleeder screw first.
| 2.1. | Before starting the bleed procedure, assistant should slowly stroke, apply,
and hold the brake pedal. |
| 2.2. | Once the brake pedal is in a held position, press START on the scan tool
and open the bleeder screw simultaneously. |
| 2.3. | When the brake pedal reaches the floor, close the bleeder screw. The
assistant can now release the brake pedal. |
| 2.4. | The assistant should again stroke, apply, and hold the brake pedal. |
| 2.5. | Open the bleeder screw until the brake pedal reaches the floor. Then close
the bleeder screw. |
| 2.6. | Repeat this procedure as many times as possible during the scan tool timed
program or until all air is removed. |
| 2.7. | Once the scan tool is done cycling the designated brake corner, ensure
that the bleeder screw is closed prior to moving on to the next corner. |

- Repeat step 2 with the scan tool for the remaining brake corners in the
following order:
Important: The assistant should continue to apply and hold the brake pedal, or open and
close the designated bleeder screw when appropriate.
- Next, the scan tool will instruct to open each bleeder screw an additional 20 seconds,
starting again with the right rear corner. This will allow any remaining air to
purge out of the system.
| 4.1. | Before starting bleed procedure, assistant should slowly stroke, apply,
and hold the brake pedal. |
| 4.2. | Once the brake pedal is in a held position, press START on the scan tool
and open the bleeder screw simultaneously. |
| 4.3. | When the brake pedal reaches the floor, close the bleeder screw. The assistant
can now release the brake pedal. |
| 4.4. | The assistant should again stroke, apply, and hold the brake pedal. |
| 4.5. | Open the bleeder screw until the brake pedal reaches the floor. Then close
the bleeder screw. |
| 4.6. | Repeat this procedure as many times as possible during the scan tool timed
program or until all air is removed. |
| 4.7. | Once scan tool is done cycling the designated brake corner, ensure that
the bleeder screw is closed prior to moving on to the next corner. |
- Once all four bleeder screws have been opened and closed the scan tool
will display PROCEDURE COMPLETE. The assistant is no longer needed.
Notice: Refer to Fastener Notice in the Preface section.
- Torque the bleeder screws.
Tighten
| • | Tighten the front bleeder screws to 11 N·m (97 lb in). |
| • | Tighten the rear bleeder screws to 7.5 N·m (66 lb in). |
- Depress the brake pedal to gage pedal height and travel. It may be necessary
to repeat steps 1-6 if pedal feel and travel are unacceptable.
- Remove the scan tool from DLC.
- Lower the vehicle.
- Inspect the brake fluid level in the master cylinder reservoir, fill as
needed with DOT 3 brake fluid.
- Road test the vehicle to verify proper brake pedal height and travel.


