If your is equipped with a digital video disc (DVD) entertainment system, the entertainment system works with the vehicle audio system and includes a DVD player, a video display screen, headphones, and a remote control.
Before You Drive
In severe or extreme weather conditions your entertainment system will shut down until the temperature is within the operating range. This protection feature will keep your video components from being damaged while the temperature is below 4°F (-20°C) or below 140°F (60°C). To resume operation, shut off the entertainment system, pull down the video screen and then heat or cool the vehicle until the temperature is within the operating range of your entertainment system.
System Description
Headphones
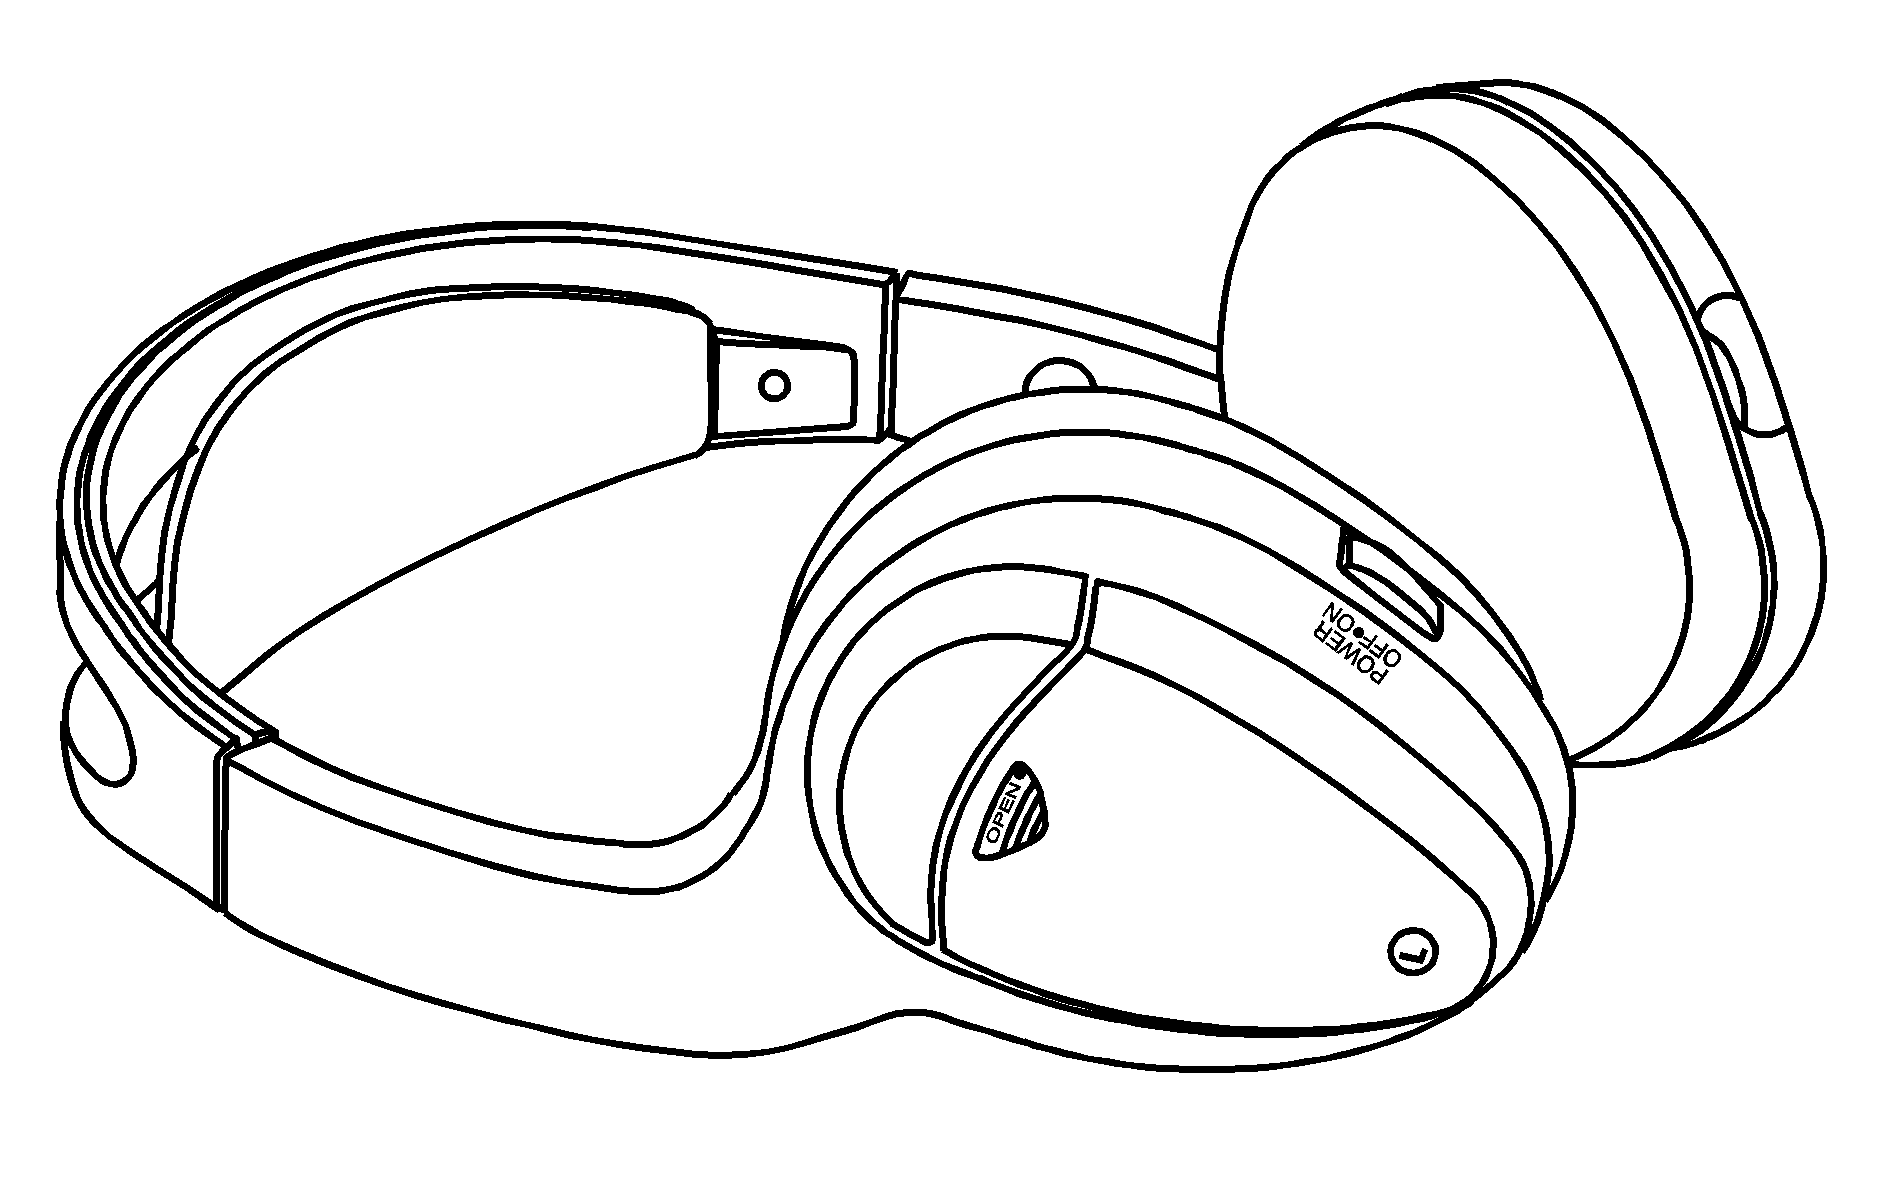
The entertainment system includes two sets of wireless headphones. The headphones are used to listen to the DVD radio or an auxiliary device connected to the RCA jacks. The wireless headphones have an ON/OFF switch and a volume control.
To use the headphones, turn the switch, located on the left side, to ON. An indicator light located on the headphones will illuminate. If the light does not illuminate, the batteries may need to be replaced. See "Battery Replacement" later in this section for more information. Switch the headphones to OFF when not in use.
If you move too far forward or step out of the vehicle or break the "line of sight" for more than 3 minutes, the headphones will shut off automatically to preserve battery life.
To adjust the volume on the headphones, use the volume control located on the right side.
Notice: Do not store the headphones in heat or direct sunlight. This could damage the headphones and repairs will not be covered by the warranty. Storage in extreme cold can weaken the batteries. Keep the headphones stored in a cool, dry place.
If the headphones are to be stored for a long period of time, remove the batteries and keep them in a cool, dry place.
Stereo RCA Jacks
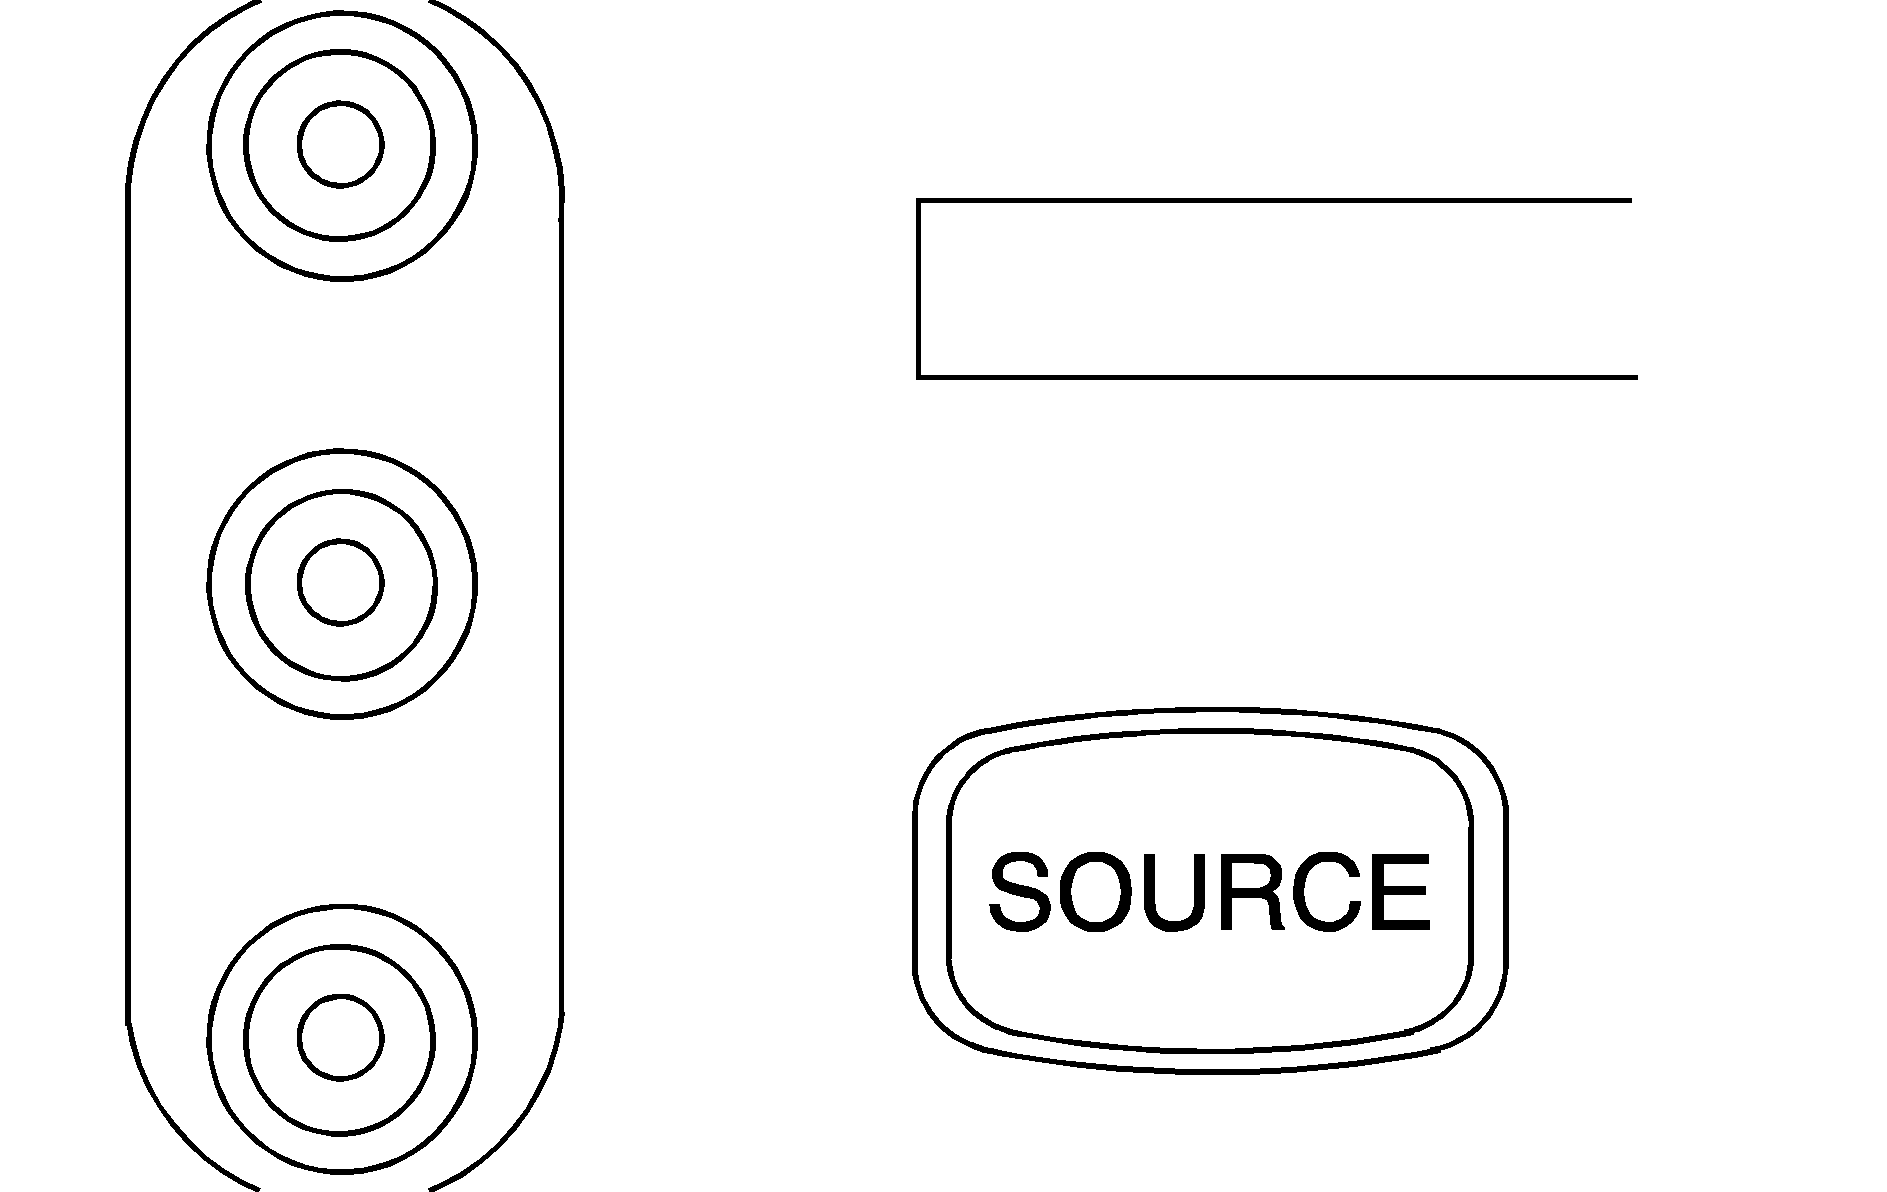
The RCA jacks are located on the faceplate of the DVD player. The RCA jacks allow audio or video signals to be connected from an auxiliary device such as a camcorder or a video game unit to the entertainment system. Adapter connectors or cables may be required to connect the auxiliary device to the RCA jacks. Refer to the manufacturer's instructions for proper usage.
The RCA jacks are color coded to match typical home entertainment system equipment. The yellow jack (top) is for the video input. The white jack (middle) is for the left audio input. The red jack (bottom) is for the right audio input.
Audio Speakers
Only one audio source can be heard through the speakers at one time. Use the AM/FM button on the radio cycle the radio bands over the speakers. Use the AUX button on the radio to cycle the cassette, CD and DVD players over the speakers.
Video Screen
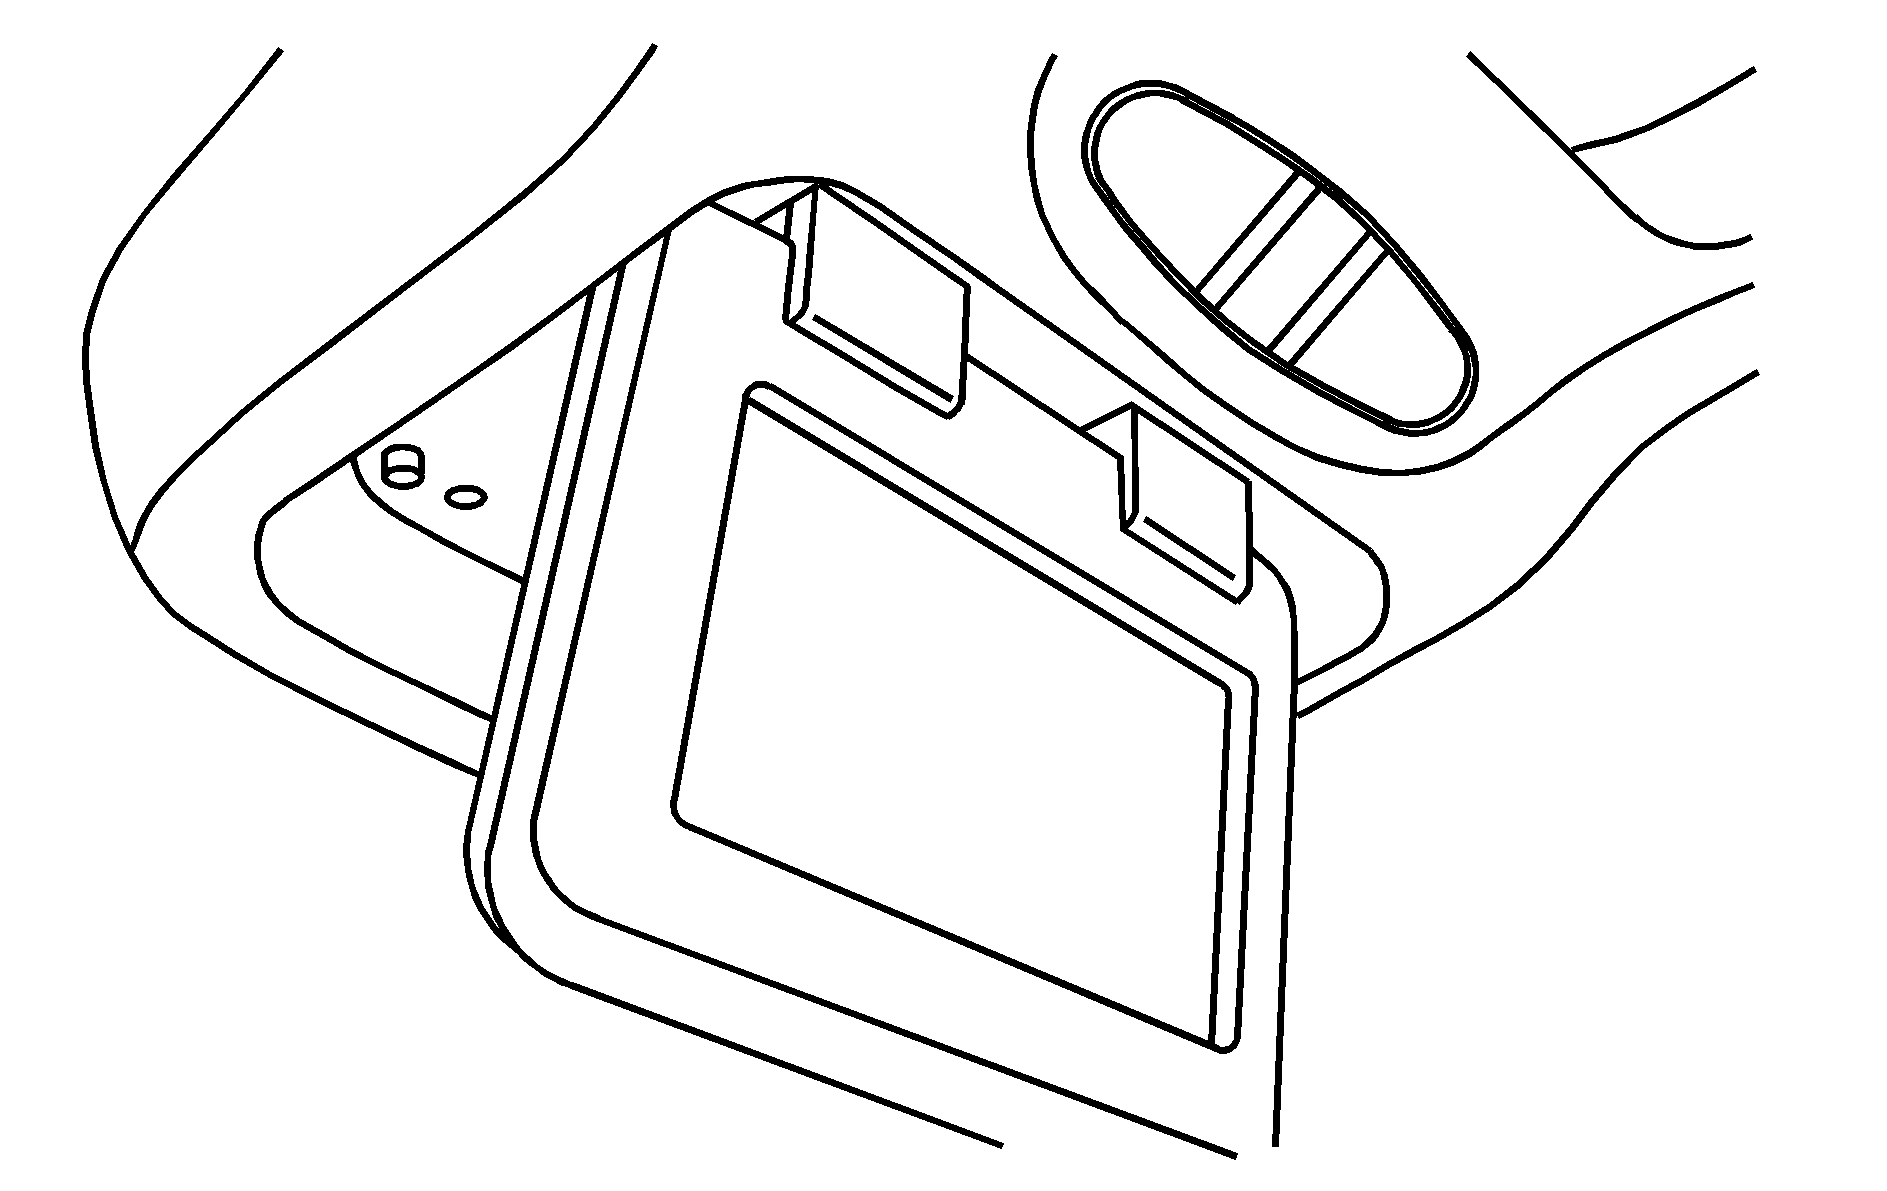
The video screen is located in the overhead console.
To use the video screen, do the following:
- Push forward on the release button and the screen will fold down.
- Pull the screen toward you and adjust its position as desired.
To close and turn off the video screen:
- Fold the video screen up into the overhead console.
- Push the screen up until it clicks into its locked position.
DVD Player
The DVD player is located in the center console between the front seats. The DVD player can be controlled by the buttons on the DVD player and the remote control. See "Remote Control" later in this section for more information.
The DVD player works while the ignition is in RUN or ACC.
The entertainment system is only compatible with DVDs authorized for use in the United States and Canada. Regular audio CDs can also be played by the DVD player. This DVD player may not play home recorded CDs (CDRs) or home recorded DVDs. If home recorded CDs do not play in the DVD player, try the audio system CD player instead.
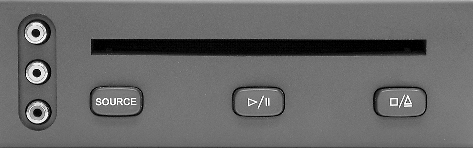
DVD Player Buttons
SOURCE: Press this button to switch the source for the entertainment system between the auxiliary device (connected to the RCA jacks) and the DVD player. Pressing this button has no effect when an auxiliary device is not connected./ : Press this button to start play. Press while playing to pause. Press it again to continue playing.
/ : Press this button to stop playing. Press this button a second time to eject the disc.
Remote Control
To use the remote control, aim it at the display above the video screen and press the desired button. Direct sunlight or very bright light may affect the ability of the entertainment system to receive signals from the remote control. Be sure the remote batteries are not discharged, as this will also effect the function of the remote control. Objects blocking the line of sight may also affect the function of the remote control.
Notice: Storing the remote control in a hot area or in direct sunlight can damage it, and the repairs will not be covered by the warranty. Storage in extreme cold can weaken the batteries. Keep the remote control stored in a cool, dry place.
If the remote is to be stored for a long period of time, remove the batteries and keep them in a cool, dry place
Remote Control Buttons
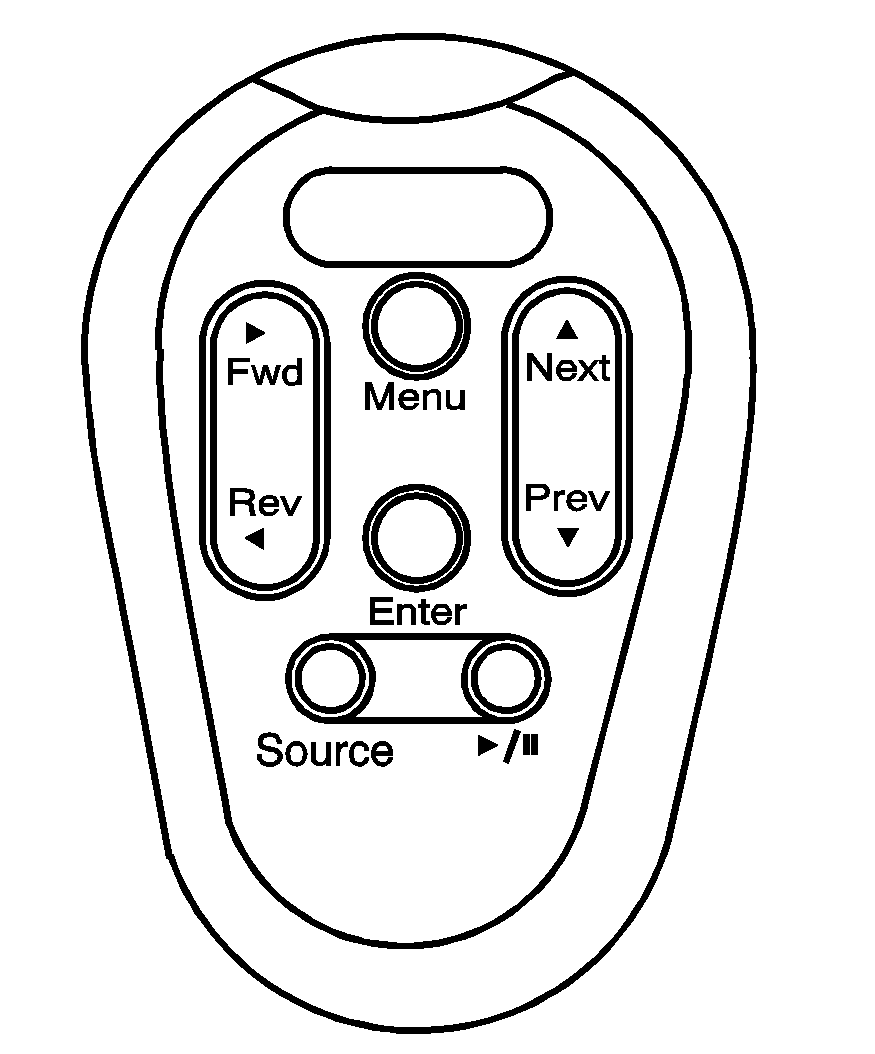
(Play/Pause): Press this button to play a disc. Press this button while a disc is playing to pause it. Press this button again to continue playing the disc. If you press and hold this button for 3 seconds or more, the DVD player will turn off.
Fwd/ Rev (Fast Forward/Reverse): Press this right or left arrow once to fast forward or reverse the DVD. To resume play, press the button again or press the play/pause button. Pressing and holding an arrow will fast forward or fast reverse the DVD and play will resume when the arrow is released. These buttons may not work when the DVD is playing the copyright information or the previews. To resume playback, press the button again or press the Play/Pause button. You can also press and hold the button to fast forward or reverse. When you let go of the button, the disc will resume playback. These buttons may not work when the DVD is playing the copyright or the previews.
Next/ Prev (Next/Previous): Press the up or the down arrow to select the next or the previous chapter. These buttons may not work when the DVD is playing the copyright information or the previews.
Menu: Press this button to view the media menu. The media menu is different for every disc. Use the up, down, right, and left arrow buttons to move the cursor around the media menu. After making the selection, press ENTER. Some discs may contain a short skit leading up to the media menu.
Source: Press this button to switch the source for the entertainment system between the auxiliary device (connected to the RCA jacks) and the DVD player. Pressing this button has no effect when there is no auxiliary device connected.
System Function and Operation
Playing a DVD
| • | Activate the overhead console screen by pushing forward on the release button and folding the screen down. |
| • | Gently insert the disc (with the label side up) into the loading slot until it stops. The DVD player will continue loading the disc and the player will automatically start. |
| • | If a disc is already in the player, press the play/pause button on the face of the DVD player or on the remote control to start playing the DVD. |
| • | The DVD image will begin on the overhead console screen. |
| • | The radio automatically switches to DVD sound (indicated by AUX on the radio display) when the DVD sound starts. |
| • | Vehicle speaker volume, bass, treble, etc. may be adjusted using the in-dash radio controls. |
Most DVDs do not play any sound during the copyright notices. When starting a DVD from the beginning, the image will begin to play on the overhead console screen within a few seconds. It will take longer for the DVD sound to play over the radio speakers and for switch to DVD sound until there is an actual sound output from the DVD.
Some DVDs will not allow you to fast forward or skip the copyright or previews. Some DVDs will begin playing the movie automatically after the previews have finished (although there may be a delay of up to 30 seconds). If the DVD does not begin playing the movie automatically, press the play/pause button on the face of the DVD player or on the remote control. If the DVD still does not play, refer to the on--screen instructions. These variations. are due to the way different DVDs are recorded, and are not related to your Saturn DVD entertainment system.
Playing a DVD with DVD Sound Through Speakers and Headphones
| • | Turn on the headphone using the switch on left side of the headphones. |
| • | Adjust the volume for each headphone using the volume wheel on the right side of the headphones. |
| • | DVD sound is always available through the headphones and is not affected by the in-dash radio controls. |
Playing a DVD with DVD Sound Through Speakers and Headphones and Radio Media Sound Through Speakers
| • | While playing a DVD in the DVD player, radio media (AM, FM, cassette or CD) may be played through the vehicle speakers. |
| • | Use the AM/FM button on the in-dash radio to select and switch between AM, FM1, and FM2 bands over the vehicle speakers. |
| • | Use the AUX button on the in-dash radio to select and switch between CD, cassette or DVD players that are loaded and available. |
| • | DVD sound is always available through the headphones and is not affected by in--dash radio controls. |
Playing a Music CD in the DVD player
| • | Gently insert a music CD into the DVD player. |
| • | The overhead console video screen is not required and may be closed into its locked position. |
| • | Sound from the music CD in the DVD player is always available through the headphones and is not affected by the in-dash radio controls. |
| • | Use the radio AUX button to select between CD, cassette, or DVD player to hear sound through the vehicle speakers from the music CD playing in the DVD player. |
Stop and Resuming Playback
To stop a disc, press the stop/eject button on the DVD player once or hold the play/pause button on the remote control for 3 seconds or more. To resume playback, press the play/pause button on the DVD player or on the remote control. As long as you have not ejected the disc, it will resume playback from the point where it was stopped. If the disc has been ejected, the player will start playing a the beginning of the disc.
Ejecting a Disc
Press the stop/eject button on the DVD player once to stop and a second time to eject the disc. If a disc is ejected from the player, but not removed, the DVD player will reload the disc after a short time to prevent damage to the disc.
Using an Auxiliary Device (RCA Jacks)
| • | The entertainment system starts in the auxiliary mode when the DVD player is tuned on. |
| • | To use the auxiliary function, connect a camcorder or video game unit to the RCA jacks and turn on the auxiliary device. |
| • | Video and audio the auxiliary device begin playing on the overhead video screen and through the vehicle speakers. |
| • | If you want to view a DVD, insert the DVD into the DVD player. The system will automatically switch to DVD and start to play. |
| • | To return to the auxiliary device just press the SOURCE button on the DVD player or the remote control. |
Fuse Location
Your entertainment system is powered by the same fuse a the radio. See Fuses and Circuit Breakers in this handbook for more information on radio fuses.
Care of Your Entertainment System Components
When cleaning the DVD player, center console, rear seat overhead console, remote control or headphones, use only a clean cloth dampened with clean water. Use care when directly touching or cleaning the screen to avoid damage.
Care of Your DVDs
Handle discs carefully. Store them in their original cases or other protective cases and away from direct sunlight and dust. If the surface of a disc is soiled, dampen a clean, soft cloth in a mild, neutral detergent solution and clean it, wiping from the center to the edge.
Be sure never to touch the side without a label when handling discs. Pick up discs by grasping the entire edges or the edge of the hole and the outer edge.
Understanding DVD Distortion
You may experience video distortion when operating cellular phones, scanners, CB radios, Global Position Systems (GPS)*, two-way radios, mobile fax, or walkie talkies. It may be necessary to turn off the DVD player when operating one of these devices in or near the vehicle.
*Excludes the OnStar® System.
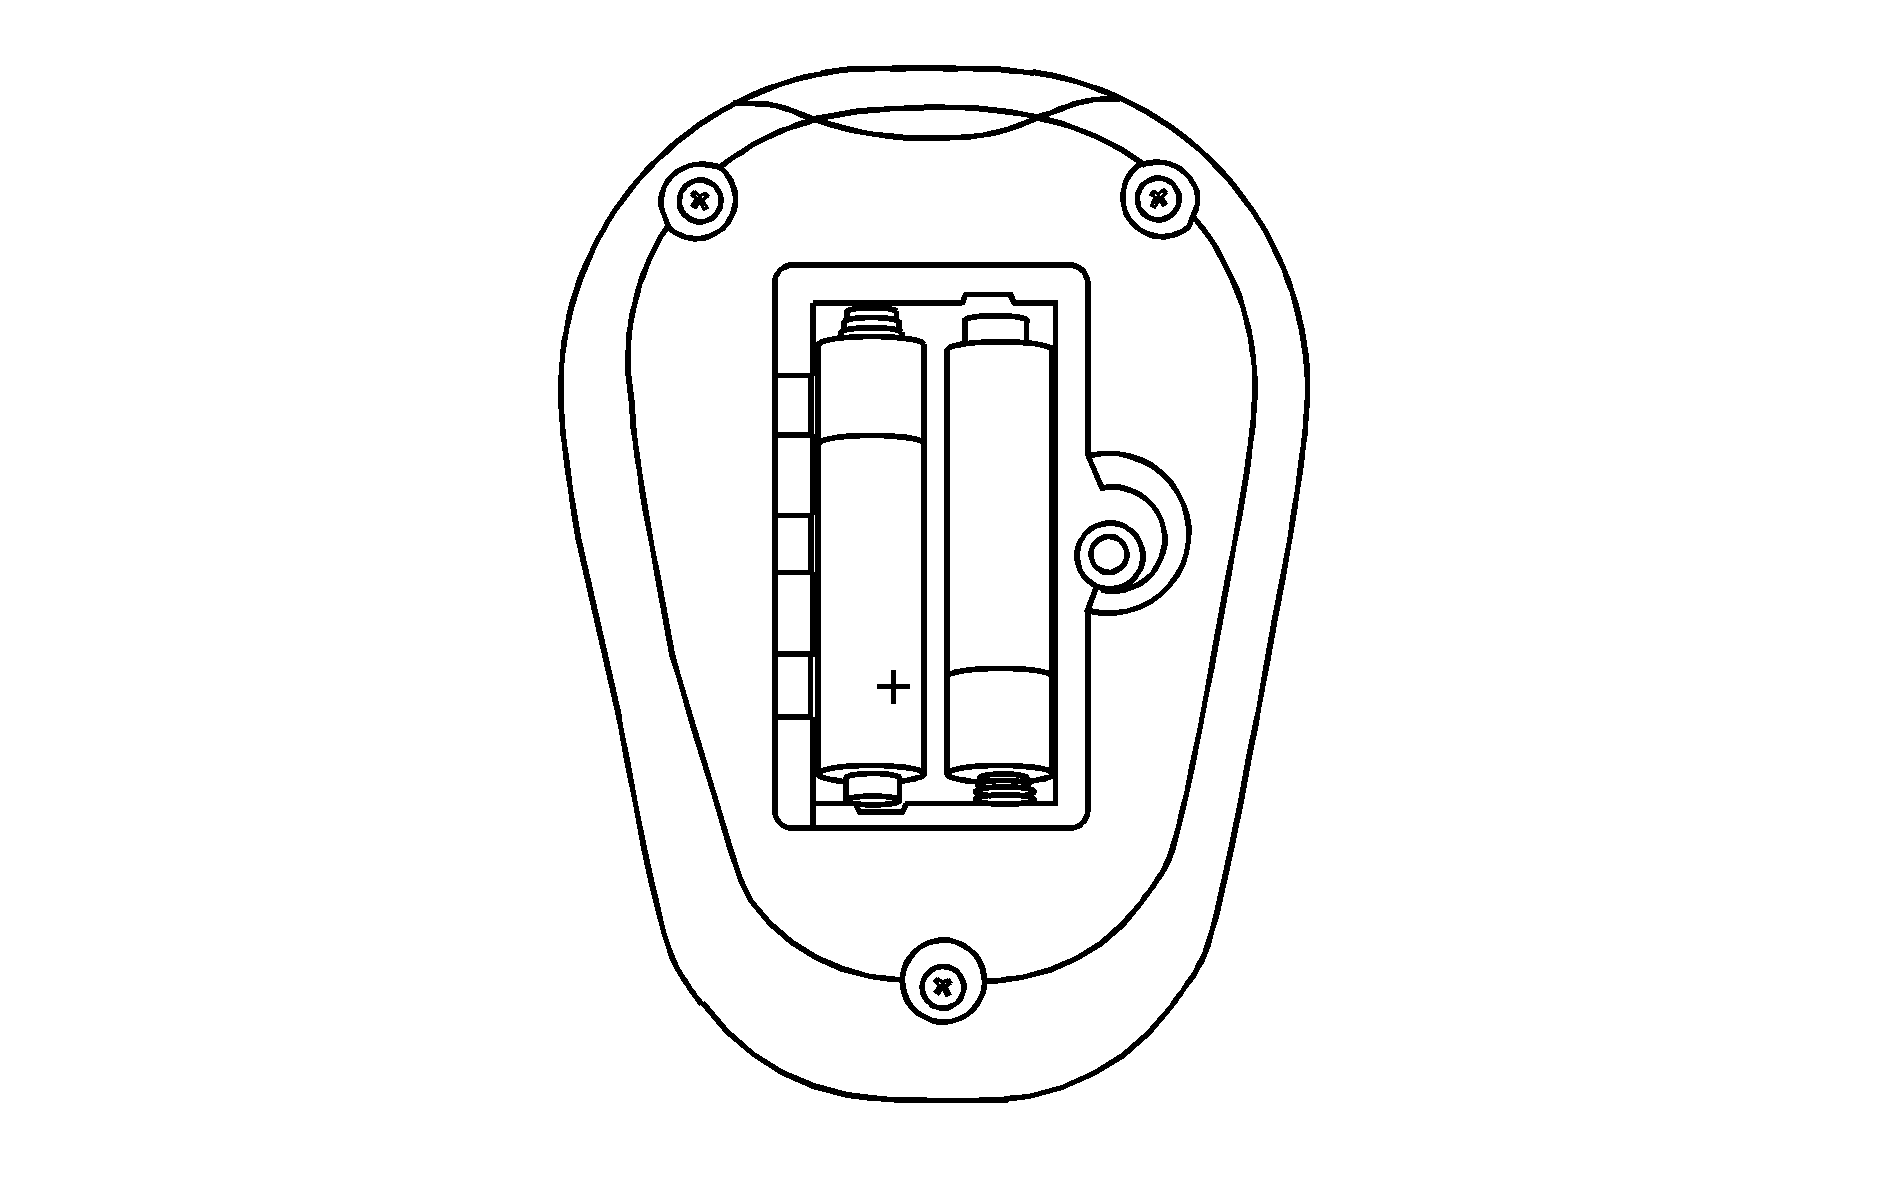
Headphone Battery Replacement
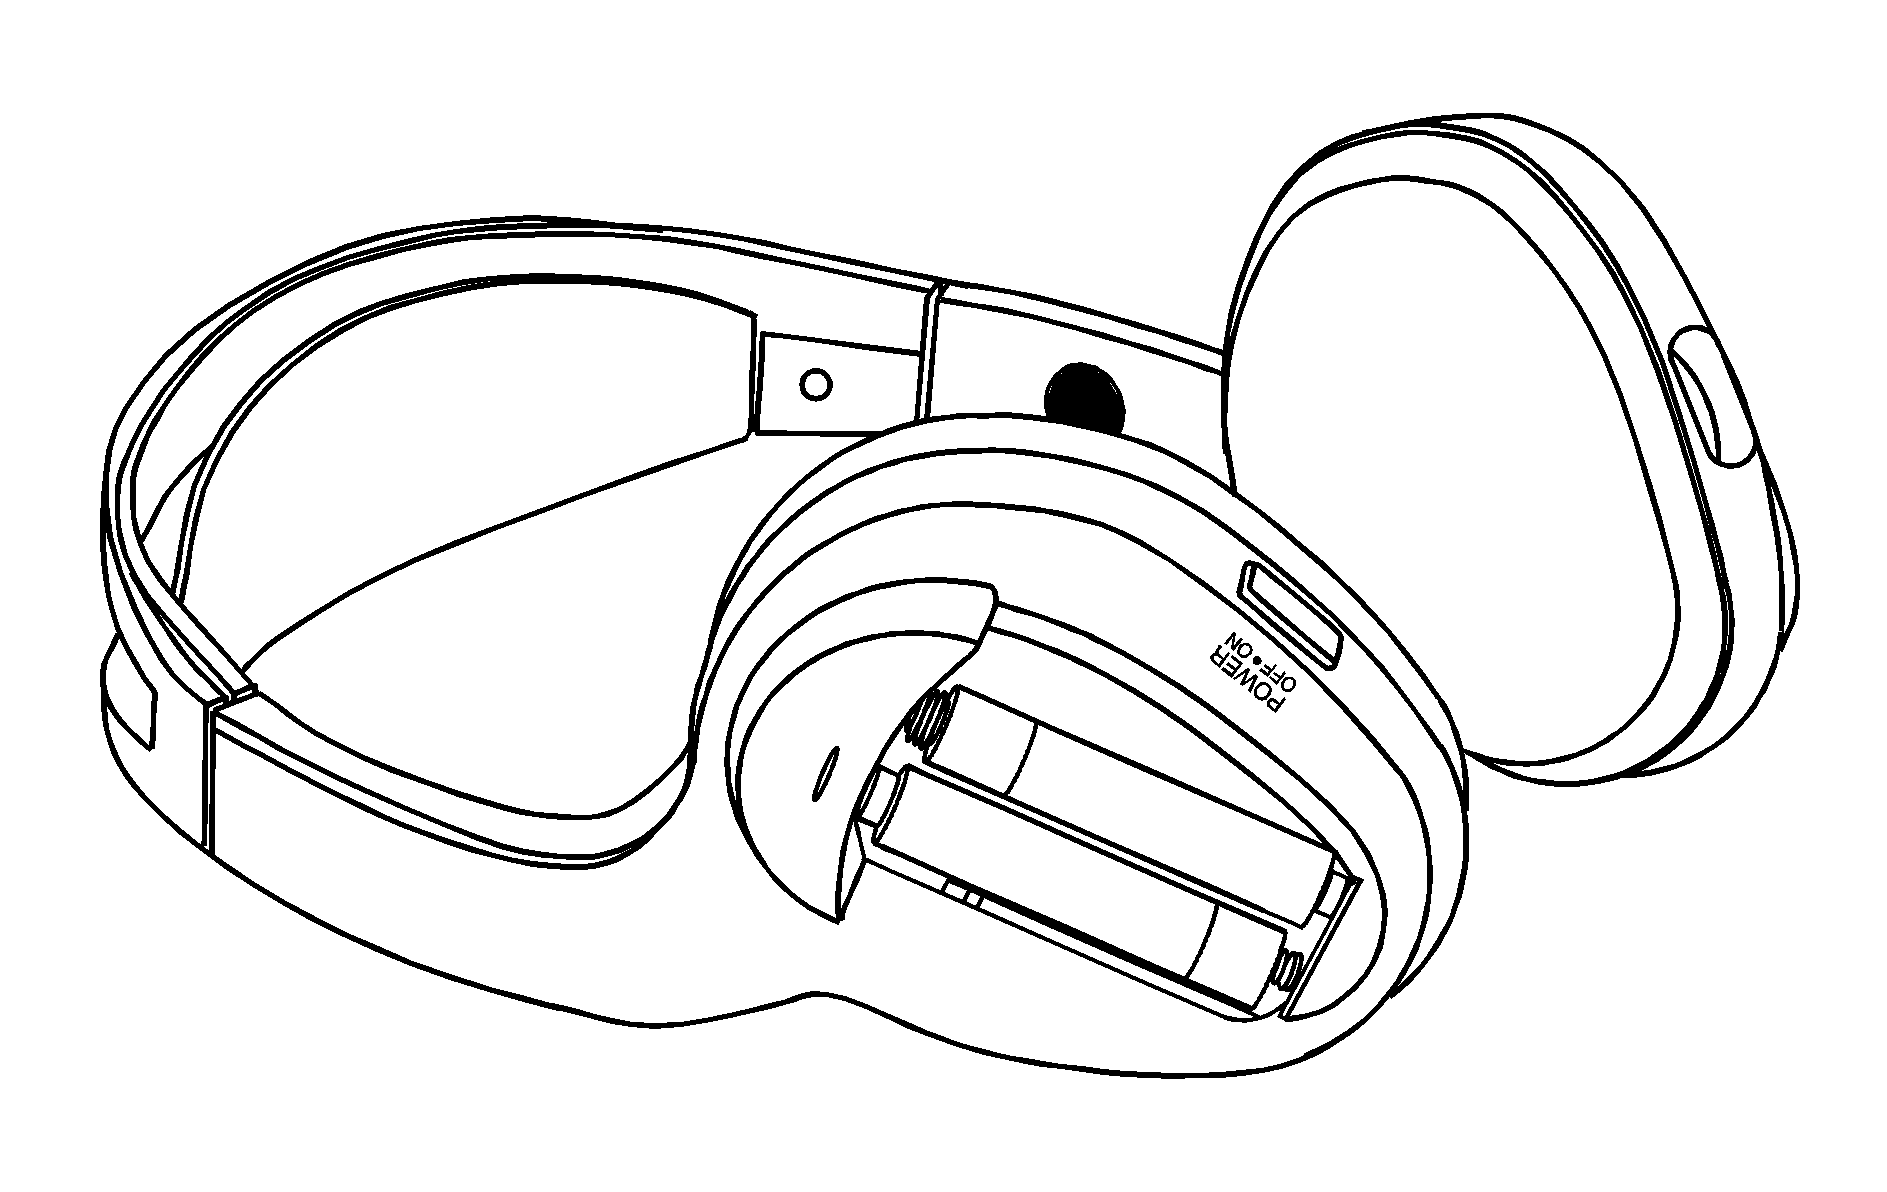
Under normal operating conditions, new batteries should provide about 50 hours headphone operation before having to be replaced. To change the batteries perform the following steps:
- Slide open the battery door located on the left side of the headphones.
- Remove the batteries from compartment.
- Replace the two AAA batteries. Refer to illustration on inside of battery compartment.
Remote Control Battery Replacement
Under normal operating conditions, new batteries should provide about 50 hours headphone operation before having to be replaced. To change the batteries perform the following steps:
- Remove remote control battery door screw located on the backside of the remote control.
- Open battery door and remove the batteries from the compartment.
- Replace the two AAA batteries. Make sure the batteries are installed correctly. Refer to illustration on inside of battery compartment.
