Product Safety - Fuel Filter Assembly Replacement

| Subject: | FUEL FILTER ASSEMBLY REPLACEMENT |
| Models: | 2003-2004 Saturn ION Vehicles with 2.2L 4-Cylinder Engine (VIN F - RPO L61) |
| Attention: | ALL SATURN RETAILERS AND AUTHORIZED SERVICE PROVIDERS |
The US National Traffic and Motor Vehicle Safety Act provides that each vehicle that is subject to a recall of this type must be adequately repaired within a reasonable time after the owner has tendered it for repair. A failure to repair within sixty (60) days after tender of a vehicle is prima facie evidence of failure to repair within a reasonable time.
If the condition is not adequately repaired within a reasonable time, the owner may be entitled to an identical or reasonably equivalent vehicle at no charge, or to a refund of the purchase price less a reasonable allowance for depreciation.
To avoid having to provide these burdensome remedies, every effort must be made to promptly schedule an appointment with each customer and to repair their vehicle as soon as possible. In the recall notification letter, customers are told how to contact the US National Highway Traffic Safety Administration if the recall is not completed within a reasonable time.
Condition
Saturn has decided that a defect relating to motor vehicle safety exists in 2003 and certain 2004 Saturn ION vehicles equipped with 2.2L 4-cylinder (L61) engines. These vehicles were built with a fuel filter assembly that may corrode prematurely on the exterior surface. If corrosion on the exterior surface of the fuel filter assembly progresses to the point of creating a hole in the shell, fuel droplets would form and drop to the ground. There would be a noticeable fuel odor around the vehicle. If an ignition source is present, a fire could result.
Correction
Retailers will replace fuel filter assembly on all affected vehicles.
Vehicles Involved
2003 and certain 2004 Saturn ION vehicles equipped with 2.2L 4-Cylinder (L61) engines within the following VIN range will require this recall:
3Z100001 - 3Z206278
4Z100001 - 4Z133557
You must verify recall involvement through your AS400 system. It is important to note that recall claims will only be paid on involved vehicles.
Owner Notification
Owners of all involved vehicles will be notified of this recall by Saturn. (Refer to the owner letter included in this bulletin.)
Facility VIN Listing
A list of vehicles assigned to you (Facility VIN Listing), which our records indicate were sold by or shipped to you, (or are located in close proximity to your facility) is enclosed.
The listing contains:
| • | Complete vehicle identification number (VIN); and |
| • | VINs of vehicles, which according to Saturn records are in retail stock. |
The Facility VIN Listing is furnished to involved Retailers with the Product Safety Recall Bulletin.
Those Retailers not involved initially in this recall will receive a message at the top of a blank Facility VIN Listing that states: NO VEHICLES ASSIGNED AT THIS TIME FOR RECALL 03068.
Retailer Responsibility
All unsold vehicles in Retailers’ possession and subject to this recall must be held and inspected/repaired per the service procedure of this recall bulletin before owners take possession of these vehicles.
Retailers are to service all vehicles subject to this recall at no charge to owners, regardless of mileage, age of vehicle, or ownership, from this time forward.
Owners who have recently purchased vehicles sold from your vehicle inventory, and for which there is no customer information indicated on the retailer listing, are to be contacted by the retailer. Arrangements are to be made to make the required correction according to the procedure contained in this bulletin. This could be done by mailing to such customers, a copy of the customer letter accompanying this bulletin. Recall follow-up cards should not be used for this purpose, since the customer may not have received the notification letter.
In summary, whenever a vehicle subject to this recall enters your vehicle inventory, or is in your retail facility for service in the future, you must take the steps necessary to be sure the recall correction has been made before selling or releasing the vehicle.
Transfer of Recall Responsibility
Saturn vehicles that have been sold by you, which may be closer in proximity to another Saturn Retailer, may still appear on your Facility VIN Listing. If either you or the vehicle owner determines that it is more desirable for a vehicle on your Facility VIN Listing to be serviced by another Saturn Retailer, or if the customer’s address has recently changed, recall responsibility may be transferred by completing the following:
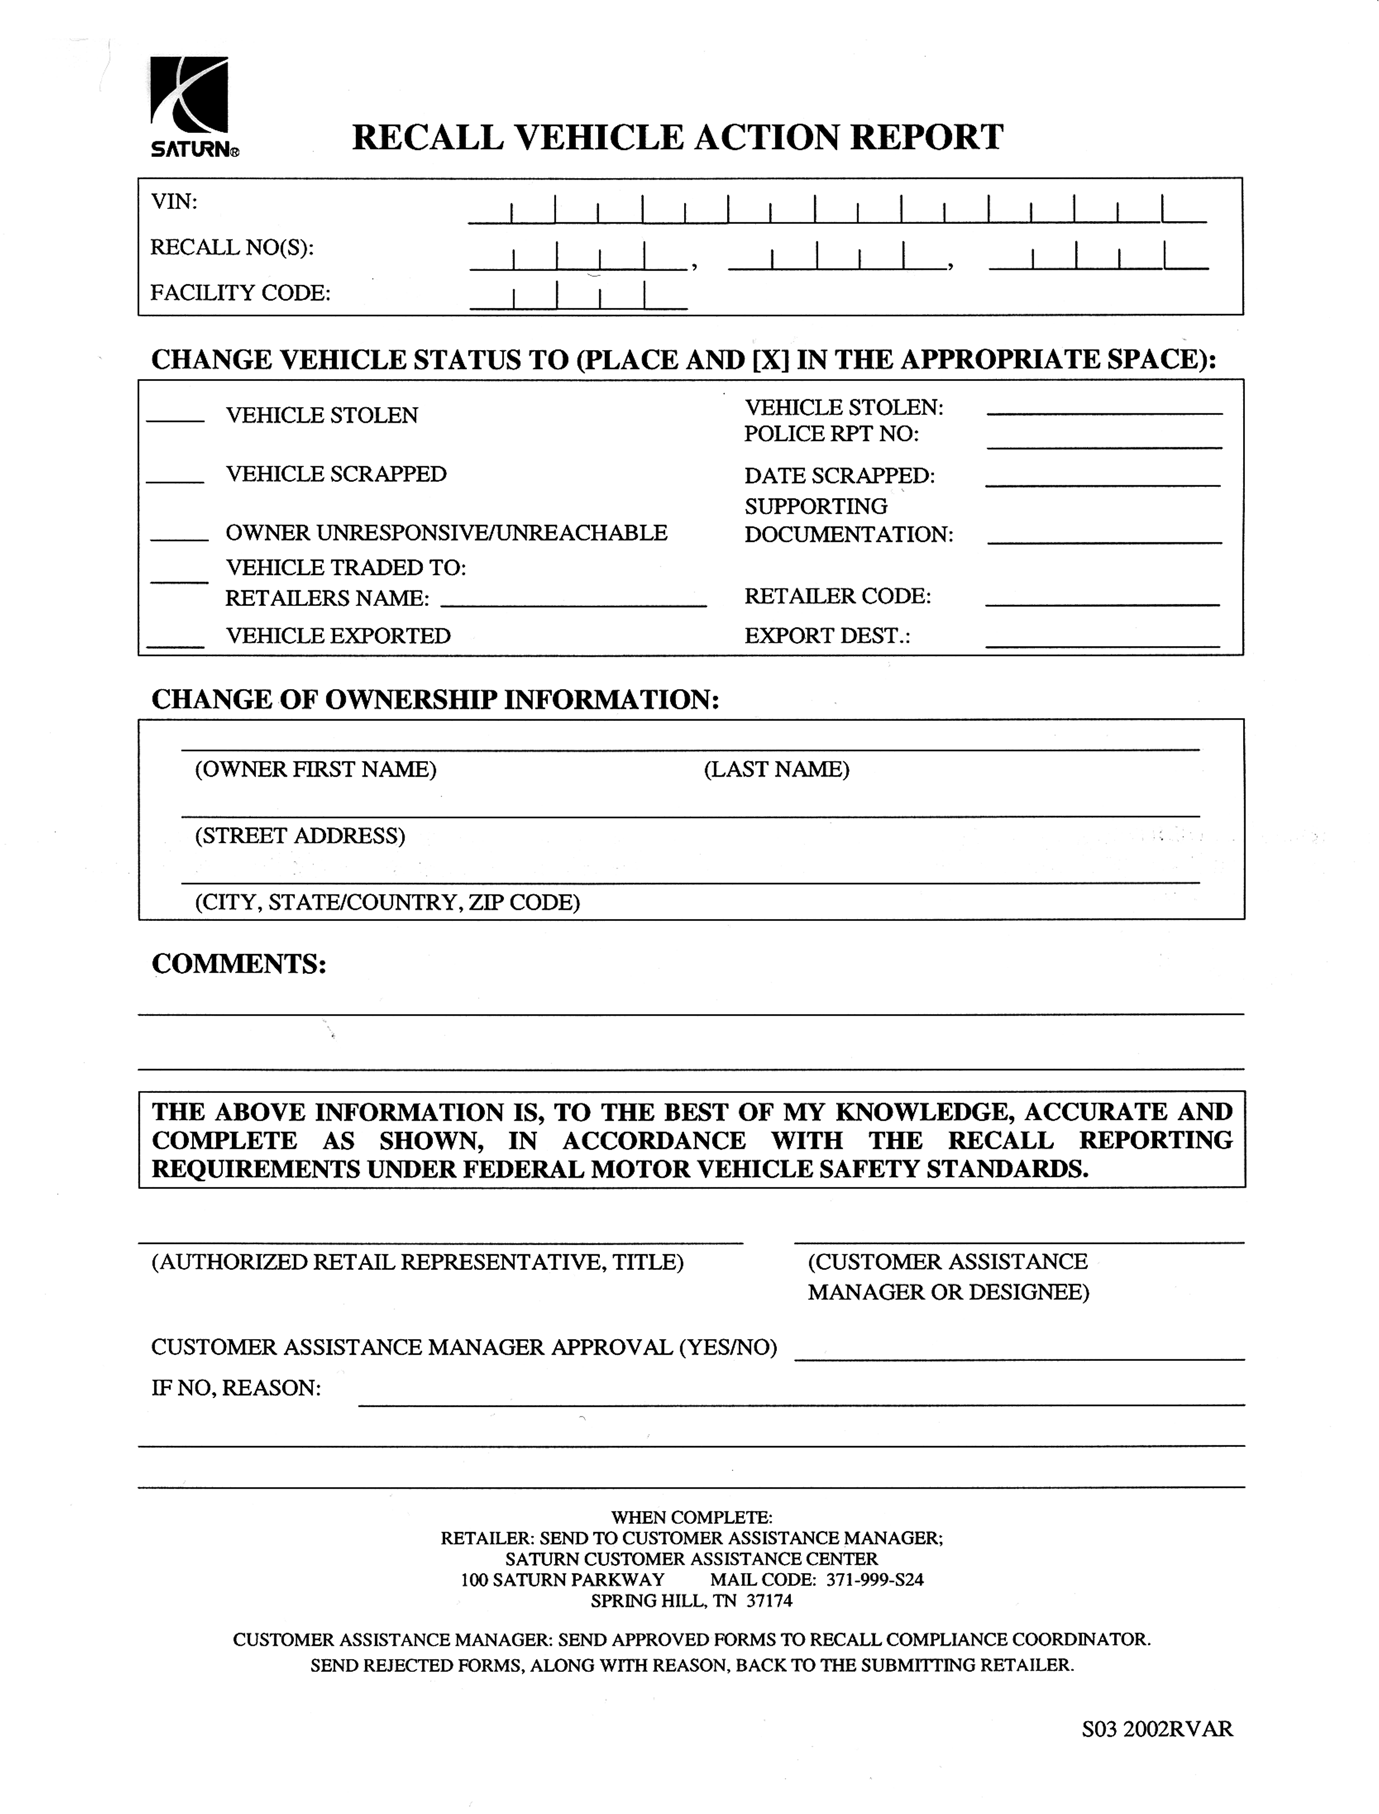
| • | Submit a Recall Vehicle Action Report to your Customer Assistance Manager (CAM) at the Saturn Customer Assistance Center. |
| -OR- |
| • | Submit an update in owner information to the Saturn Owner of Record system, via SERVICELINE XL, for Saturn Customer Assistance Center review and approval. |
A copy of the Recall Vehicle Action Report is included for your reference. Additional copies can be ordered from Saturn Publications (1-800-828-2112, prompt 3, Item # S032002RVAR). All changes to recall responsibility will be reflected in your next Unfixed VIN Report.
All other changes in vehicle status (e.g., scrapped, stolen, etc.) are to be made in accordance with section 4.4.3 of the Retailer Service Policies & Procedures Manual, "Notifying Saturn of Vehicle Status Change."
Parts Information
- A pre-shipment of the required parts to perform this recall has been automatically sent to involved Retailers from Saturn Service Parts Operations (SSPO). These initial shipments are to aid Retailers in recall preparation and ensure minimal customer inconvenience.
- Should you require any additional parts, please contact your Parts Support Analyst (PSA) and we will expedite the shipment.
Part Number | Description | Quantity Required per Vehicle |
|---|---|---|
22734980 | Filter Asm - Fuel | 1 |
Disposition of Replaced Parts
Retailers will scrap all replaced parts in a manner that ensures that they cannot be reused, remanufactured, or otherwise entered into the stream of commerce in the future.
Suggestions for Ensuring Customer Satisfaction
As you know, Saturn's success hinges upon our ability to execute superior customer support throughout the ownership experience, especially when important corrective actions such as this are required. It is imperative that every effort is made to accommodate the affected owners. Additionally, priority should be given to customer vehicles over retail inventory vehicles. If you have any questions, please coordinate with the Saturn Customer Assistance Center to help ensure customer satisfaction.
Service Procedure
Removal Procedure
- Keep a shop cloth and a container ready to capture any spilled fuel.
- Relieve the fuel system pressure.
- Raise and support the vehicle. Refer to "Lifting and Jacking the Vehicle" in the General Information section of the 2003 or 2004 Saturn ION Service Manual, Vol. 1.
- Remove the fuel filter retaining bolt (1). Do NOT discard bolt. Retain this bolt for installation of the new fuel filter assembly.
- Disconnect the fuel filter from the engine feed fuel pipe (1). Refer to Steps 5.1 - 5.5 for instructions for disconnecting quick connect fittings (metal collar).
- Tilt the fuel filter downward and drain off the fuel into an approved fuel container.
- Disconnect the fuel tank feed and return hose fittings from the fuel filter. Refer to Steps 7.1 - 7.5 for instructions for disconnecting quick connect fittings (plastic collar - press release).
- Drain any remaining fuel into an approved fuel container.
- Discard the fuel filter assembly (fuel filter and bracket) into an approved container.
Caution: Gasoline or gasoline vapors are highly flammable. A fire could occur if an ignition source is present. Never drain or store gasoline or diesel fuel in an open container, due to the possibility of fire or explosion. Have a dry chemical (Class B) fire extinguisher nearby.
Caution: Always wear safety goggles when working with fuel in order to protect the eyes from fuel splash.
Caution: Remove the fuel tank cap and relieve the fuel system pressure before servicing the fuel system in order to reduce the risk of personal injury. After you relieve the fuel system pressure, a small amount of fuel may be released when servicing the fuel lines, the fuel injection pump, or the connections. In order to reduce the risk of personal injury, cover the fuel system components with a shop towel before disconnection. This will catch any fuel that may leak out. Place the towel in an approved container when the disconnection is complete.
| 2.1. | Turn the ignition OFF. |
| 2.2. | Remove fuel pump relay (located in BCM fuse box) in order to avoid possible fuel discharge if an accidental attempt is made to start the engine. |
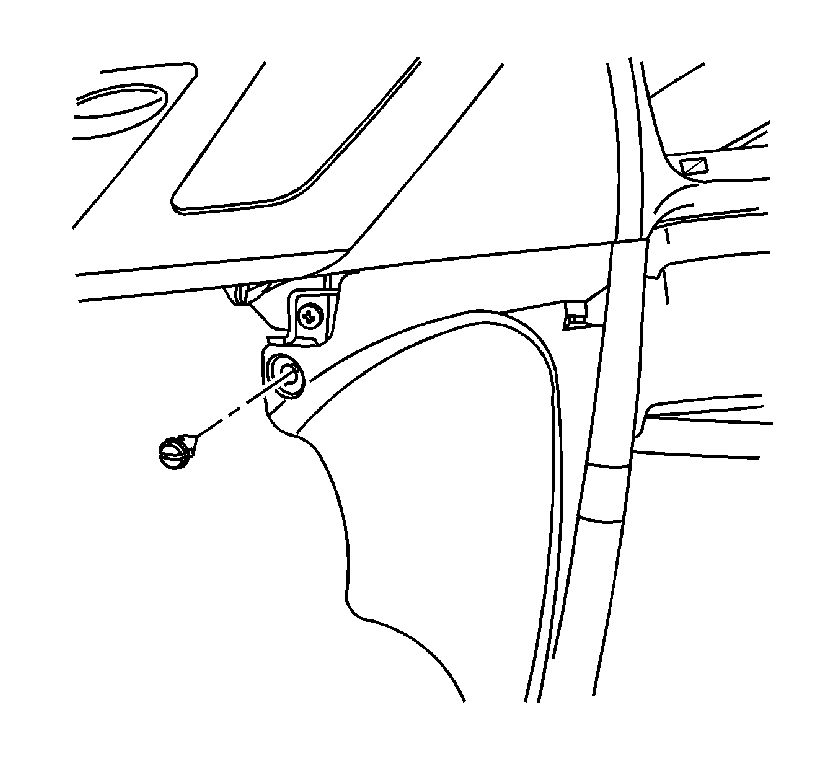
| 2.2.1. | Remove the left console side extension retainer. Turn the retainer counterclockwise to remove. |
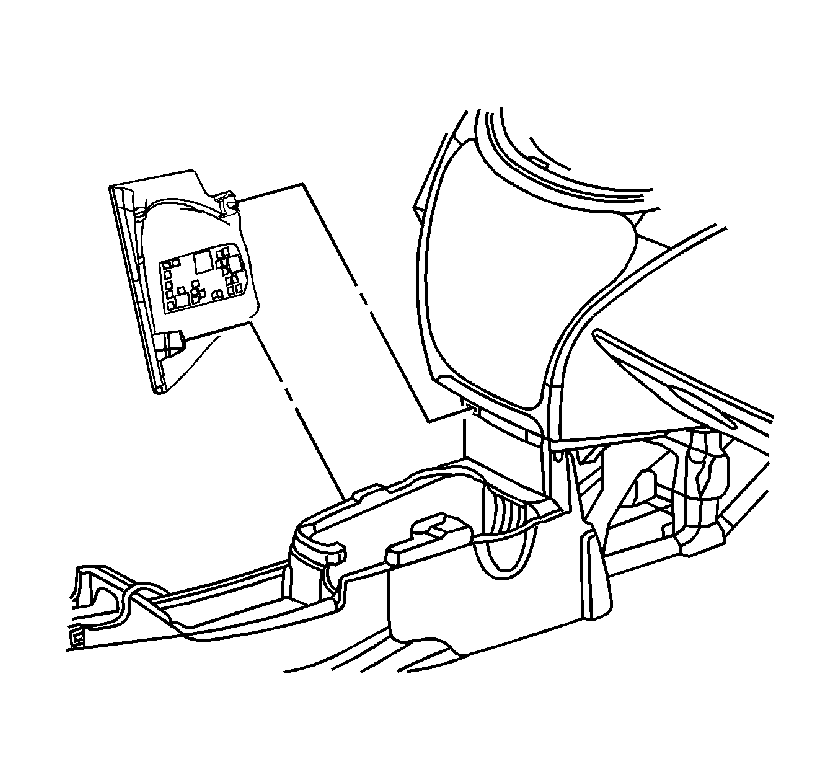
| 2.2.2. | Remove the left console side extension by pulling the console side extension rearward to disengage from the console. |
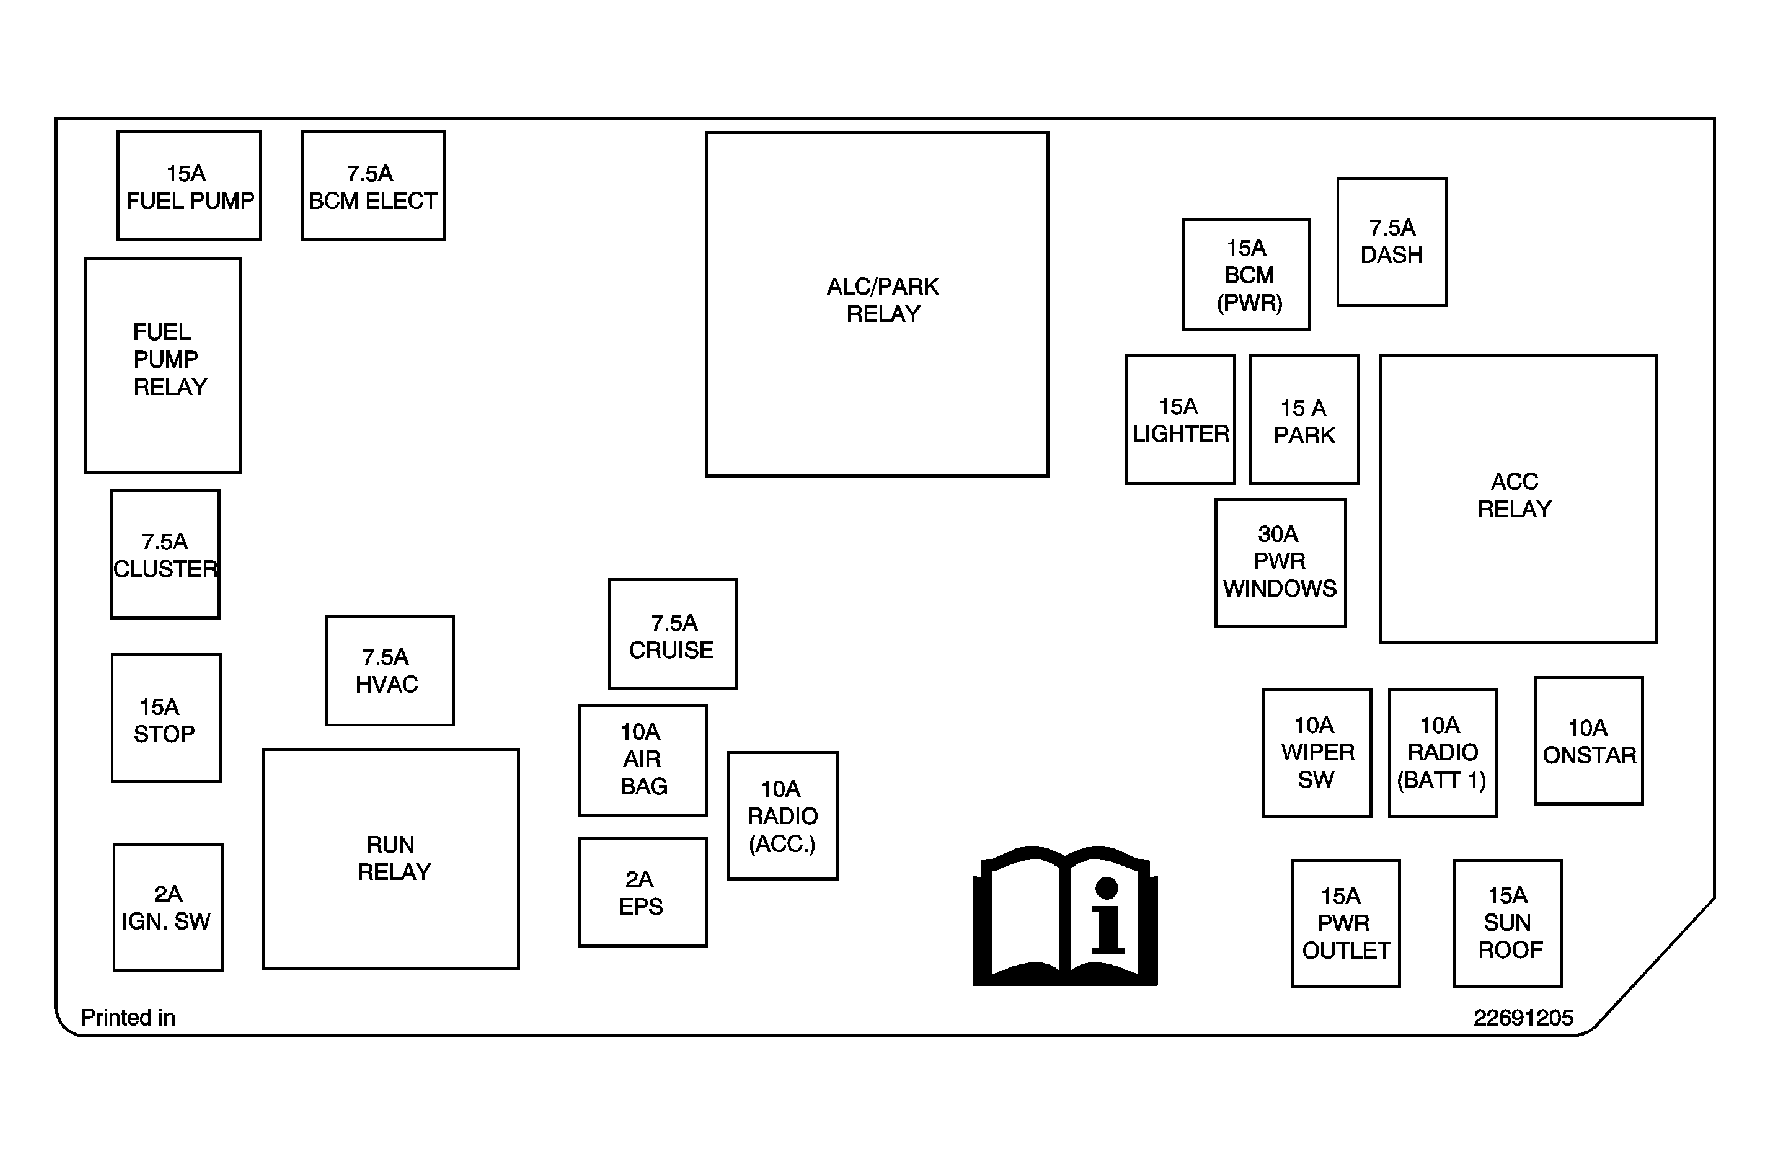
| 2.2.3. | Locate fuel pump relay in BCM fuse box. Remove fuel pump relay. Place fuel pump relay in a safe location. Do NOT discard fuel pump relay. |
| 2.3. | Loosen the fuel filler cap to relieve the fuel tank vapor pressure. |
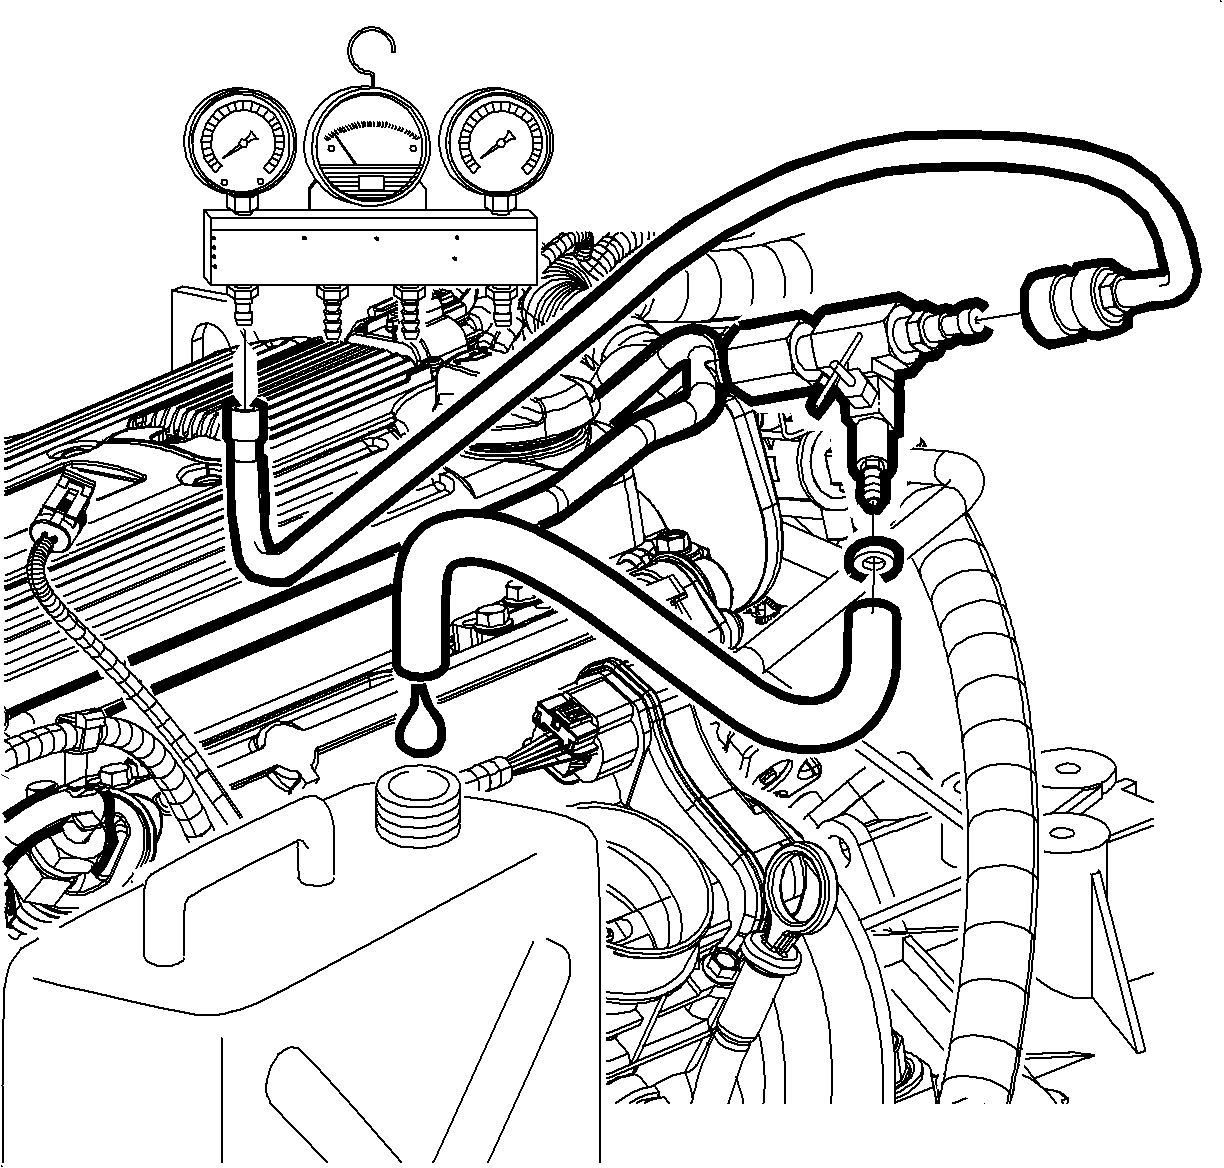
| 2.4. | Connect the SA9127E Gauge Bar Set to the fuel pressure service port connection. |
| Caution: Gasoline or gasoline vapors are highly flammable. A fire could occur if an ignition source is present. Never drain or store gasoline or diesel fuel in an open container, due to the possibility of fire or explosion. Have a dry chemical (Class B) fire extinguisher nearby. |
Notice: Clean all of the following areas before performing any disconnections
in order to avoid possible contamination in the system:
|
| 2.4.1. | Remove the cap from the fuel pressure service port connection. |
| Caution: Wrap a shop towel around the fuel pressure connection in order to reduce the risk of fire and personal injury. The towel will absorb any fuel leakage that occurs during the connection of the fuel pressure gage. Place the towel in an approved container when the connection of the fuel pressure gage is complete. |
| 2.4.2. | Connect Gage Bar (53476) to Fuel Gage Pressure Adapter (309725) using a flexible hose from Gage Bar Set (SA9127E). |
| 2.4.3. | Make sure needle valve on Fuel Gage Pressure Adapter (309725) is closed (OFF). |
| Notice: Do not use any tools to tighten the adapter to the fuel pressure service port. If the adapter will not seal with finger tightening, then the seal is defective or damaged and needs to be replaced. Excessive torque on the adapter will damage the fuel pressure service port. |
| 2.4.4. | Connect Fuel Gage Pressure Adapter (309725) to fuel pressure service port connection. Wrap a shop towel around the fitting while connecting the gage to avoid spillage. |
| Caution: Do not drain the fuel into an open container. Never store the fuel in an open container due to the possibility of a fire or an explosion. |
| 2.5. | Place the bleed hose of the SA9127E into an approved fuel container. |
| 2.6. | Open the bleed valve on the SA9127E in order to bleed the fuel system pressure. The fuel connections are now safe for servicing. |
| 2.7. | Place a shop towel under the fuel pressure service port to catch any remaining fuel spillage. |

| 2.8. | Disconnect the SA9127E from the fuel pressure service port connection. |
| 2.9. | Drain any fuel remaining in the gauge into an approved fuel container. |
| 2.10. | Install the cap to the fuel pressure service port. |
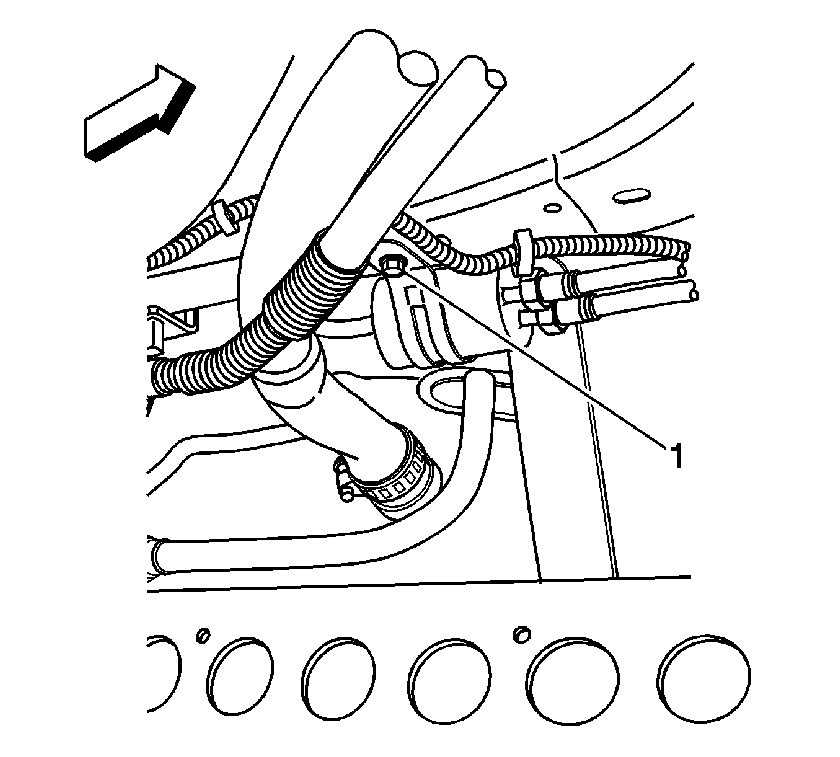
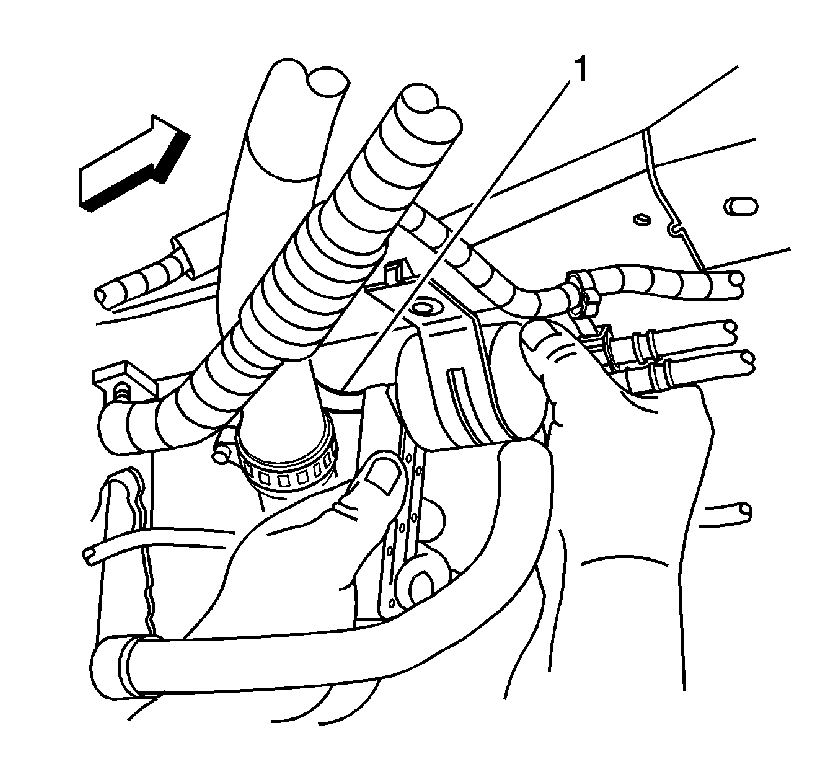
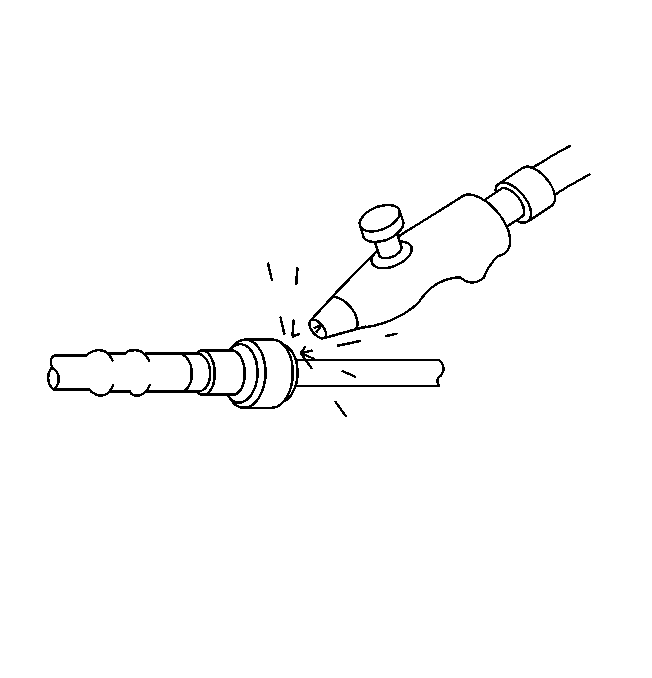
| Caution: Wear safety glasses when using compressed air, as flying dirt particles may cause eye injury. |
| 5.1. | Blow dirt out of the fitting using compressed air. |
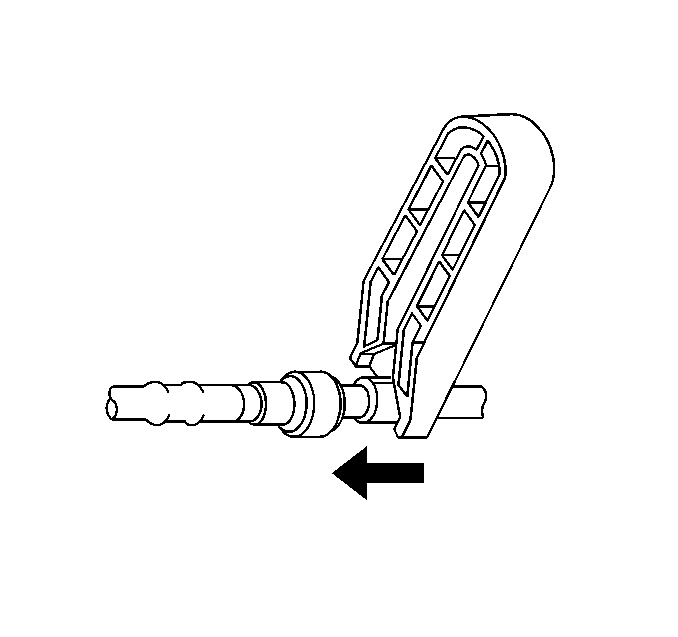
| 5.2. | Choose the correct tool from J 37088-A tool set for the size of the fitting. Insert the tool into the female connector, then push inward to release the locking tabs. |
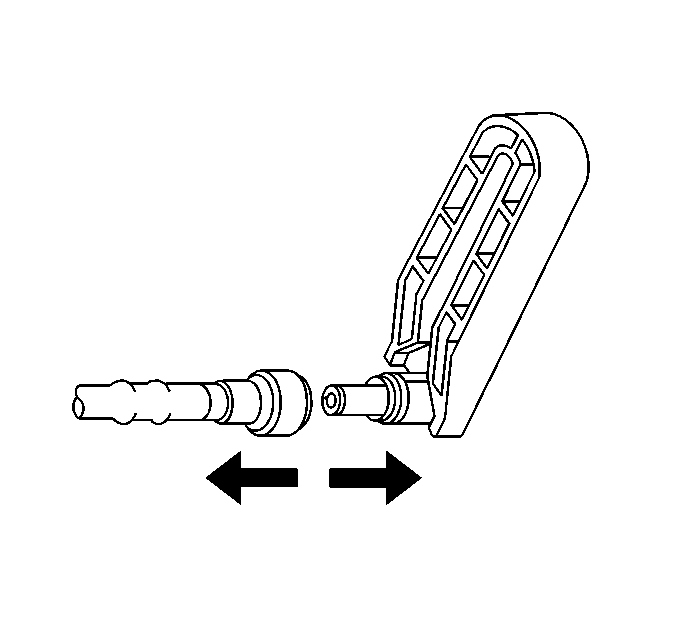
| 5.3. | Pull the connection apart. |
| Notice: If necessary, remove rust or burrs from the fuel pipes with an emery cloth. Use a radial motion with the fuel pipe end in order to prevent damage to the O-ring sealing surface. Use a clean shop towel in order to wipe off the male tube ends. Inspect all the connections for dirt and burrs. Clean or replace the components and assemblies as required. |
| 5.4. | Inspect the fitting for dirt. |
| 5.5. | Clean or replace the components as required. |
| Caution: Wear safety glasses when using compressed air, as flying dirt particles may cause eye injury. |
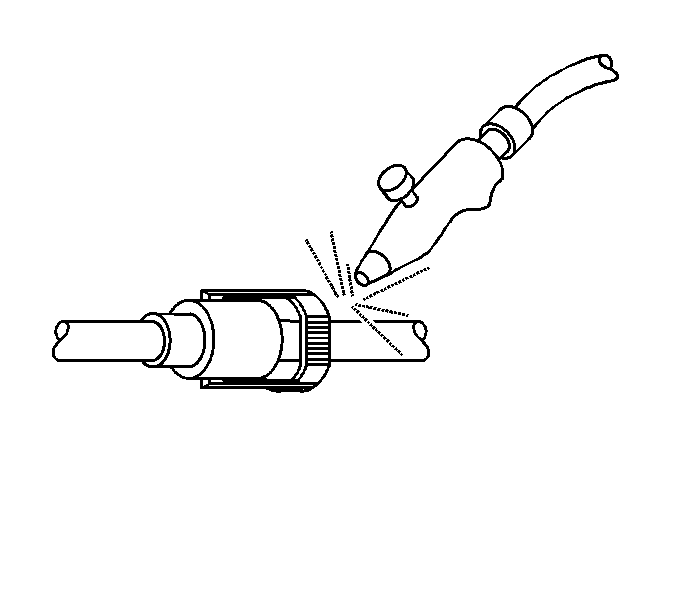
| 7.1. | Blow dirt out of the fitting using compressed air. |
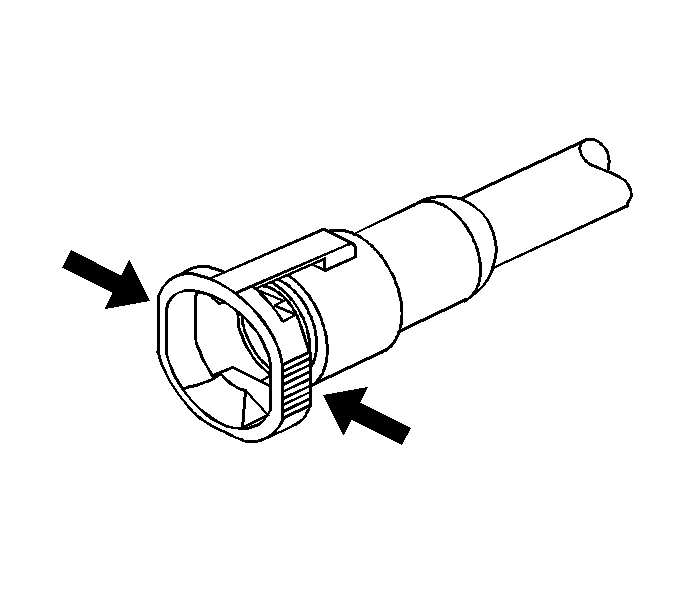
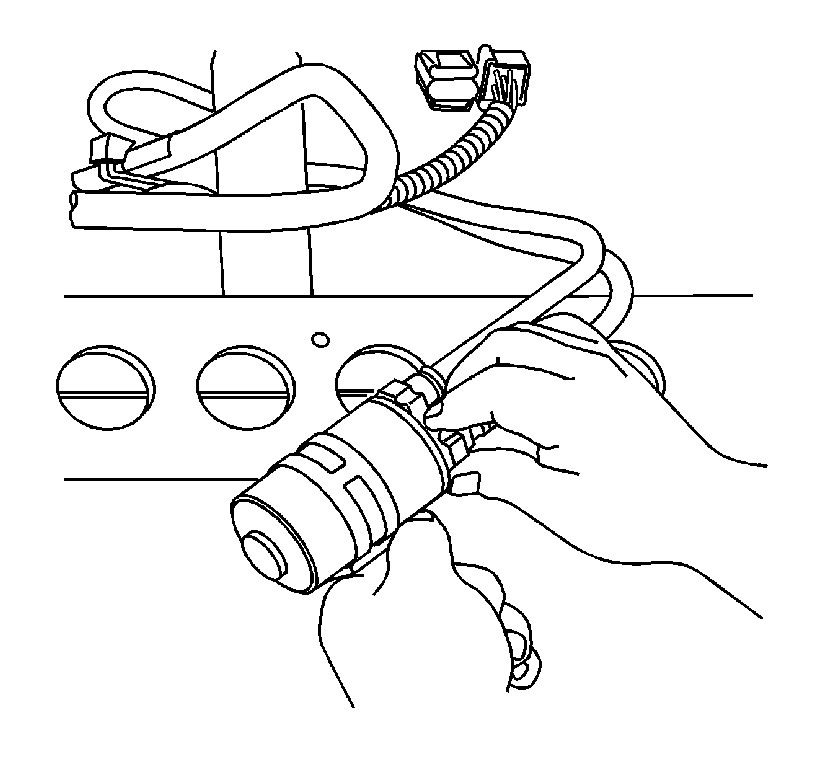
| 7.2. | Depress the tabs on the connector housing in order to release the connector. |
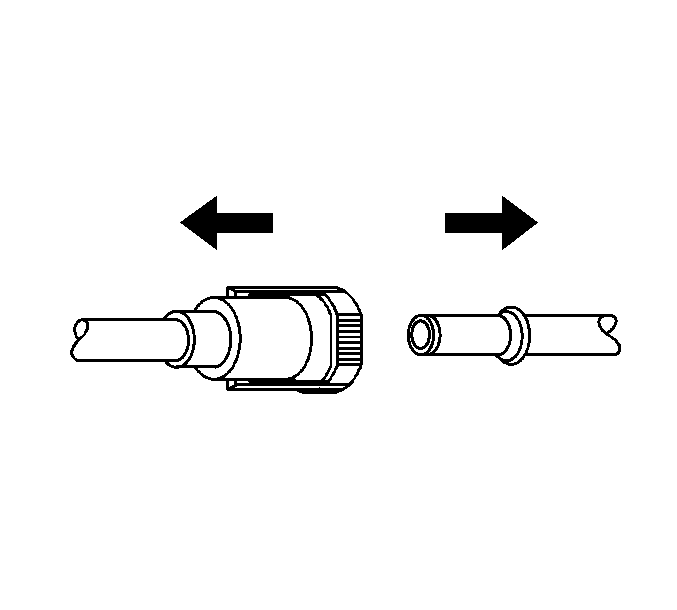
| 7.3. | Continue to depress the tabs while pulling the connector apart. |
| Notice: Inspect all the connections for dirt. Clean or replace the components as required. |
| 7.4. | Inspect the fitting for dirt. |
| 7.5. | Clean or replace the components as required. |
Installation Procedure
- Remove the protective caps from the new fuel filter assembly, P/N 22734980.
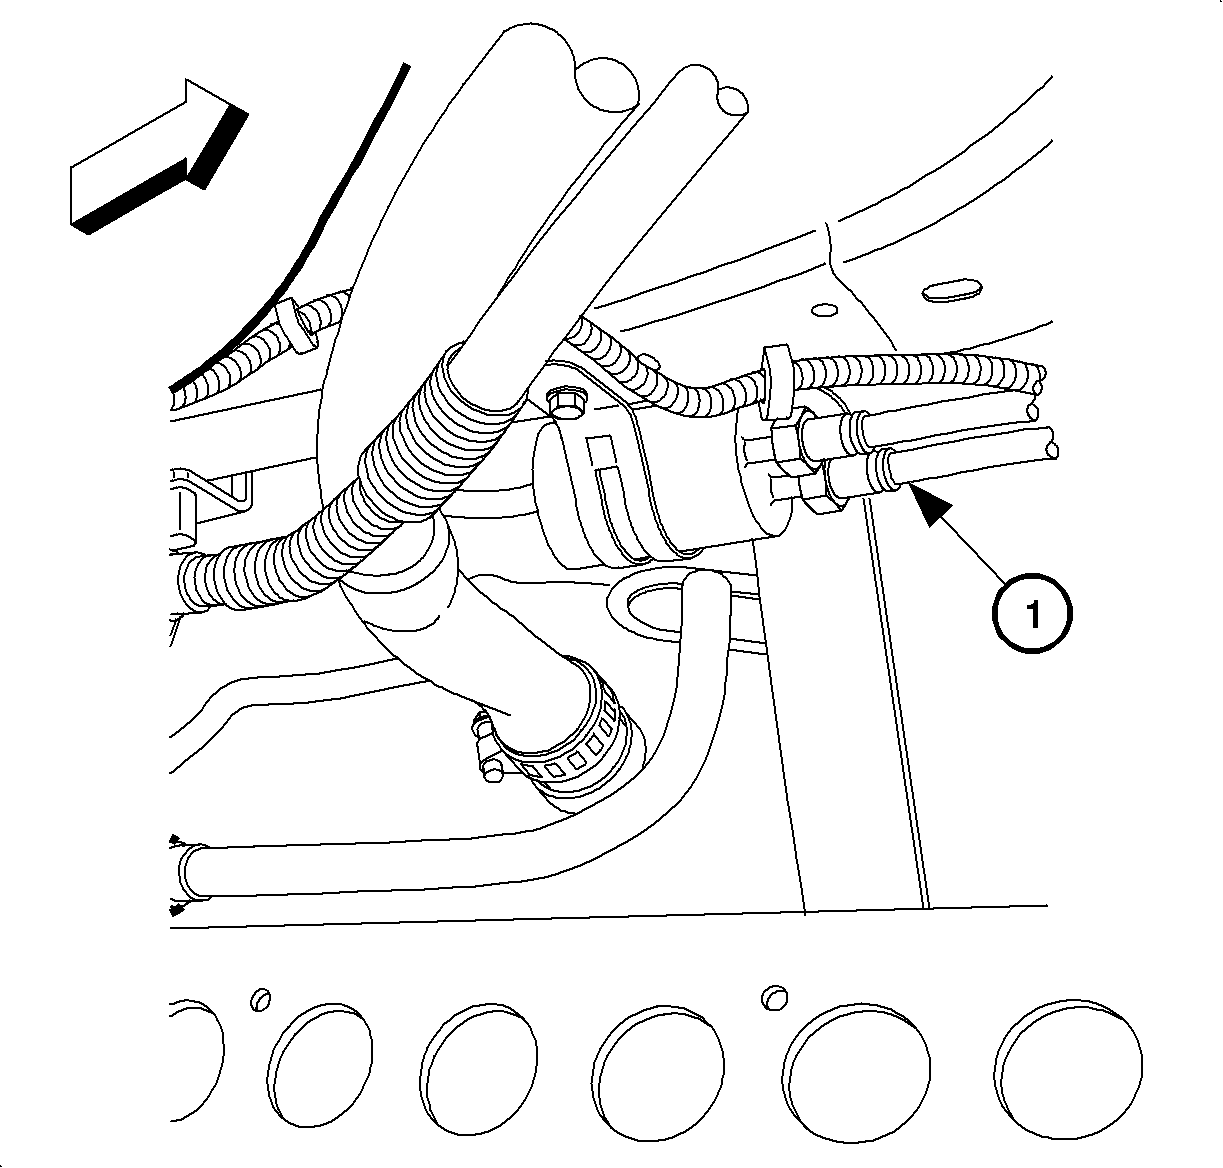
- Connect the fuel tank feed and return hose fittings (1) to the fuel filter. Refer to Steps 2.1 - 2.3 for instructions for connecting quick connect fittings (plastic collar - press release).
- Connect the fuel filter to the engine fuel feed pipe (1). Refer to Steps 3.1 - 3.3 for instructions for connecting quick connect fittings (metal collar).
- Install the fuel filter retaining bolt (1).
- Lower the vehicle.
- Install the fuel pump relay.
- Inspect for fuel leaks using the following procedure:
- Affix Recall Identification Label on a clean, dry surface of the radiator core support in an area clearly visible when the hood is raised. (For more information, refer to "RECALL IDENTIFICATION LABEL" in this bulletin.)
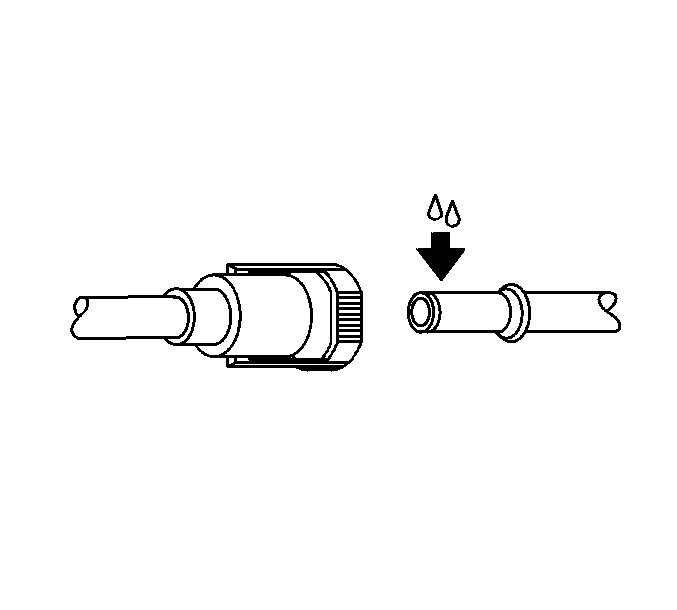
| Caution: In order to reduce the risk of fire and personal injury, before connecting fuel pipe fittings, always apply a few drops of clean engine oil to the male pipe ends. This will ensure proper reconnection and prevent a possible fuel leak. During normal operation, the O-rings located in the female connector will swell and may prevent proper reconnection if not lubricated. |
| 2.1. | Apply a few drops of clean engine oil to the male pipe end. |
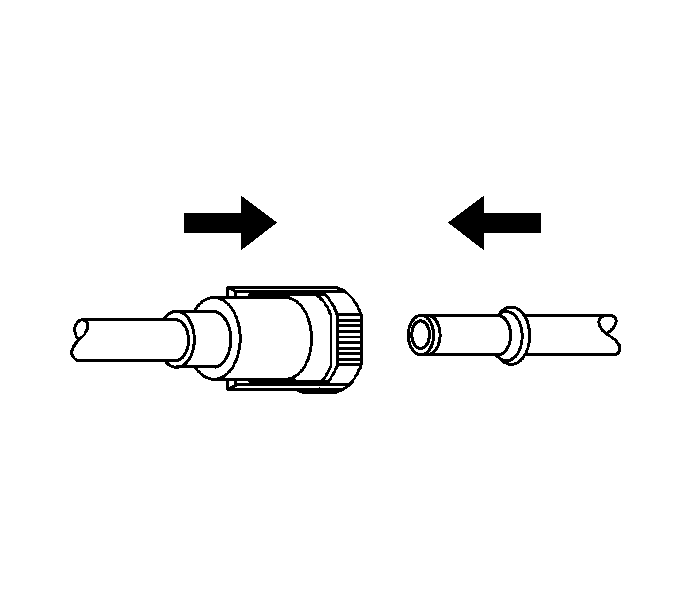
| 2.2. | Push both sides of the quick-connect fittings together in order to snap the retainer in place. |
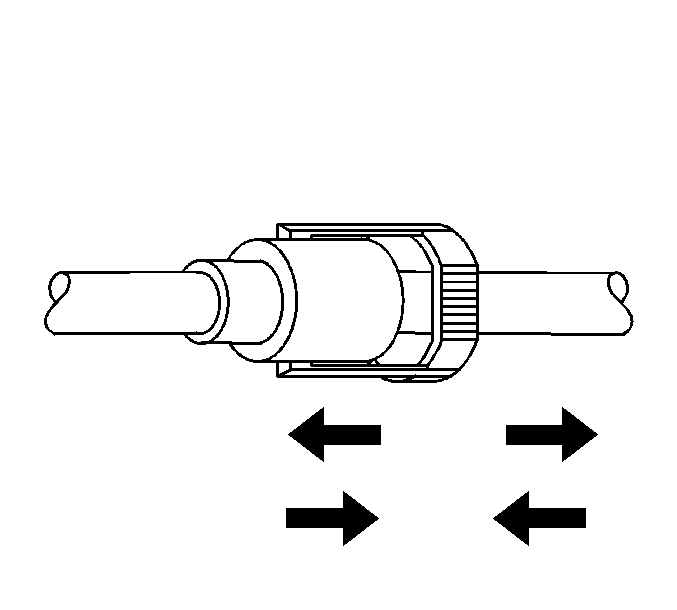
| 2.3. | Pull on both sides of the quick-connect fitting in order to make sure the connection is secure. |
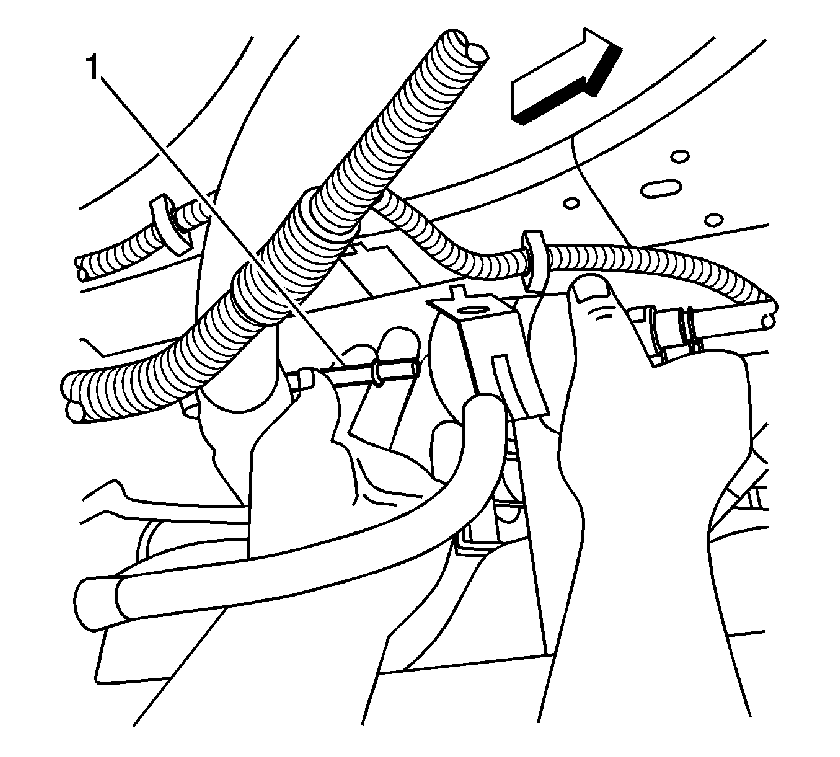
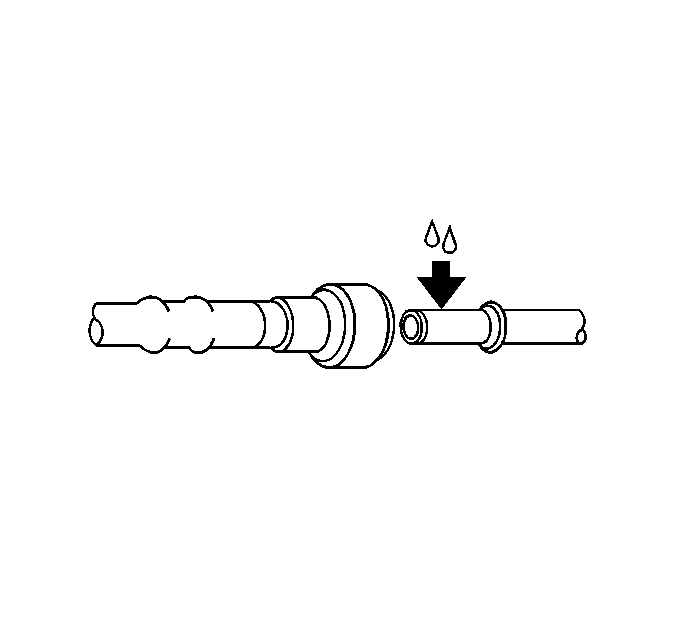
| Caution: In order to reduce the risk of fire and personal injury, before connecting fuel pipe fittings, always apply a few drops of clean engine oil to the male pipe ends. This will ensure proper reconnection and prevent a possible fuel leak. During normal operation, the O-rings located in the female connector will swell and may prevent proper reconnection if not lubricated. |
| 3.1. | Apply a few drops of clean engine oil to the male pipe end. |
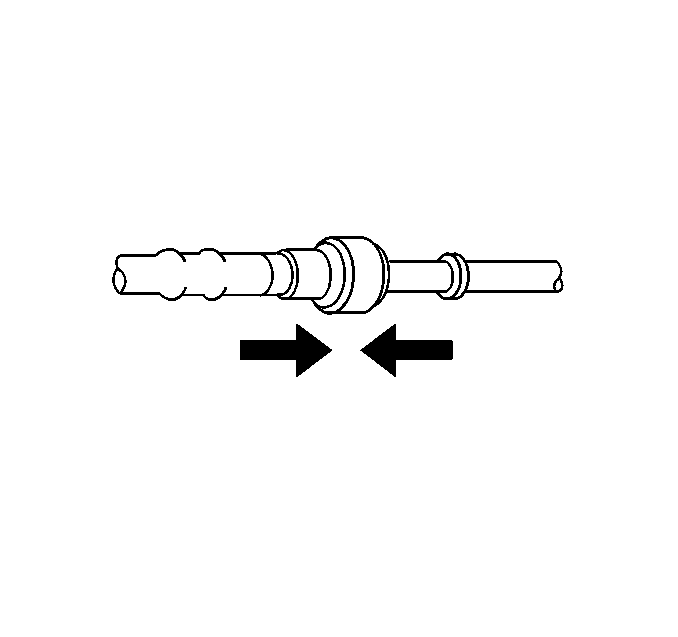
| 3.2. | Push both sides of the fitting together to cause the retaining tabs to snap into place. |
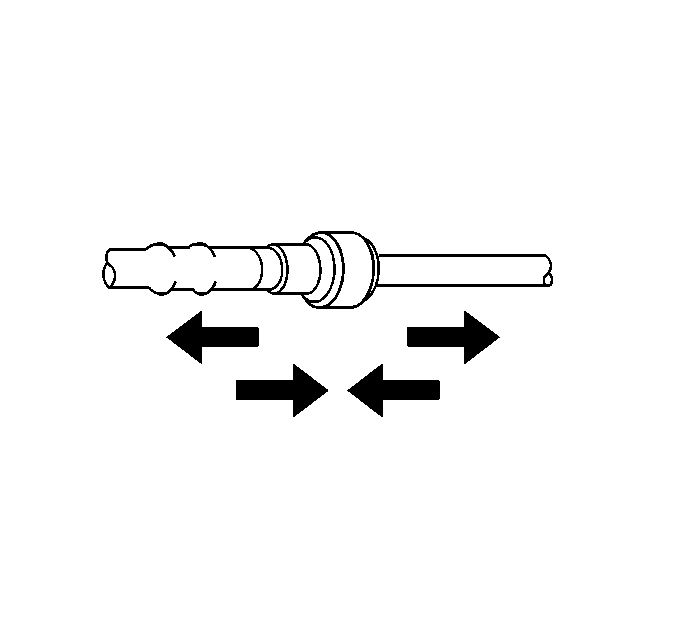
| 3.3. | Once installed, pull on both sides of the fitting to make sure the connection is secure. |

Notice: Use the correct fastener in the correct location. Do not use paints, lubricants, or corrosion inhibitors on fasteners or fastener joint surfaces unless specified. These coatings affect fastener torque and joint clamping force and may damage the fastener. Use the correct tightening specifications when installing fasteners in order to avoid damage to parts and systems.
Tighten
Tighten the fuel filter retaining bolt to 10 N·m
(89 lb-in).

| 6.1. | Install the fuel pump relay in the correct location in the BCM fuse box. |

| 6.2. | Install the console side left side extension. |

| 6.3. | Install the console side extension retainer and turn clockwise to secure. |
| 7.1. | Turn ON the ignition, with the engine OFF for 2 seconds. |
| 7.2. | Turn OFF the ignition for 10 seconds. |
| 7.3. | Turn ON the ignition, with the engine OFF. |
| 7.4. | Inspect for fuel leaks at connections, hoses, pipes, and filter. |
| • | If fuel leak is detected, identify source of leak and correct condition. Relieve fuel system pressure prior to servicing fuel system. |
| • | If no fuel leaks are detected, turn ignition OFF and proceed to Step 8. |
Recall Identification Label
Upon completion of the recall, a Recall Identification Label and Clear Protective Cover should be affixed on a clean, dry surface of the radiator core support in an area clearly visible when the hood is raised. Each label provides a space to print in ink (or type) the recall number (03068) and the five (5) digit facility code of the retailer performing the recall service.
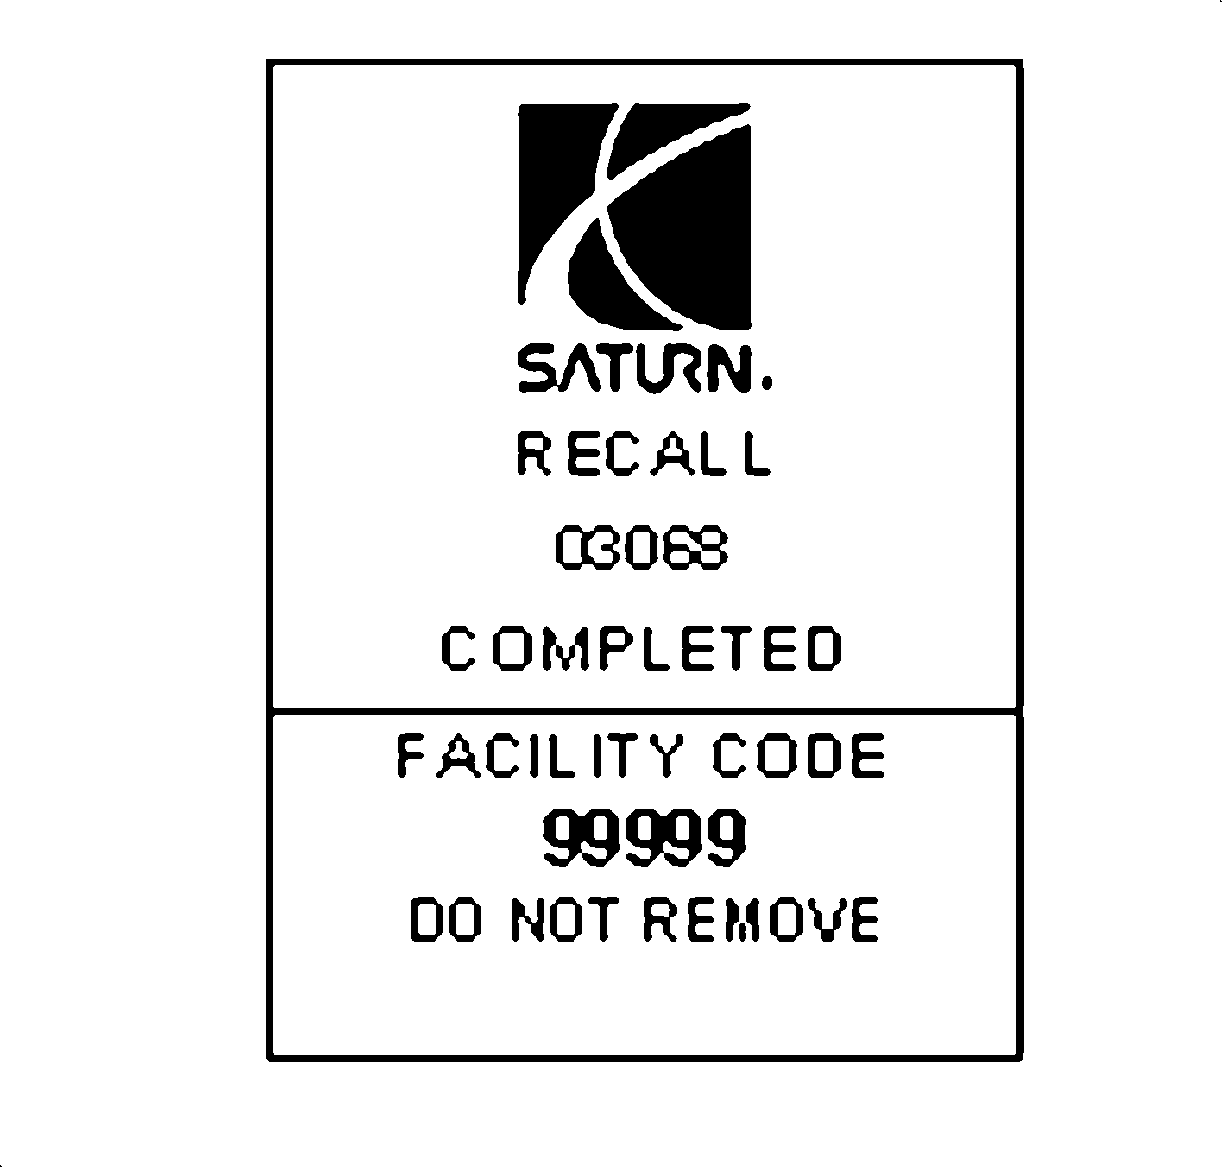
As a reminder, additional labels may be ordered from Saturn publications (1-800-828-2112, prompt 3, Item Number S03 00013A for the Recall Identification Label, and item number S03 00013B for the Clear Protective Cover).
Credit
1. To receive credit for replacing the fuel filter assembly, submit a claim with the information below:
Repair Performed | Failed Part No.* | Sale Type | Case Type | Labor Op | Labor Hours* | Admin. Hrs. ** |
|---|---|---|---|---|---|---|
Replace Fuel Filter Assembly | 22612464 | WC | VC | V1095 | 0.4 Hr | 0.1 Hr. |
2. To receive credit for loaner/rental car cost or other goodwill expenses, submit a claim with the information below:
Service Performed | Case Type | Labor Op | Net Item Amount | Net Item Code | # Days Rental |
|---|---|---|---|---|---|
Loaner Reimbursement | VC | V1096 | *** | C | **** |
Other Goodwill | VC | V1097 | *** | R | N/A |
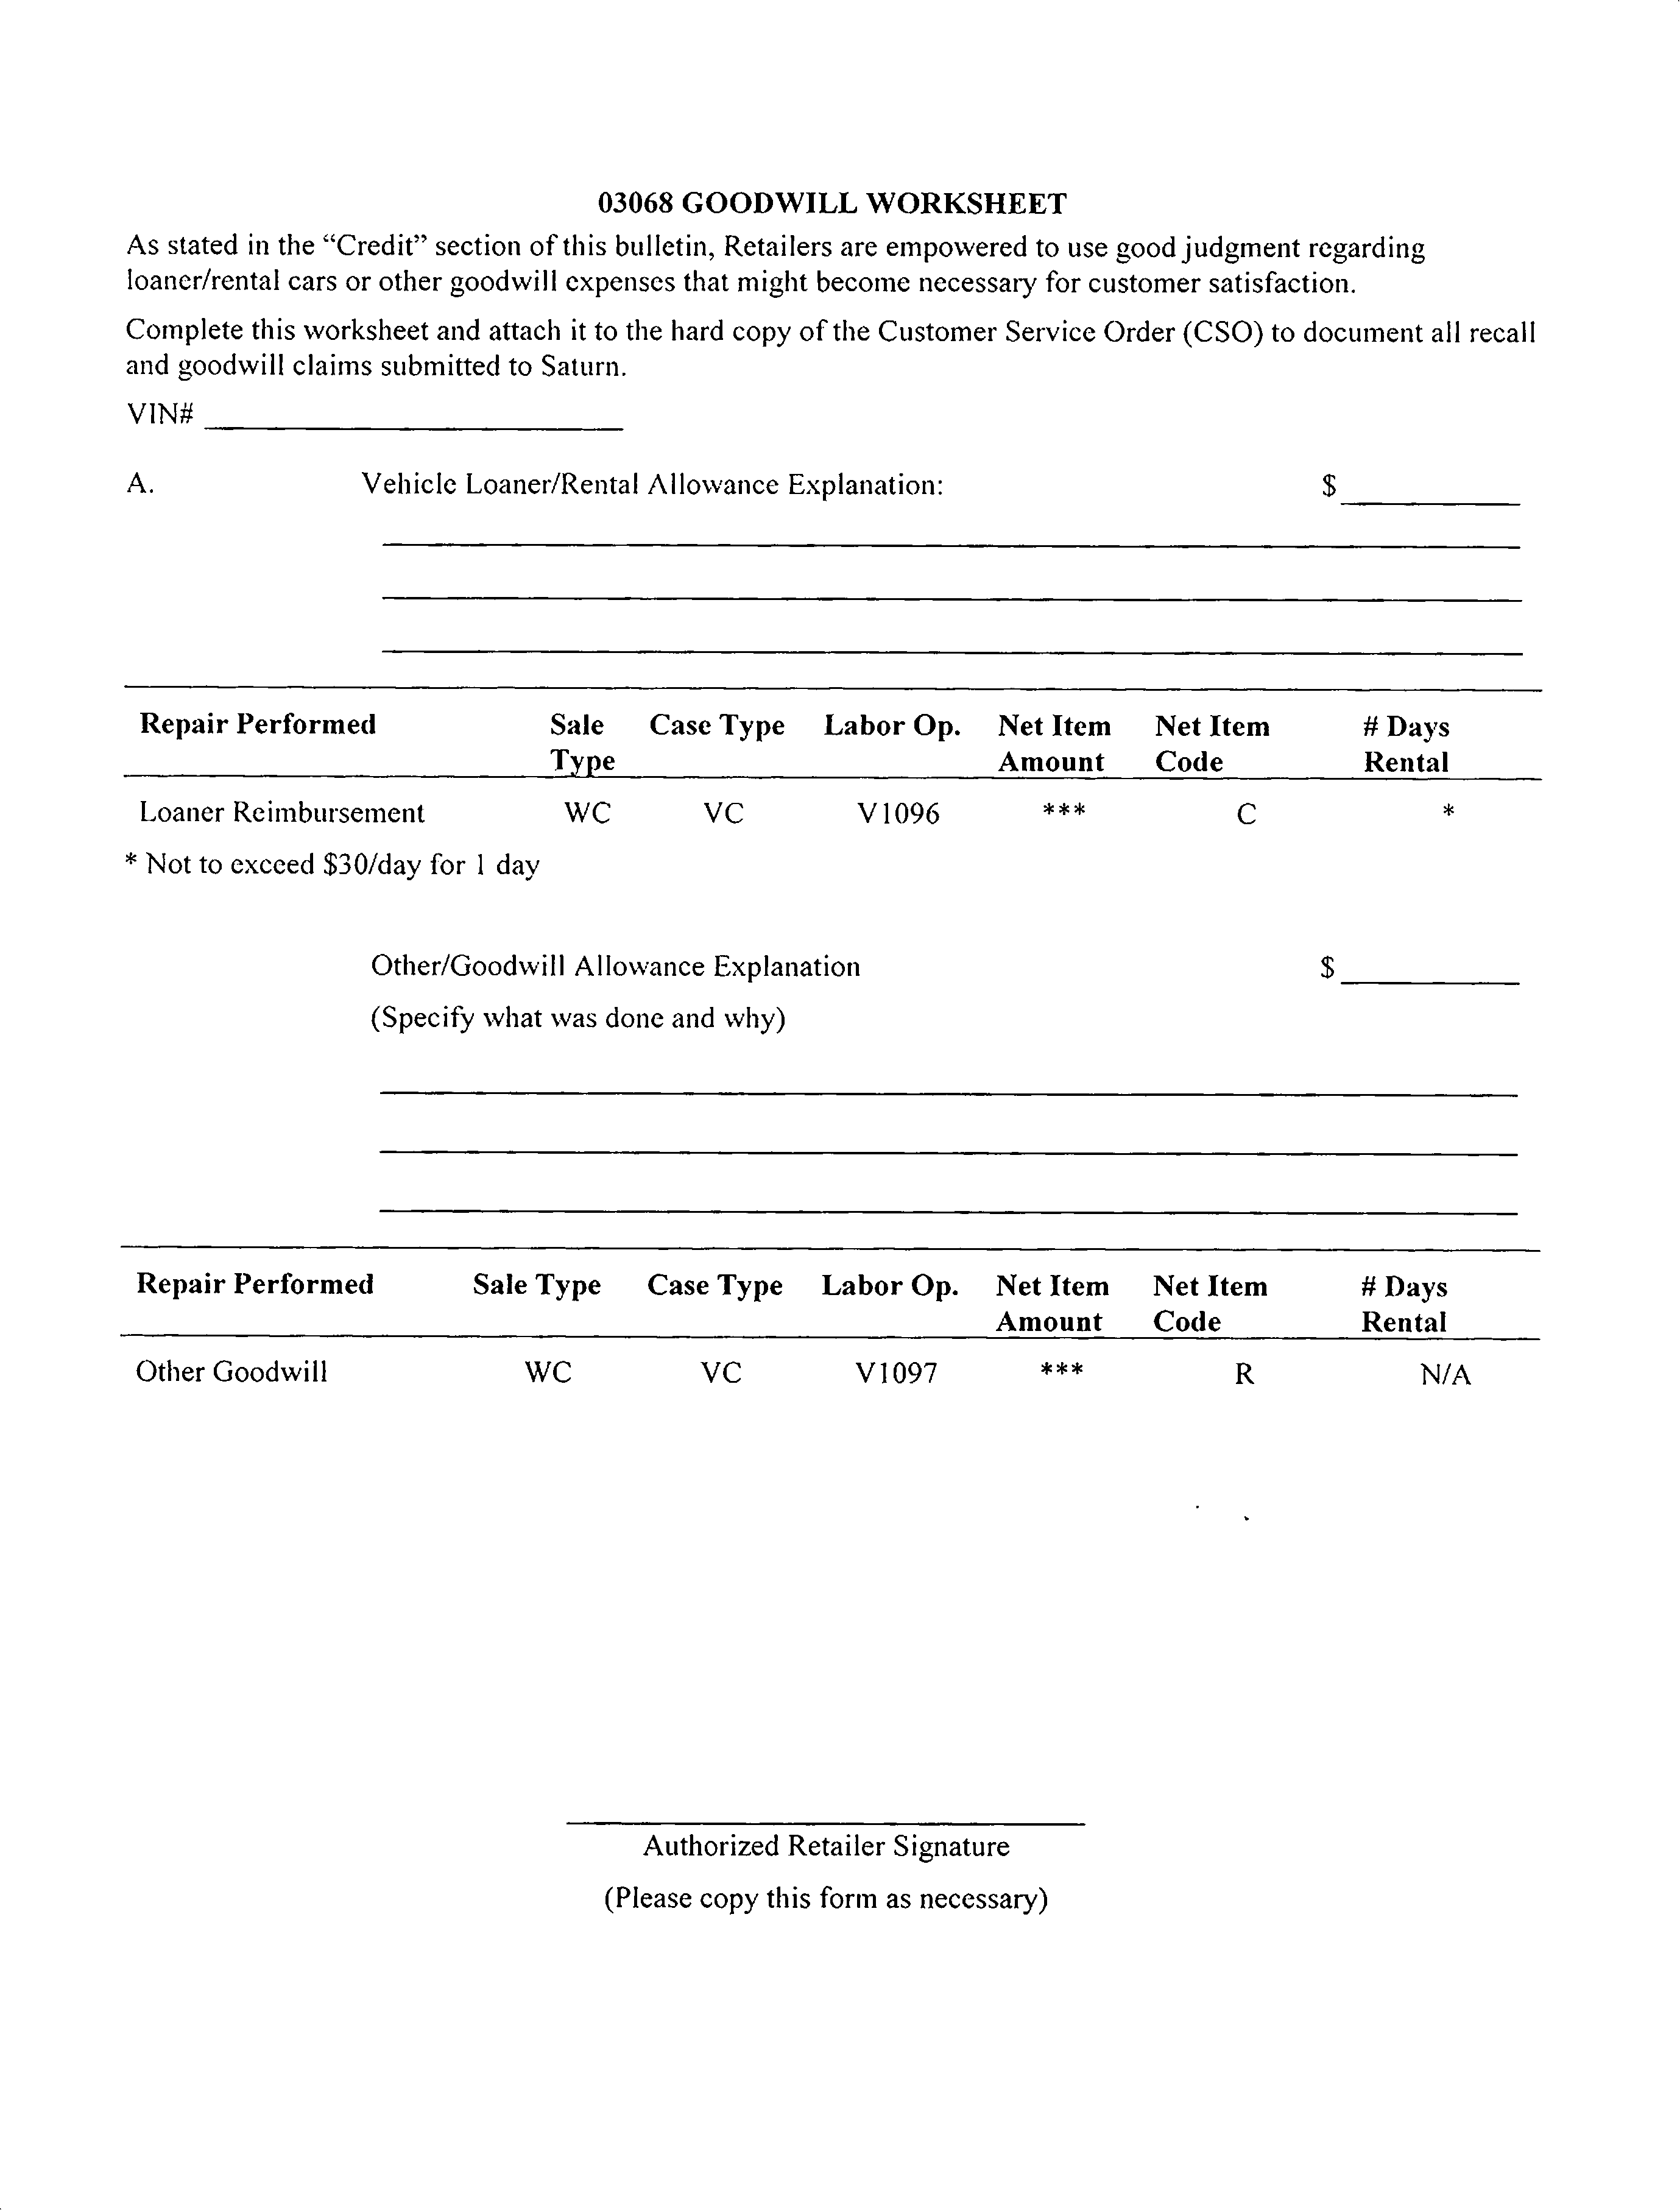
3. Retailers are empowered to use good judgement regarding loaner/rental cars or any other goodwill expenses deemed necessary. It will not be necessary to call the Saturn Customer Assistance Center for authorization of goodwill. The Goodwill Worksheet (printed toward the back of this bulletin) must be used to document goodwill expenses. The completed Goodwill Worksheet must be attached to the hard copy of the CSO. Retailers are to make sufficient copies of the blank Goodwill Worksheet to document goodwill expenses.
4. Check your Saturn SERVICELINE.XL Claim Memorandum daily. Remember to code the claim as a WC sale type, and VC case type. Contact your field representative if you need assistance.
5. All labor operations claimed in this bulletin must be submitted on individual (unrelated) CSO lines. Refer to the Customer Service Order Preparation Manual for details on Product Recall Claim Submission.
* The parts allowance should be the sum total of the current SSPO retailer net price plus 40% of all parts required for the repair.
** Recall administration allowance
*** Net amount must be submitted as a miscellaneous sale...Loaner reimbursement not to exceed $30/day
**** Enter number of days vehicle was rented...Not to exceed 1 day.
December, 2003
Dear Saturn Owner:
This notice is sent to you in accordance with the requirements of the National Traffic and Motor Vehicle Safety Act.
Saturn has decided that a defect relating to motor vehicle safety exists in 2003 and certain 2004 model year Saturn ION vehicles equipped with 2.2L 4-cylinder (L61) engines. These vehicles were built with a fuel filter that may corrode prematurely on the exterior surface. If corrosion on the exterior surface of the fuel filter progresses to the point of creating a hole in the shell, fuel droplets would form and drop to the ground. There would be a noticeable fuel odor around the vehicle. If an ignition source is present, a fire could result.
What Saturn will do:
To prevent the possibility of this condition occurring, Saturn retailers will replace the fuel filter assembly. This service will be performed at no charge to you.
What you should do:
Contact your Saturn Retailer as soon as possible to arrange for the fuel filter and bracket assembly replacement. Repairs will take about 30 minutes although some additional time may be required for paperwork and processing.
The enclosed reply card identifies your vehicle and will facilitate completion of the repairs when presented to your Saturn retail facility. If your address has changed, please provide the new information in the space provided. This will assist us in ensuring that all affected vehicles are corrected.
Your Retailer is prepared to perform this service promptly and with minimal inconvenience to you. However, if your car is provided to the Retailer on the agreed service date and the condition is not remedied on that date, or within a reasonable time, please contact the Saturn Customer Assistance Center at 1-800-972-8876, or for the hearing impaired, 1-800-833-6000. We will assist you and the Retailer in getting your car serviced.
If, after contacting your Saturn Retailer and the Saturn Customer Assistance Center, you are still not satisfied we have done our best to remedy this condition without charge, you may wish to write the Administrator, National Highway Traffic Safety Administration, 400 7th St., SW, Washington, DC 20590, or call 1-888-327-4236.
Again, we sincerely regret any inconvenience or concern this situation may cause you. We want you to know that we will do our best, throughout your ownership experience, to ensure that your Saturn provides you many miles of enjoyable driving.
Sincerely,
Saturn Corporation
03068
