- Raise the engine and transaxle assembly.

- Temporarily install the 6 crossmember bolts.
Notice: Refer to Fastener Notice in the Preface section.

- Install the left side mounting insulator bolt and nut.
Tighten
Tighten the left side mounting insulator nut and bolt 80 N·m (60 lb ft).
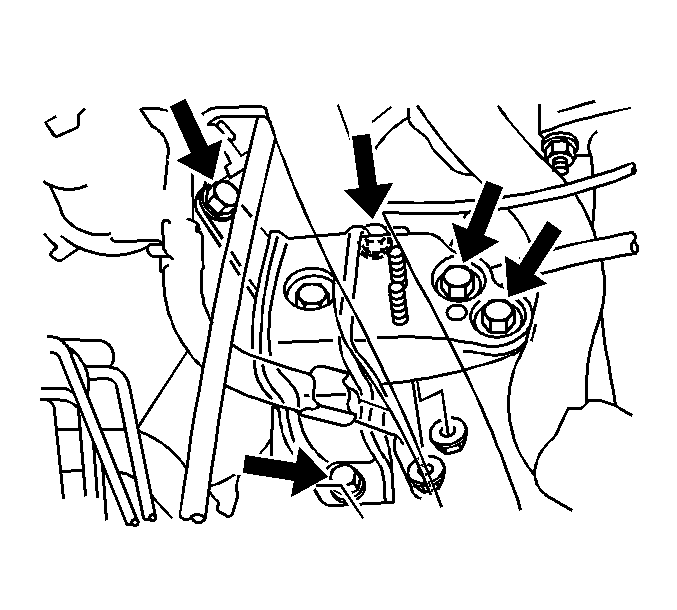
- Install the 5 bolts and 2 nuts from the right side engine mount, then remove the engine lift.
Tighten
Tighten the right side engine mount nuts and bolts to 52 N·m (38 lb ft).

- Align the right side of the crossmember, then install and temporarily tighten bolt (1), then bolt (2).

- Align the left side of the crossmember, then install and temporarily tighten bolt (1), then bolt (2).
Tighten
| • | Tighten the right and left side bolts (1) to 157 N·m (116 lb ft). |
| • | Tighten the right and left side bolts (2) to 113 N·m (83 lb ft). |
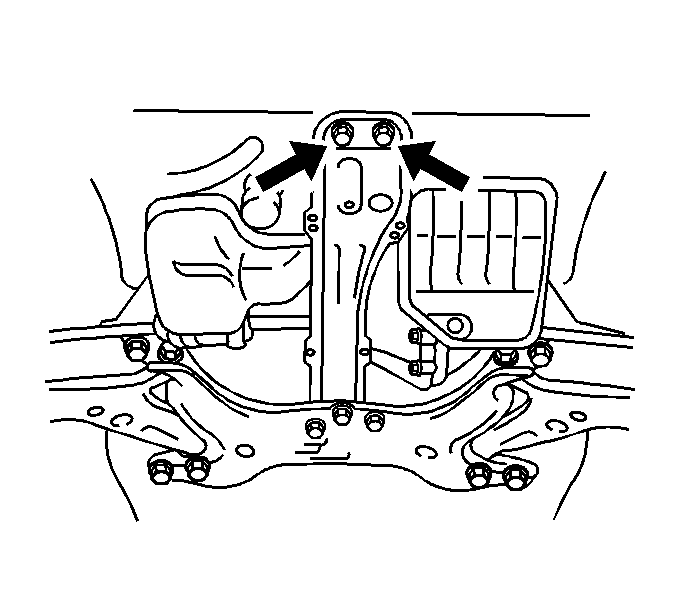
- Install the crossmember rear bolts and tighten.
Tighten
Tighten the crossmember rear bolts to 39 N·m (29 lb ft).
- Connect the lower control arm assembly.
Tighten
Tighten the nuts and the bolt to 89 N·m (65.6 lb ft).
- Connect the front stabilizer link assembly.
Tighten
Tighten the nut to 74 N·m (54.6 lb ft).
- Install the left side tie rod end.
Tighten
Tighten the outer tie rod nut to 49 N·m (36.1 lb ft). Align the cotter pin slot by tightening the outer tie rod nut up to 1/6 additional turn, or 70 N·m (52 lb ft) maximum.
Do not loosen the nut in order to insert the cotter pin.
- Install the drive shaft lock nut.
Tighten
Tighten the nut to 216 N·m (159 lb ft).
- Install the front exhaust pipe. Refer to
Front Pipe Replacement
.
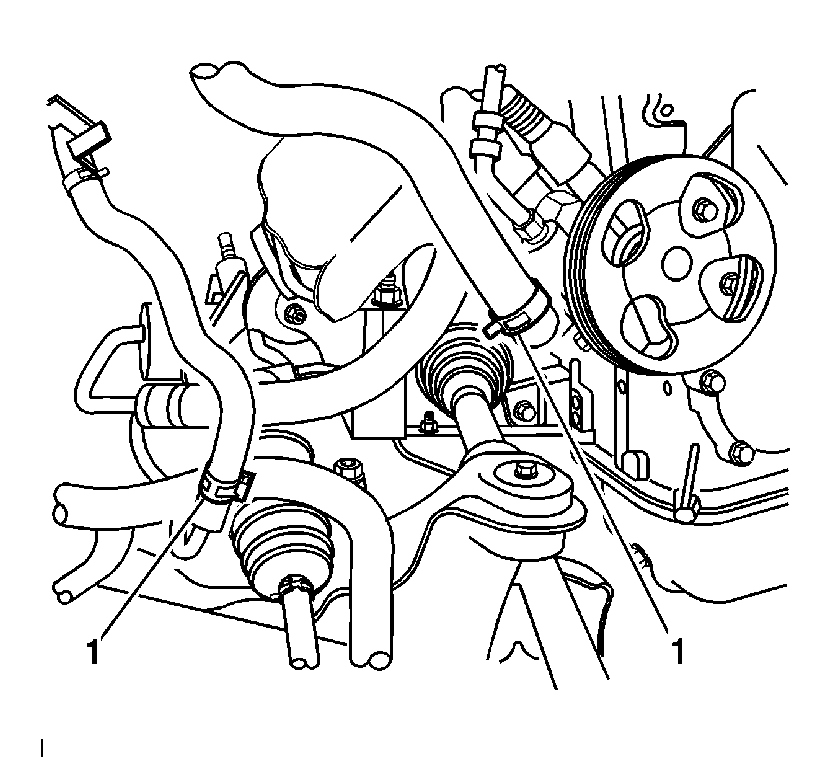
- Connect the power steering lines (1), then refill the power steering system. Refer to
Checking and Adding Power Steering Fluid
.
- Connect the oil cooler hoses.
- Install the right and left engine splash shield. Refer to
Engine Splash Shield Replacement - Left Side
and
Engine Splash Shield Replacement - Right Side
.
- Lower the vehicle.
- Install the steering intermediate shaft assembly. Refer to
Intermediate Steering Shaft Replacement
.
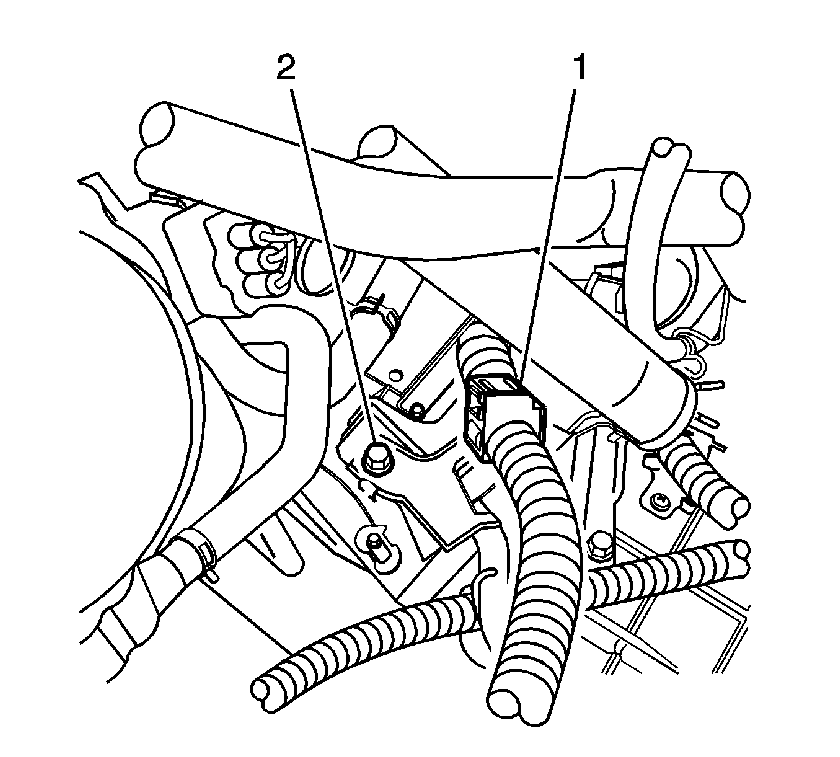
- Install the shift cable mounting bracket bolt (2)
and clip the wire harness (1).
Tighten
Tighten the bolt to 12 N·m (9 lb ft).

- If equipped with an automatic transaxle, install the shift cable to the transaxle.
| 19.1. | Install the shift cable nut. |
Tighten
Tighten the nut to 12 N·m (9 lb ft).
| 19.2. | Clip the cable to the mounting bracket. |
- Pull the engine harness wire through the passenger compartment.
- Connect the 3 cowl wire electrical connectors to the connector mounting bracket.
- Connect the 2 ECM connectors.
- Connect the ground cable to the engine.
- Connect the ground cables to the transaxle.
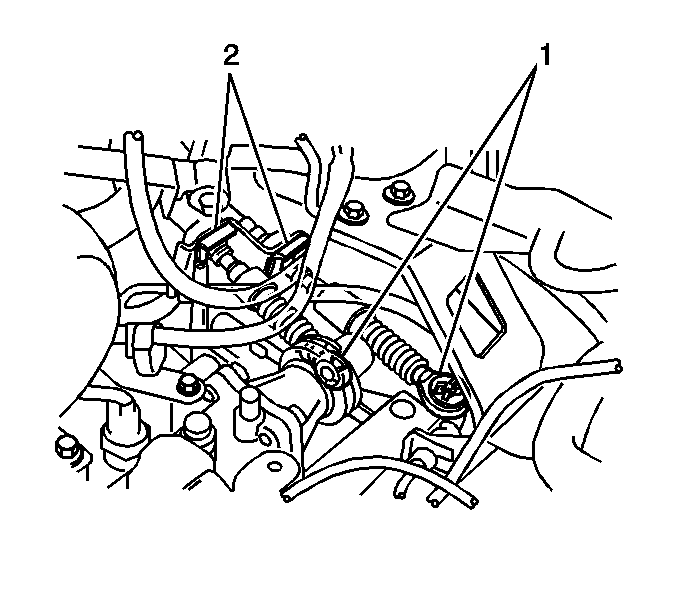
- If equipped with a manual transaxle, connect the transaxle control cables to the transaxle.
| 25.1. | Connect the transaxle control cables (2) to the transaxle. |
| 25.2. | Clip the cable (1) to the mounting bracket. |
- Connect the clutch actuator cylinder. Refer to
Clutch Actuator Cylinder Replacement
.

- Connect the 3 engine compartment relay box connectors (1, 2, 3).

- Connect 2 ground cables (1, 2) from front left side of engine compartment.
Tighten
Tighten the bolts to 9 N·m (7 lb ft).

- Connect the 2 wire harness clamps.
- Install the engine relay box cover.
- Install the radiator. Refer to
Radiator Replacement
.
- Install the generator. Refer to
Generator Replacement
.
- Install the radiator inlet hose. Refer to
Radiator Inlet Hose Replacement
.
- Install the radiator outlet hose. Refer to
Radiator Outlet Hose Replacement
.
- Connect the brake booster vacuum hose to the brake booster.
- Connect the heater hose to the water hose union on the cylinder head.
- Connect the heater hose to the water by-pass pipe.
- Connect the fuel tube to the fuel pipe.
- Install the fuel tube clamp.
- Connect the cruise control actuator electrical connector.
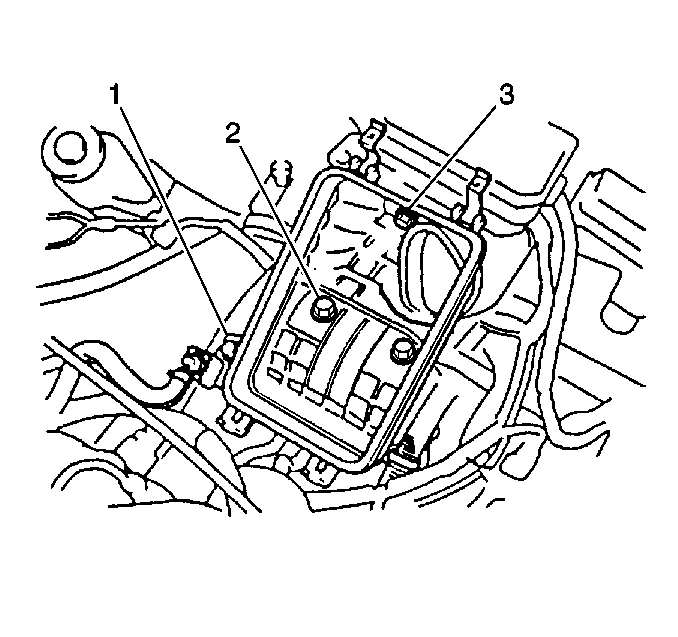
- Install the air cleaner case as follows:
| 41.1. | Install the air cleaner, then the 3 air cleaner case bolts (2). |
Tighten
Tighten the bolts to 7 N·m (62 lb in).
| 41.2. | Connect the air cleaner wire harness clamp, connector, and hose. |
| 41.3. | Install the air filter. |
- Install the air cleaner cover as follows:
| 42.1. | Install the air cleaner cap and air cleaner hose assembly. |
| 42.2. | Connect the air cleaner hose to the throttle body, then tighten the air cleaner hose clamp bolt. |
| 42.3. | Connect the air cleaner cap to the air cleaner case, then latch the 2 air cleaner clamps. |
| 42.4. | Connect the MAF sensor connector. |
- Connect the IAT sensor.

- Connect the accelerator cable to the throttle body (1).
- Install the accelerator cable to the accelerator cable bracket.
- If the vehicle is equipped with a manual transmission, remove the following components:
- If the vehicle is equipped with A/C, position the A/C compressor and install the A/C compressor bolts. Refer to
Air Conditioning Compressor Replacement
.
- Install the serpentine drive belt. Refer to
Drive Belt Replacement
.
- Refill the engine oil.
- Refill the cooling system. Refer to
Cooling System Draining and Filling
.
- Connect the negative battery cable.
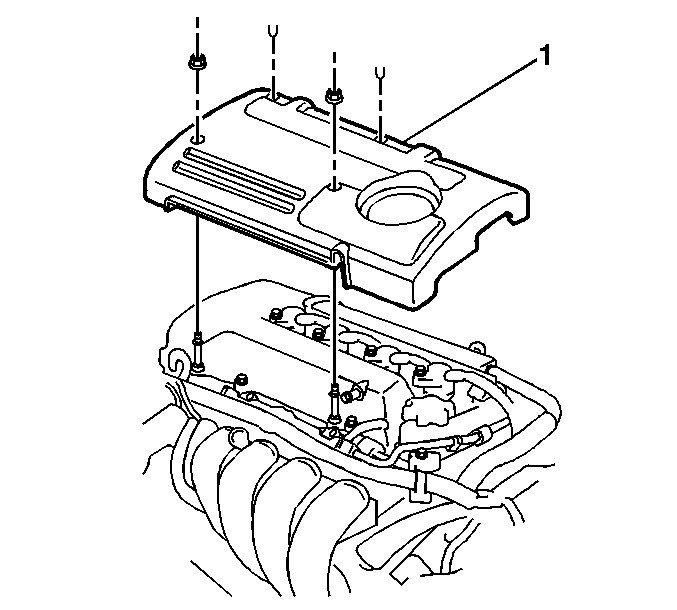
- Position the engine cover (1) to the engine.
- Install the 2 engine cover plastic retainers.
- Install the 2 engine cover fasteners.
- Start the engine and check for fluid leaks.


