CAMPAIGN: SHOULDER BELT GUIDE LOOP CRACKING-NEW P/N RELEASED

SUBJECT: SHOULDER BELT GUIDE LOOP CRACKING
Models: 1991 Chevrolet Lumina, Cavalier 1991 Pontiac Grand Prix, Sunbird 1991 Oldsmobile Cutlass Supreme 1991 Buick Regal
TO: ALL GENERAL MOTORS DEALERS
U.S. Campaign Number Cross Reference ------------------------------------ Chev Olds Pont Buick 91C21 91CO7 91CO6 91C04
General Motors of Canada Limited has determined that certain 1991 Chevrolet Lumina, Cavalier, Pontiac Grand Prix, Sunbird, Oldsmobile Cutlass Supreme and Buick Regal model vehicles fail to comply to Canada Motor Vehicle Safety Standard (CMVSS) 208 "Seat Belt Installations." Some of these vehicles have been built with cracked front door shoulder belt guide loops which may not provide front seat occupants with proper protection in the event of a vehicle crash.
To correct this condition, dealers are to inspect the front door shoulder belt guide loops for possible cracks. If a cracked guide loop is found, both front door guide loops will have reinforcing plates installed.
VEHICLES INVOLVED:
Involved are certain 1991 Chevrolet Lumina, Cavalier, Pontiac Grand Prix, Sunbird, Oldsmobile Cutlass Supreme and Buick Regal model vehicles built within the following break points:
Year Model Plant Plant Code From Through ---- ----- ----- ---------- ---- ------- 1991 Lumina Oshawa #1 "9" SOP M9171758 1991 Lumina Oshawa #2 "1" SOP M1125145 1991 Cavalier Lordstown "7" SOP M7185111 1991 Grand Prix Fairfax "F" SOP MT246454 1991 Sunbird Lordstown "7" SOP M7590841 1991 Cutlass Supreme Doraville "D" SOP MD344760 1991 Regal Oshawa #2 "1" M1800001 M1852079
All affected vehicles have been identified by the VIN listing provided to involved dealers with this bulletin. Any dealer not receiving a listing was not shipped any of the affected vehicles.
DEALER CAMPAIGN RESPONSIBILITY:
Dealers are to perform this campaign on all involved vehicles at no charge to owners, regardless of kilometres traveled, age of vehicle, or ownership, from this time forward.
Whenever a vehicle subject to this campaign is taken into your new or used vehicle inventory, or it is in your dealership for service, you are to ensure the campaign correction has been made before selling or releasing the vehicle.
Owners of vehicles recently sold from your new vehicle inventory are to be contacted by the dealer, and arrangements made to make the required modification according to instructions contained in this bulletin.
CAMPAIGN PROCEDURE:
Refer to Section 4 of the Service Policies and Procedures Manual for the detailed procedure on handling Product Campaigns. Dealers are requested to complete the campaign on all transfers as soon as possible.
OWNER NOTIFICATION:
All owners of record at the time of campaign release are shown on the attached computer listing and have been notified by first class mail from General Motors. The listings provided are for campaign activity only and should not be used for any other purpose.
PARTS INFORMATION:
Parts required to complete this campaign should be ordered through regular channels, as follows:
IF GUIDE LOOP IS NOT CRACKED
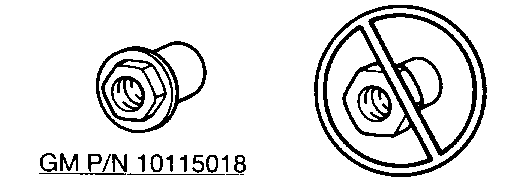
Part Number Description Quantity/Vehicle ----------- ----------- ---------------- 10115018 Guide Loop Nut - W-Car 2 22551133 Guide Loop Nut - J-Car 2
NOTICE: If P/N 22551133 (J-Car Nut) cannot be obtained, the nuts removed from the car can be reused if thread locking compound is applied. The nut for the W-Car is not to be reused under any circumstances.
IF GUIDE LOOP IS CRACKED
Part Number Description Quantity/Vehicle ----------- ----------- ---------------- 10216391 Guide Loop Reinforcement Kit - W-Car 1 22582246 Guide Loop Reinforcement Kit - J-Car 1
Each Kit contains: 2 Reinforcing Plates, 2 Nuts and An Instruction Sheet.
NOTICE: It is anticipated that less than 3% of vehicles will require the guide loop reinforcement kit to complete this campaign. Please order parts accordingly.
NOTICE: During the early stages of this product safety campaign, Oshawa may restrict the number of kits which may be requested on any one order due to available parts quantities.
SPECIAL TOOLS AND INSTRUCTIONAL VIDEO:
Each dealer will be shipped a Guide Loop Inspection/Drilling Fixture J-39425-4, T-Handle Cutting Tool J-39425-1 and a Bulb PT7190-12 with metal dust. These tools are being furnished to dealers at no charge. Each tool package will be identified with Campaign Number 2DO3. Additional tools, if required, may be ordered from Kent-Moore.
Each dealer will be shipped an instructional video tape for this campaign. This tape demonstrates the service procedure described on the following pages. Mechanics should be certain to view this tape prior to attempting to perform this procedure.
PARTS AND LABOUR CLAIM INFORMATION:
Credit for the campaign work performed will be paid upon receipt of a properly completed campaign claim card or DCS transmission in accordance with the following:
Repair Code Description Time Allowance ----------- ----------- -------------- 2A Inspect - No Reinforcement Kit Required .4 - (W-Car)
3A Inspect - No Reinforcement Kit Required .4 - (J-Car)
4A Inspect/Install Reinforcement Kit .6 - (W-Car)
5A Inspect/Install Reinforcement Kit .6 - (J-Car)
Time allowance includes 0.1 hour for dealer administrative detail associated with this campaign. Parts credit will be based on dealer net plus 30% to cover parts handling.
SERVICE PROCEDURE:
Tools Required: J-39425-4 Guide Loop Inspection/Drilling Fixture J-39425-1 T-Handle Cutting Tool PT7190-12 Bulb With Metal Dust
Inspection Procedure:
1. Lower front door window glass and remove plastic shoulder belt guide loop plug cover (W- Car) or plastic shoulder belt guide loop anchor cover (J-Car), nut and rubber washer (W- Car). DO NOT USE POWER TOOLS TO REMOVE GUIDE LOOP NUT.
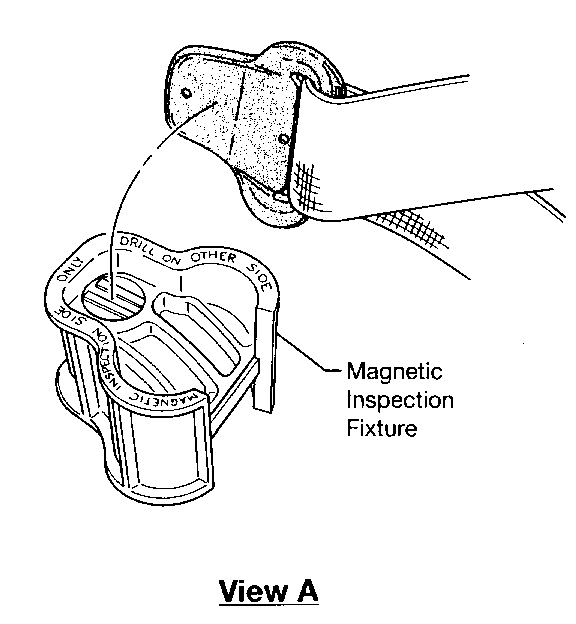
2. Pull guide loop outside of vehicle and place in Guide Loop Inspection/Drilling Fixture (J-39425-4) (See View A). Use "Magnetic Inspection" side of fixture for this step.
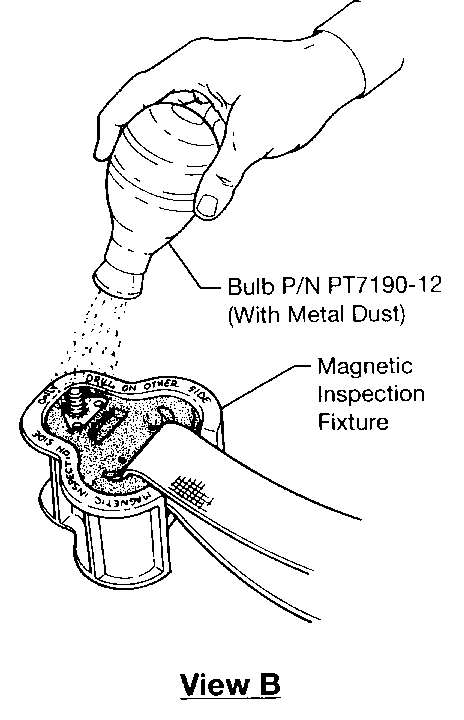
3. Apply small amount of metal dust to guide loop (See View B).
4. With guide loop still in fixture, gently shake dust from side to side to highlight any possible crack.
5. Inspect guide loop for cracks. If guide loop is cracked, metal dust will have been drawn to crack line (See View C & D) and a guide loop reinforcement kit must be installed on both side of vehicle.
If guide loop does not have a crack, perform steps 1 through 5 on the opposite front door guide loop to determine if that guide loop is cracked. Do not Reinstall Guide Loop Until Both Sides Have Been Inspected.
6. Remove all traces of dust from guide loop(s) and from magnetic fixture by brushing or blowing.
7. If cracks were not found, reinstall guide loop, rubber washer (W-Car) and a new guide loop nut (to be ordered separately). For J-Cars 2 only, the old nut may be reused after a small amount of Loctite (GM P/N 993365) or equivalent is applied to the threads. The old W-Car nut cannot be reused under any circumstances.
Torque nut to 28 N.m (21 lb. ft.). Reinstall nut cover (W-Car) or anchor cover (J-Car) and install Campaign Identification Label.
NOTICE: Use only guide loop nut P/N 10115018 on W-Car. DO NOT SUBSTITUTE OR REUSE OLD NUT.
NOTICE: Use only guide loop nut P/N 22551133 on J-Car. DO NOT SUBSTITUTE. If this nut cannot be obtained, reuse the old nut after a small amount of Loctite (GM P/N 993365) or equivalent is applied to the threads.
8. If cracks were found on guide loop, a reinforcement plate must be installed following the "Installing Reinforcement Assemblies" procedure on page 6.
Installing Reinforcement Assemblies
(To Be Performed On Both Front Door Guide Loops When Either Front Door Guide Loop Is Cracked)
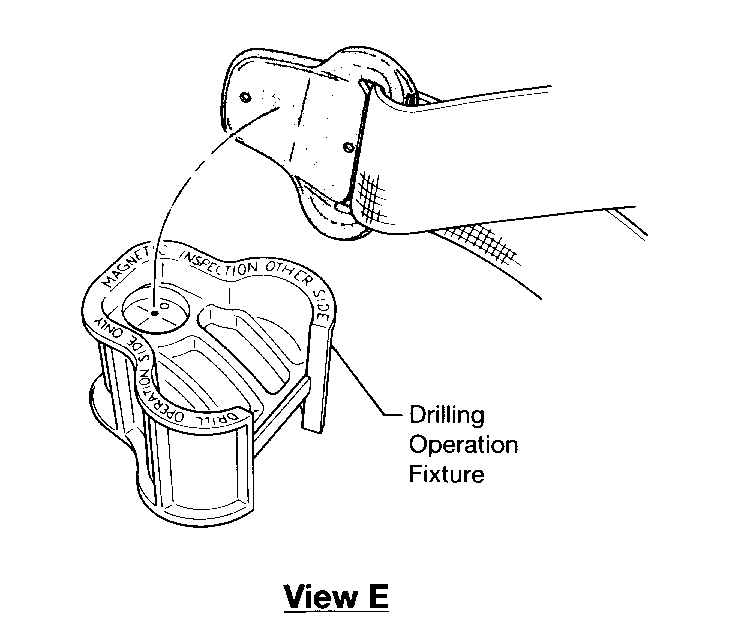
1. Using "Drilling Operation" side of Guide Loop Inspection/Drilling Fixture (J-39425-4), place guide loop in fixture (See View E).
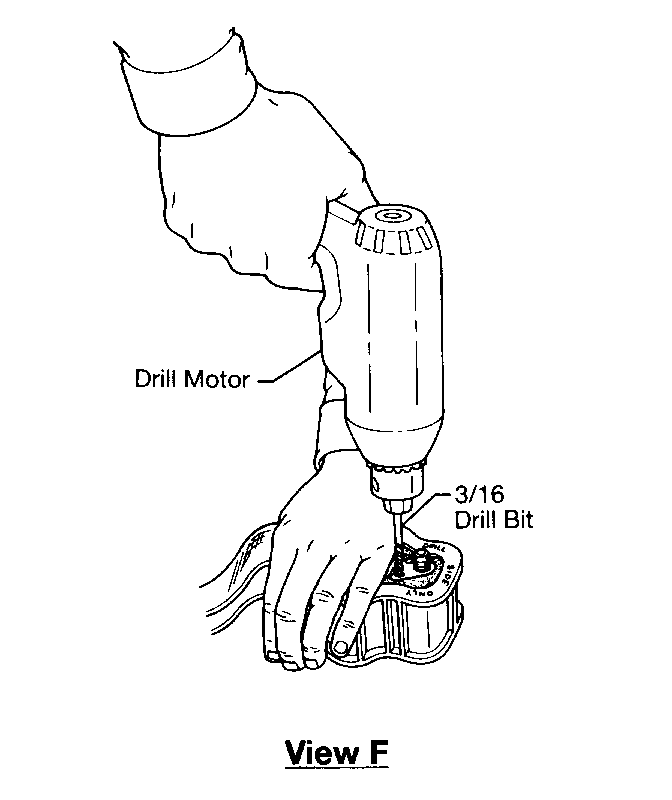
2. Locate two holes in guide loop plate on either side of threaded stud. While holding guide loop in fixture with palm, use 3/16" (5 mm) drill bit to drill through black plastic material (See View F).
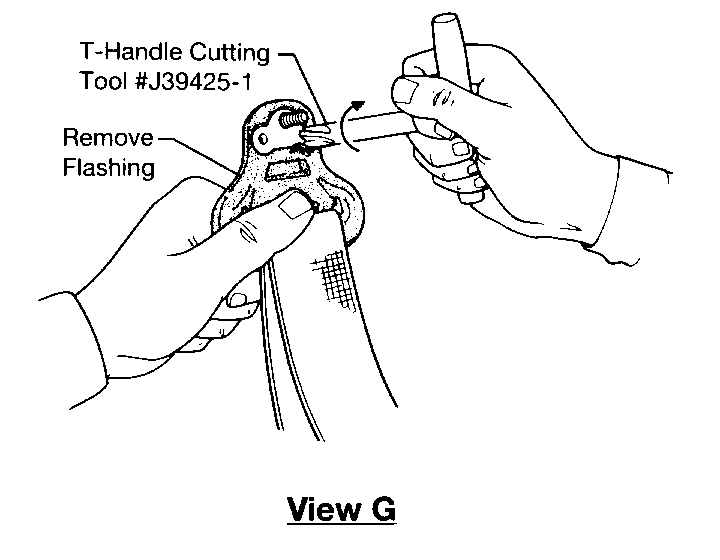
3. Using T-Handle Cutting Tool (J-39425-1) to remove all black plastic material from in and around holes in guide loop as illustrated in View G, above. This creates two circular cutouts in lower comers of triangular area on back side of guide loop.
NOTICE: TURNING HANDLE BACK AND FORTH WHILE APPLYING DOWNWARD PRESSURE HAS BEEN DETERMINED TO DO A BETTER CLEANING JOB THAN FULL ROTATION OF THE HANDLE.
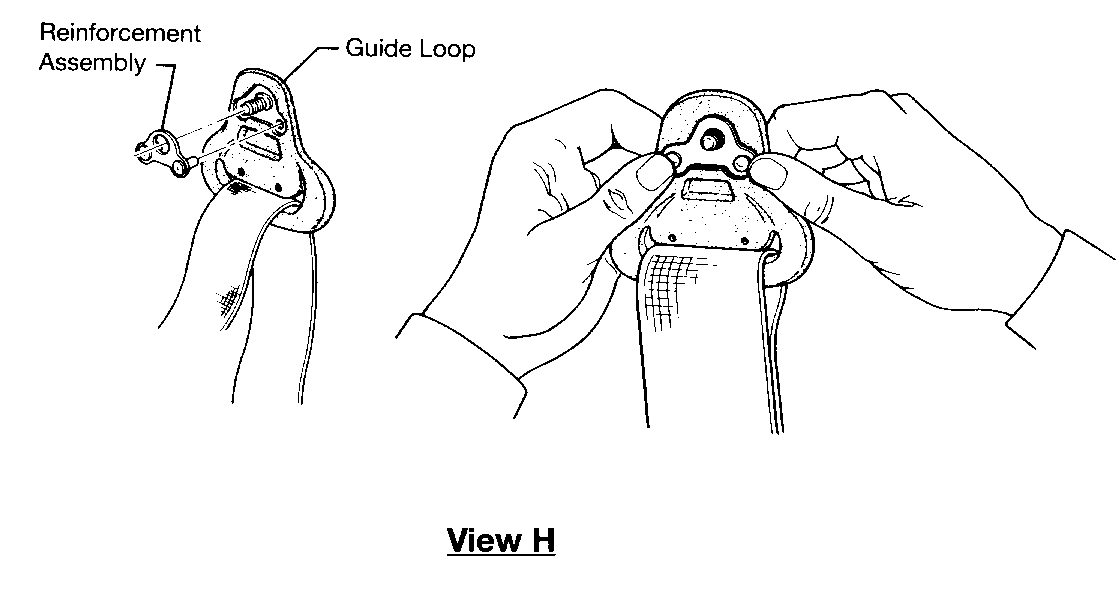
4. Install reinforcement plate studs into holes in guide loop. Ensure reinforcement plate is completely seated by firmly pressing plate into guide loop cutout area (See View H).
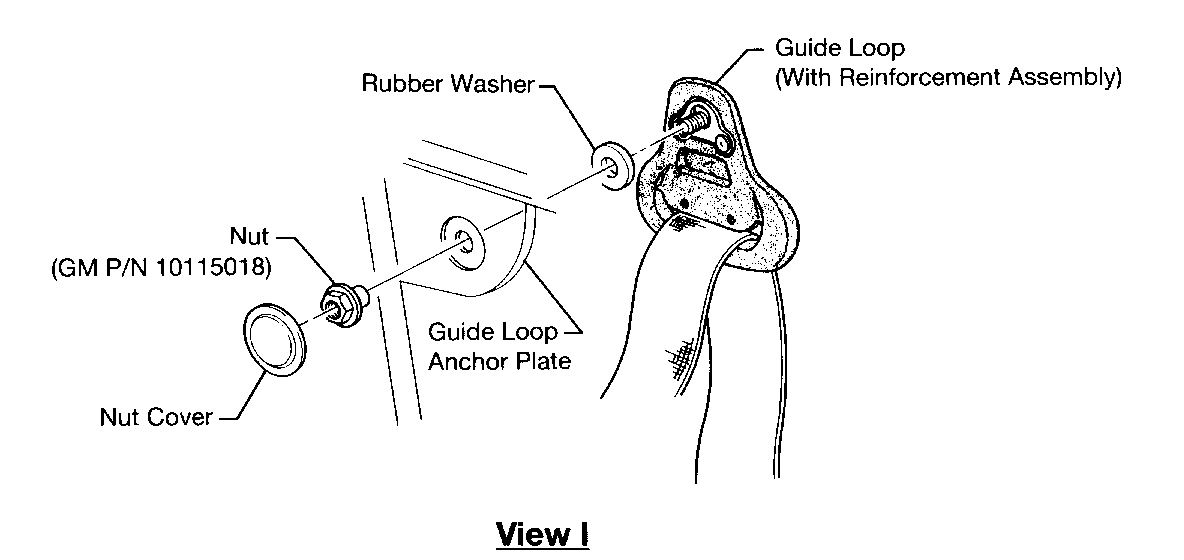
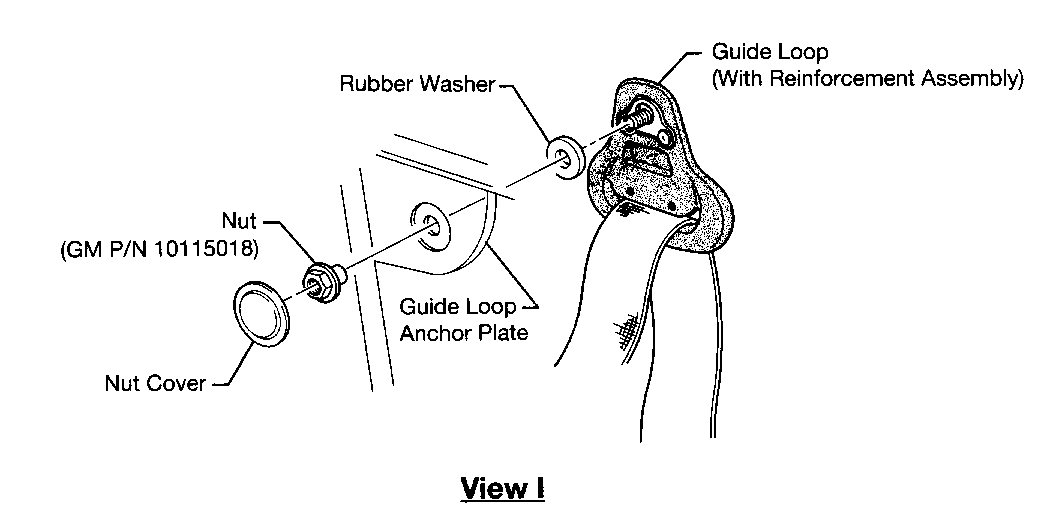
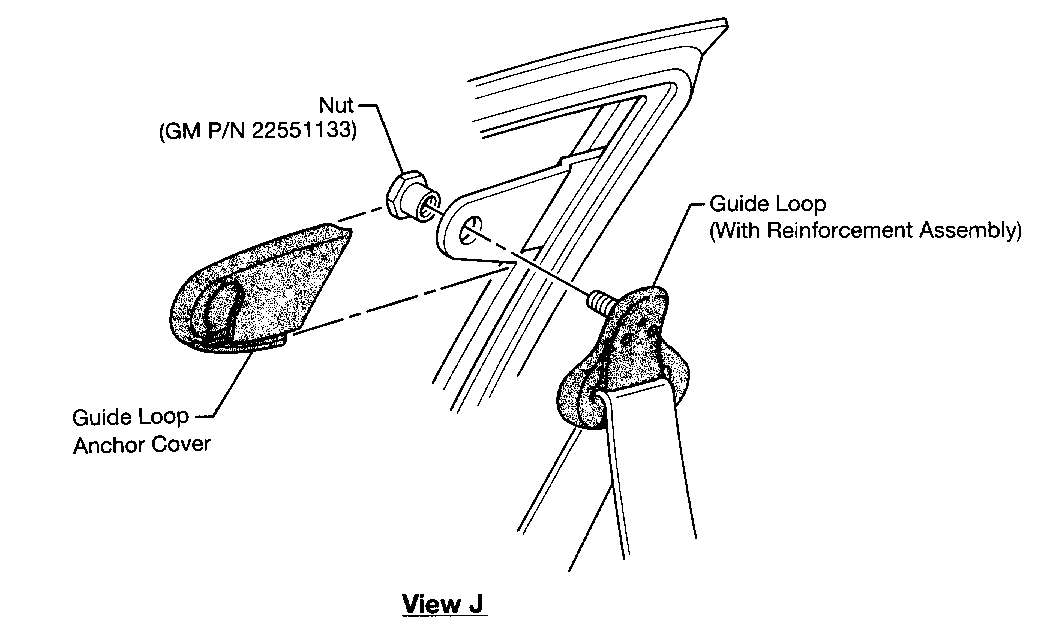
5. Reinstall guide loop (with reinforcement assembly in place) using rubber washer removed previously (W-Car Only) and new nut supplied in reinforcement kit. Torque nut to 28 N.m (21 lb. ft.). Reinstall nut cover (W-Car) or anchor cover (J-Car). See View 1, below for W-Car assembly. See View J, below for J-Car Assembly.
6. Repeat reinforcement assembly installation on opposite front door guide loop.
7. Install Campaign Identification Label.
INSTALLATION OF CAMPAIGN IDENTIFICATION LABEL:
Clean surface of radiator upper mounting panel and apply a Campaign Identification Label. Make sure the connect campaign number is inserted on the label. This will indicate that the campaign has been completed.
VEHICLE RECALL NOTICE:
February 1992
Dear General Motors Customer:
General Motors of Canada Limited has determined that certain 1991 Chevrolet Lumina, Cavalier, Pontiac Grand Prix, Sunbird, Oldsmobile Cutlass Supreme and Buick Regal model vehicles fail to comply to Canada Motor Vehicle Safety Standard (CMVSS) 208 "Seat Belt Installations." Some of these vehicles may have been built with cracked front door shoulder belt guide loops which may not provide front seat occupants with proper protection in the event of a vehicle crash.
To correct this condition, your GM dealer will inspect the front door shoulder belt guide loops on your vehicle for possible cracks. If a cracked guide loop is found, both front door shoulder belt guide loops will have reinforcing plates installed. This service will be performed for you at no charge.
Please contact your GM dealer as soon as possible to arrange a service date.
If parts are required, ask your dealer for details regarding their availability. If parts are not in stock, they can be ordered before scheduling your service date.
This letter identifies your vehicle. Presentation of this letter to your dealer will assist their Service personnel in completing the necessary correction to your vehicle in the shortest possible time.
Subsequent to contacting your dealer, further assistance, if required, may be obtained from our Customer Assistance Centre, toll free, by calling 1-800-263-3777 (English), or 1-800-263-7854 (French).
We are sorry to cause you this inconvenience; however, we have taken this action in the interest of your continued satisfaction with our products.


General Motors bulletins are intended for use by professional technicians, not a "do-it-yourselfer". They are written to inform those technicians of conditions that may occur on some vehicles, or to provide information that could assist in the proper service of a vehicle. Properly trained technicians have the equipment, tools, safety instructions and know-how to do a job properly and safely. If a condition is described, do not assume that the bulletin applies to your vehicle, or that your vehicle will have that condition. See a General Motors dealer servicing your brand of General Motors vehicle for information on whether your vehicle may benefit from the information.
