Electronic Brake Control Module Replacement w/o JL4
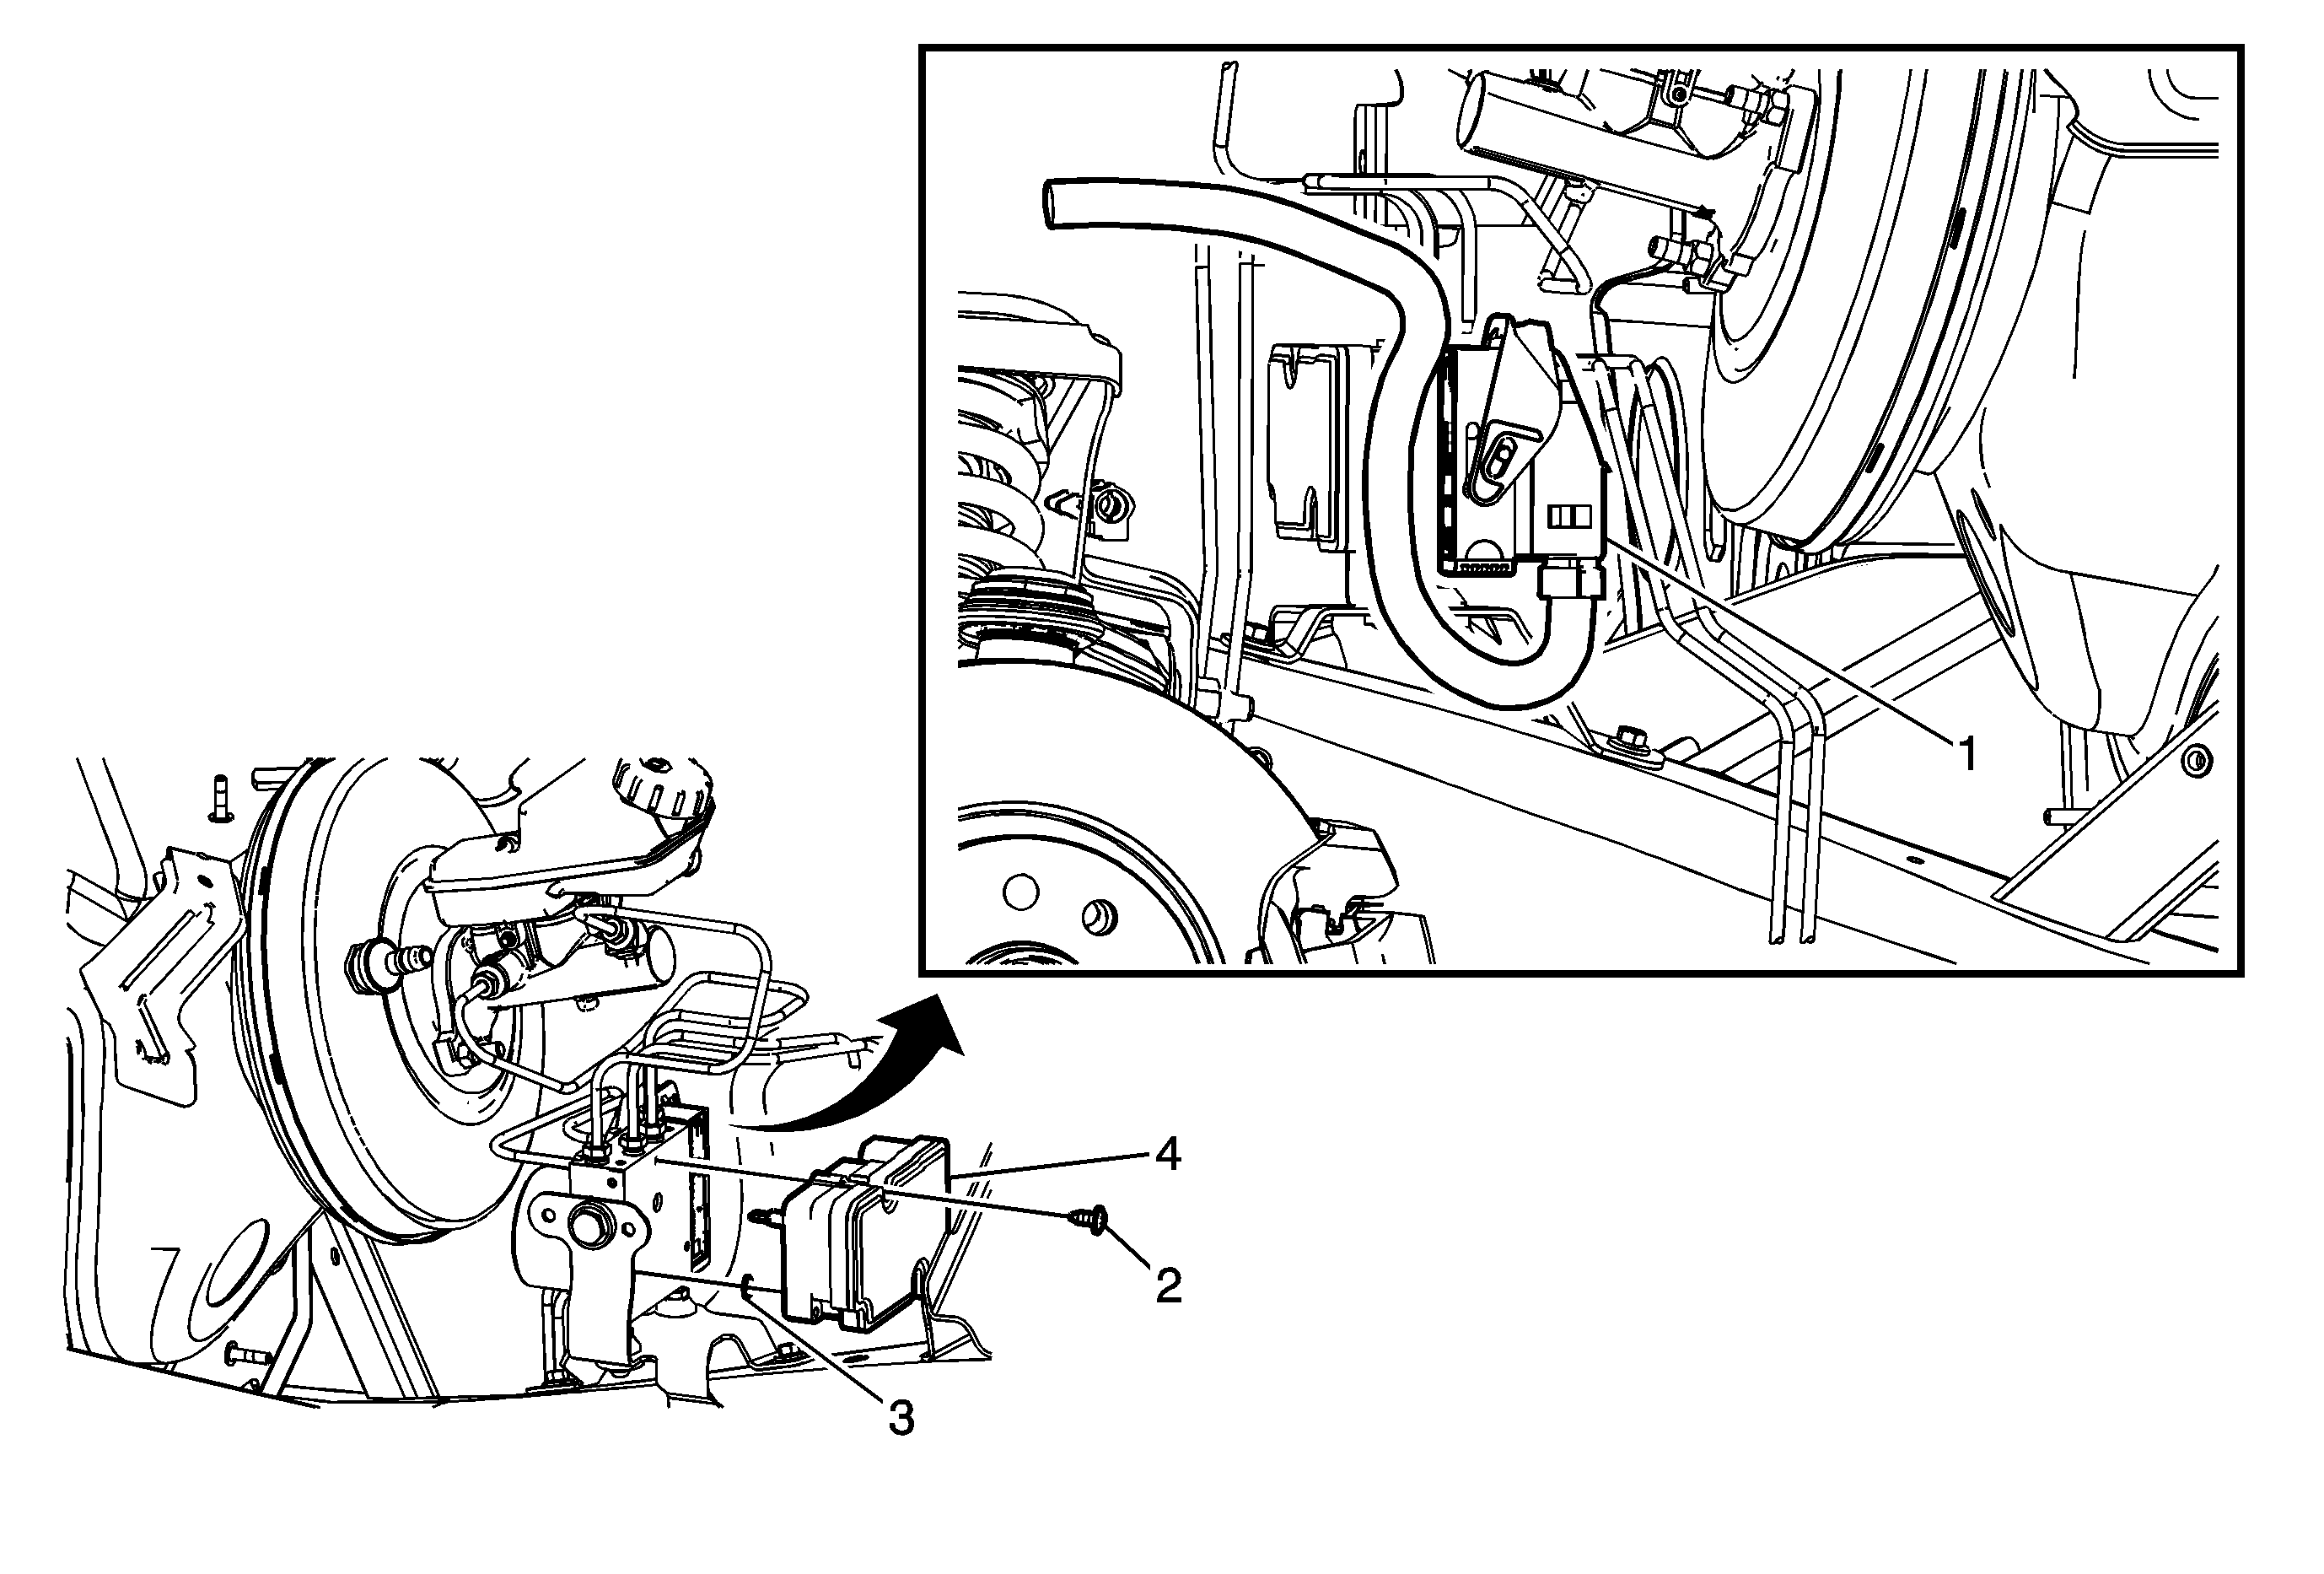
Callout | Component Name |
|---|---|
|
Notice: Always connect or disconnect the wiring harness connector from the EBCM/EBTCM with the ignition switch in the OFF position. Failure to observe this precaution could result in damage to the EBCM/EBTCM. Preliminary Procedures
| |
1 | Electronic Brake Control Module (EBCM) Electrical Connector ProcedureLift the EBCM electrical connector locking lever upward. |
2 | EBCM Screw (Qty: 3) Notice: Refer to Fastener Notice in the Preface section. Tighten |
3 | EBCM O-Ring Seal (Qty: 8) ProcedureIf installing a new EBCM, install new O-ring seals. |
4 | Electronic Brake Control Module Procedure
|
Removal Procedure
Notice: Always connect or disconnect the wiring harness connector from the EBCM/EBTCM with the ignition switch in the OFF position. Failure to observe this precaution could result in damage to the EBCM/EBTCM.
- Turn the ignition switch to the OFF position.
- Thoroughly clean the electronic brake control module (EBCM) to brake pressure modulator valve (BPMV) area of any accumulated dirt and foreign material.
- Disconnect the EBCM electrical connector (1) by lifting the locking tabs on the lower edge of the lever.
- Position the electrical connector toward the front of the vehicle.
- Disconnect the power brake booster vacuum sensor electrical connector (1).
- Disconnect the brake fluid level indicator switch electrical connector (2).
- Release the engine wiring harness retaining clip from the master cylinder mounting stud and position the harness (3) downward.
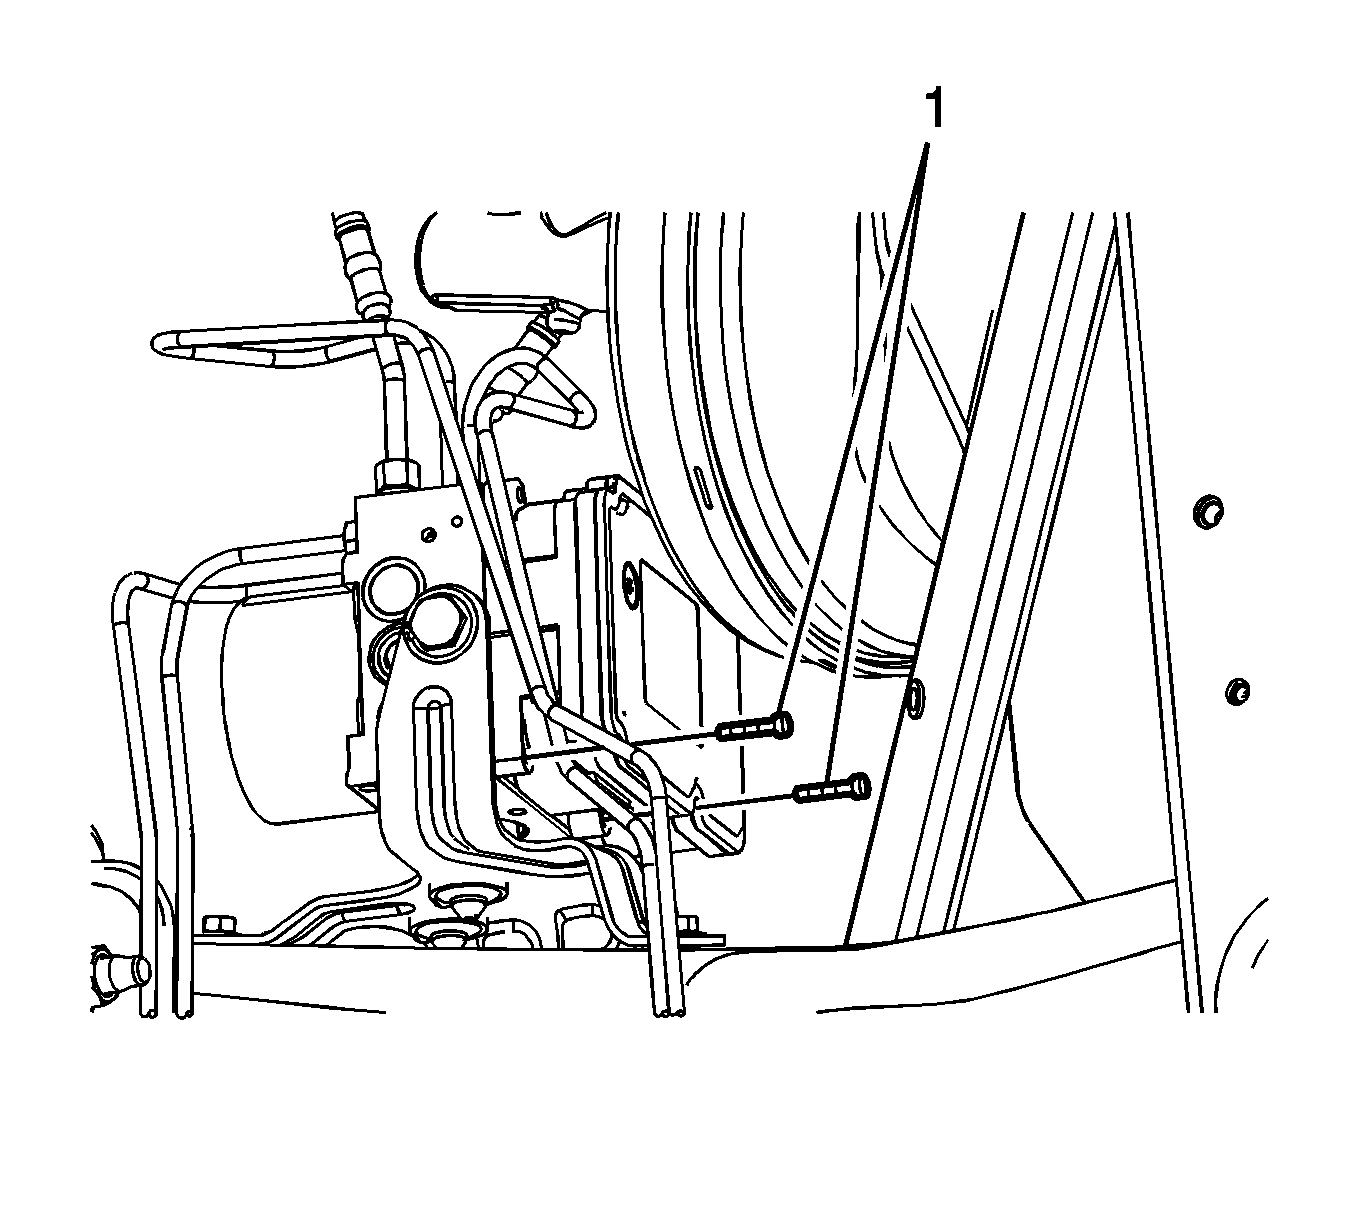
- Remove the 2 upper EBCM bolts (1).
- Remove the 2 lower EBCM bolts (1).
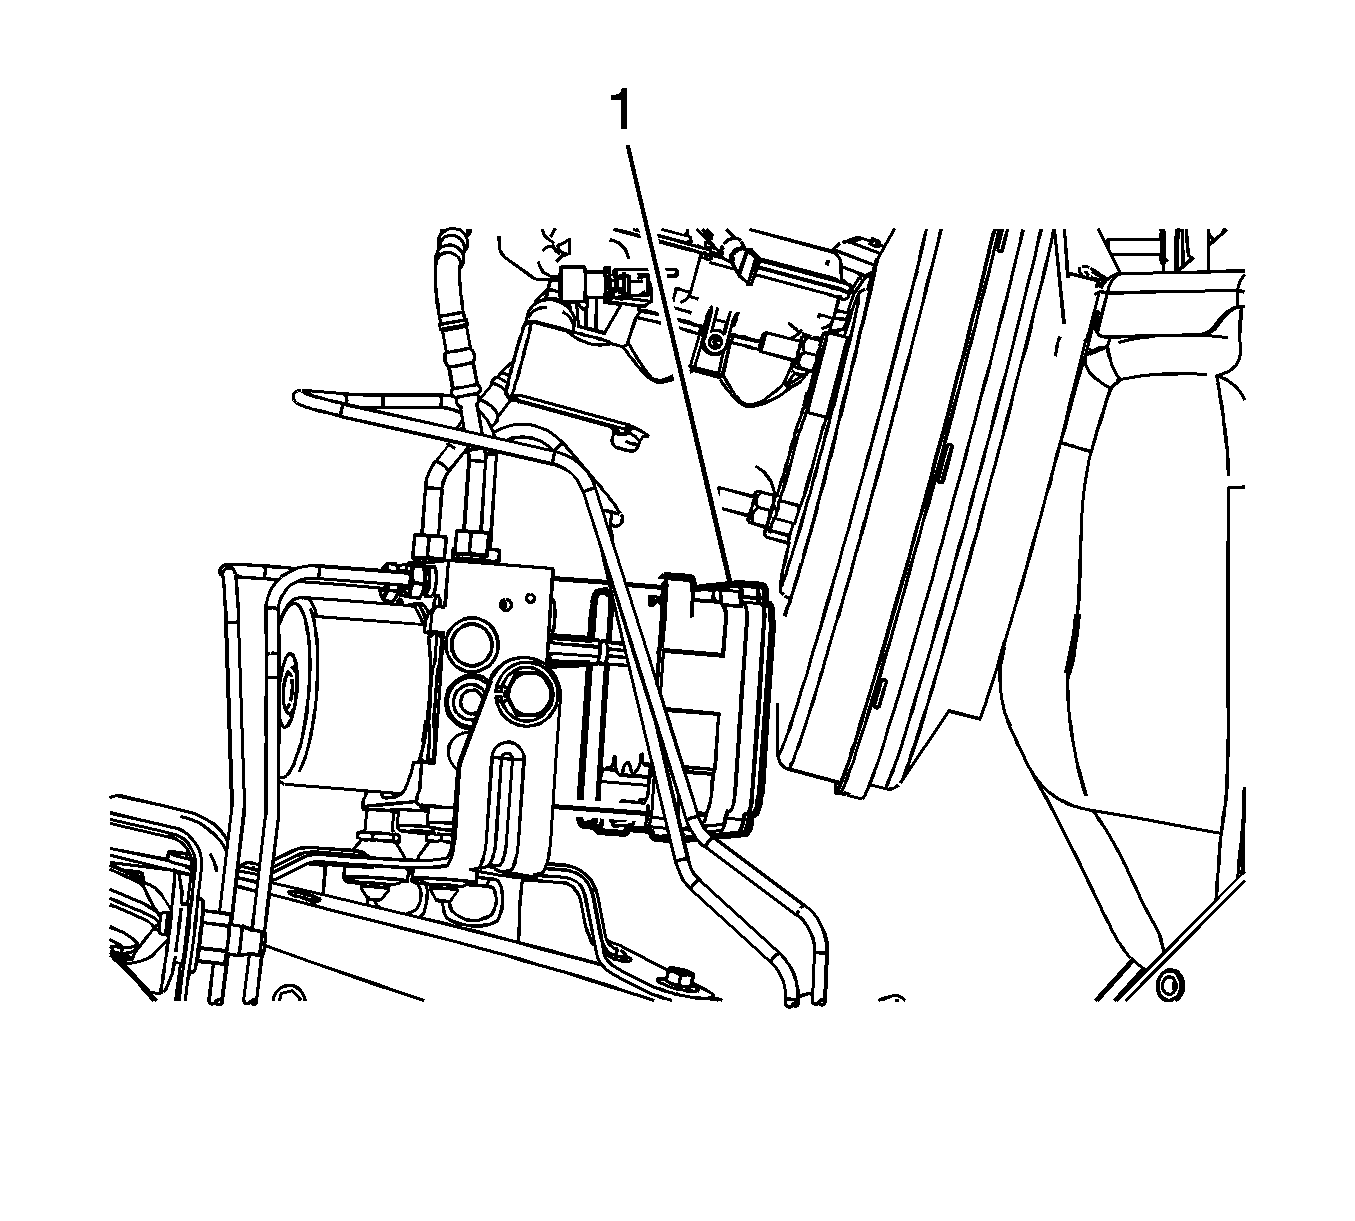
- Carefully separate the EBCM (1) from the BPMV.
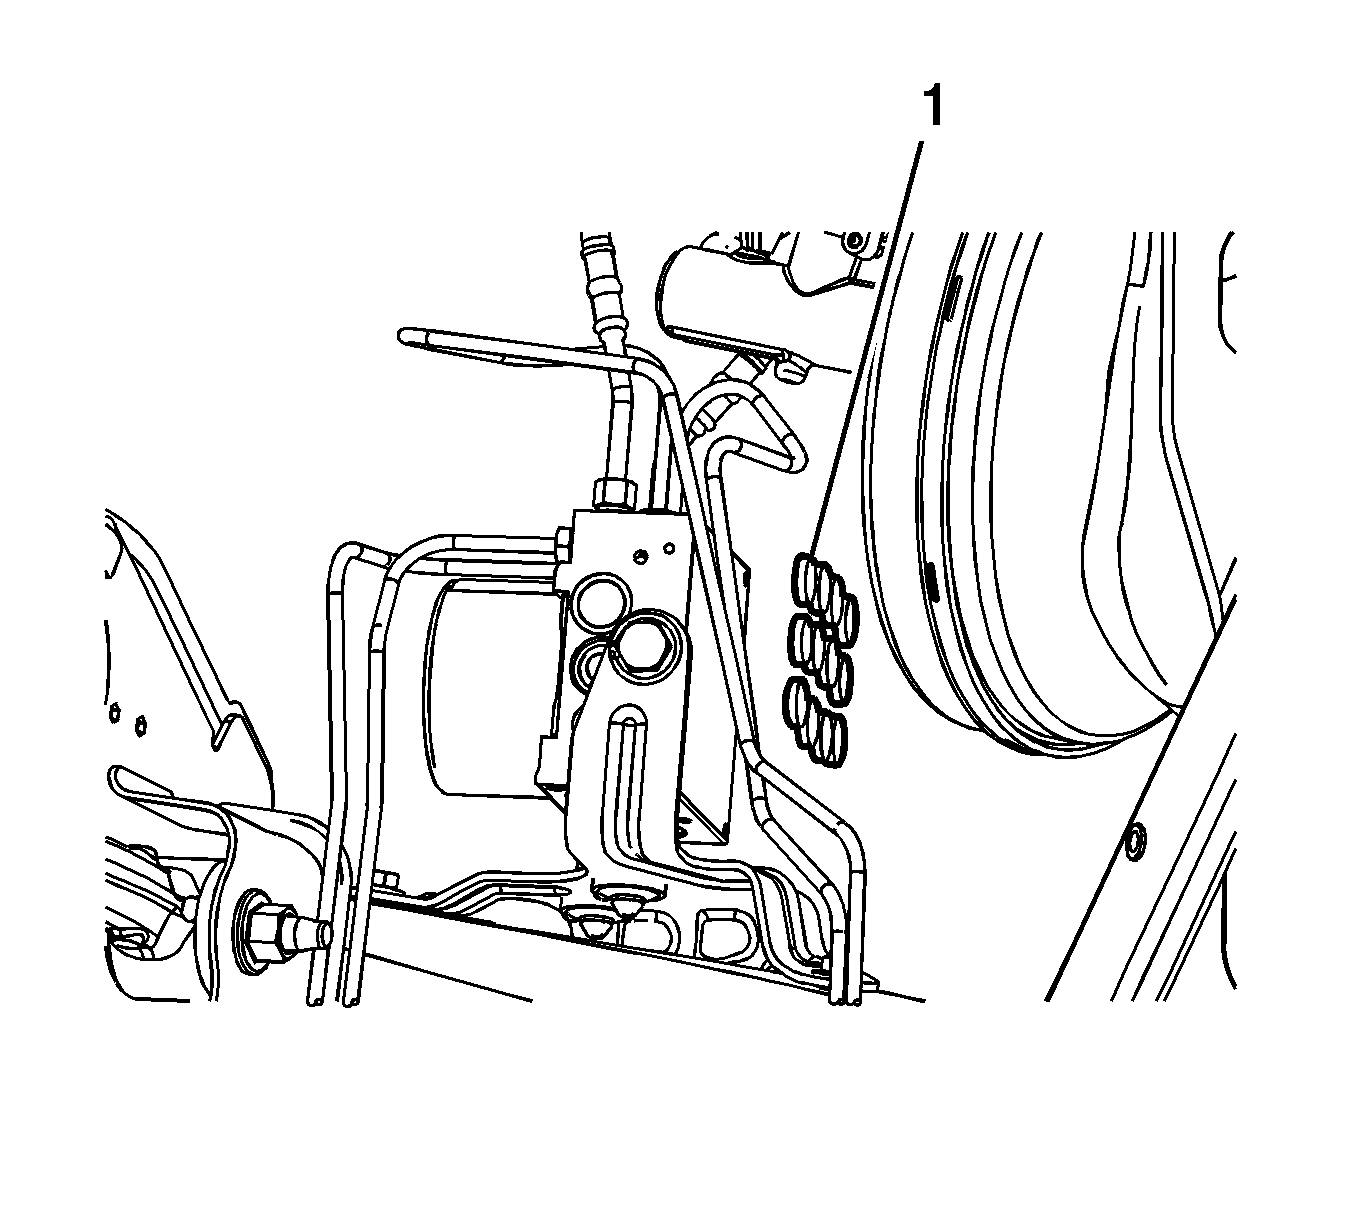
- If installing a new EBCM, remove the 12 EBCM seals (1).
- Clean the sealing surface of the BPMV with denatured alcohol and a clean shop cloth and allow to dry.
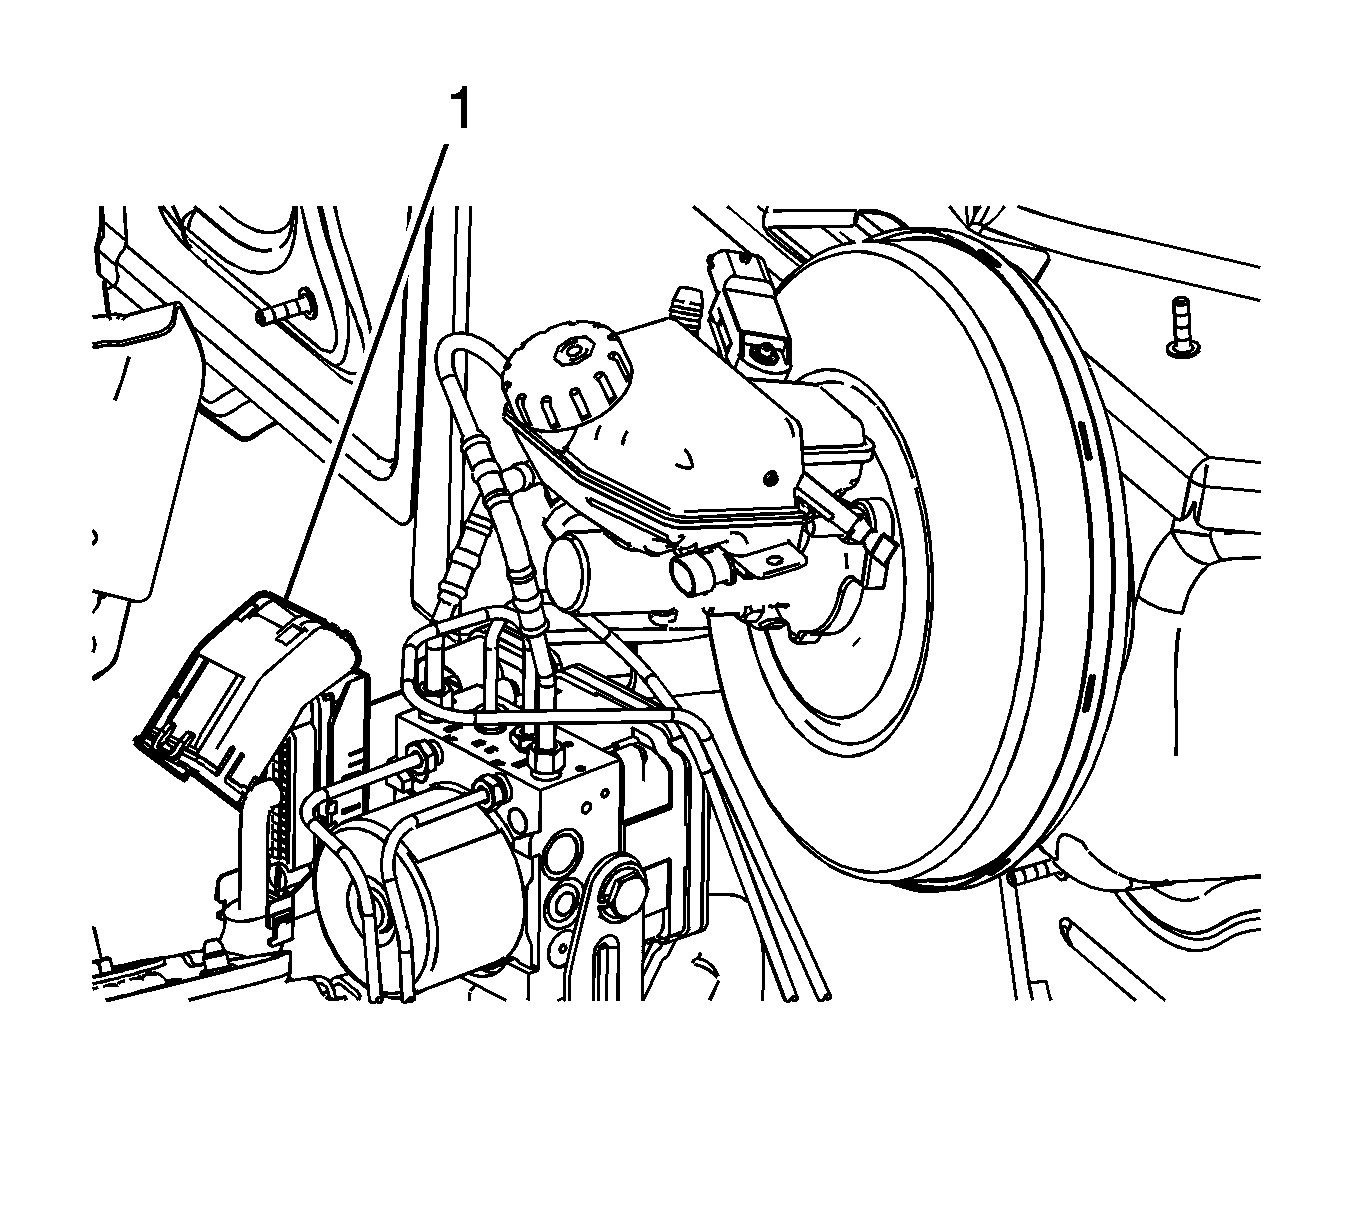
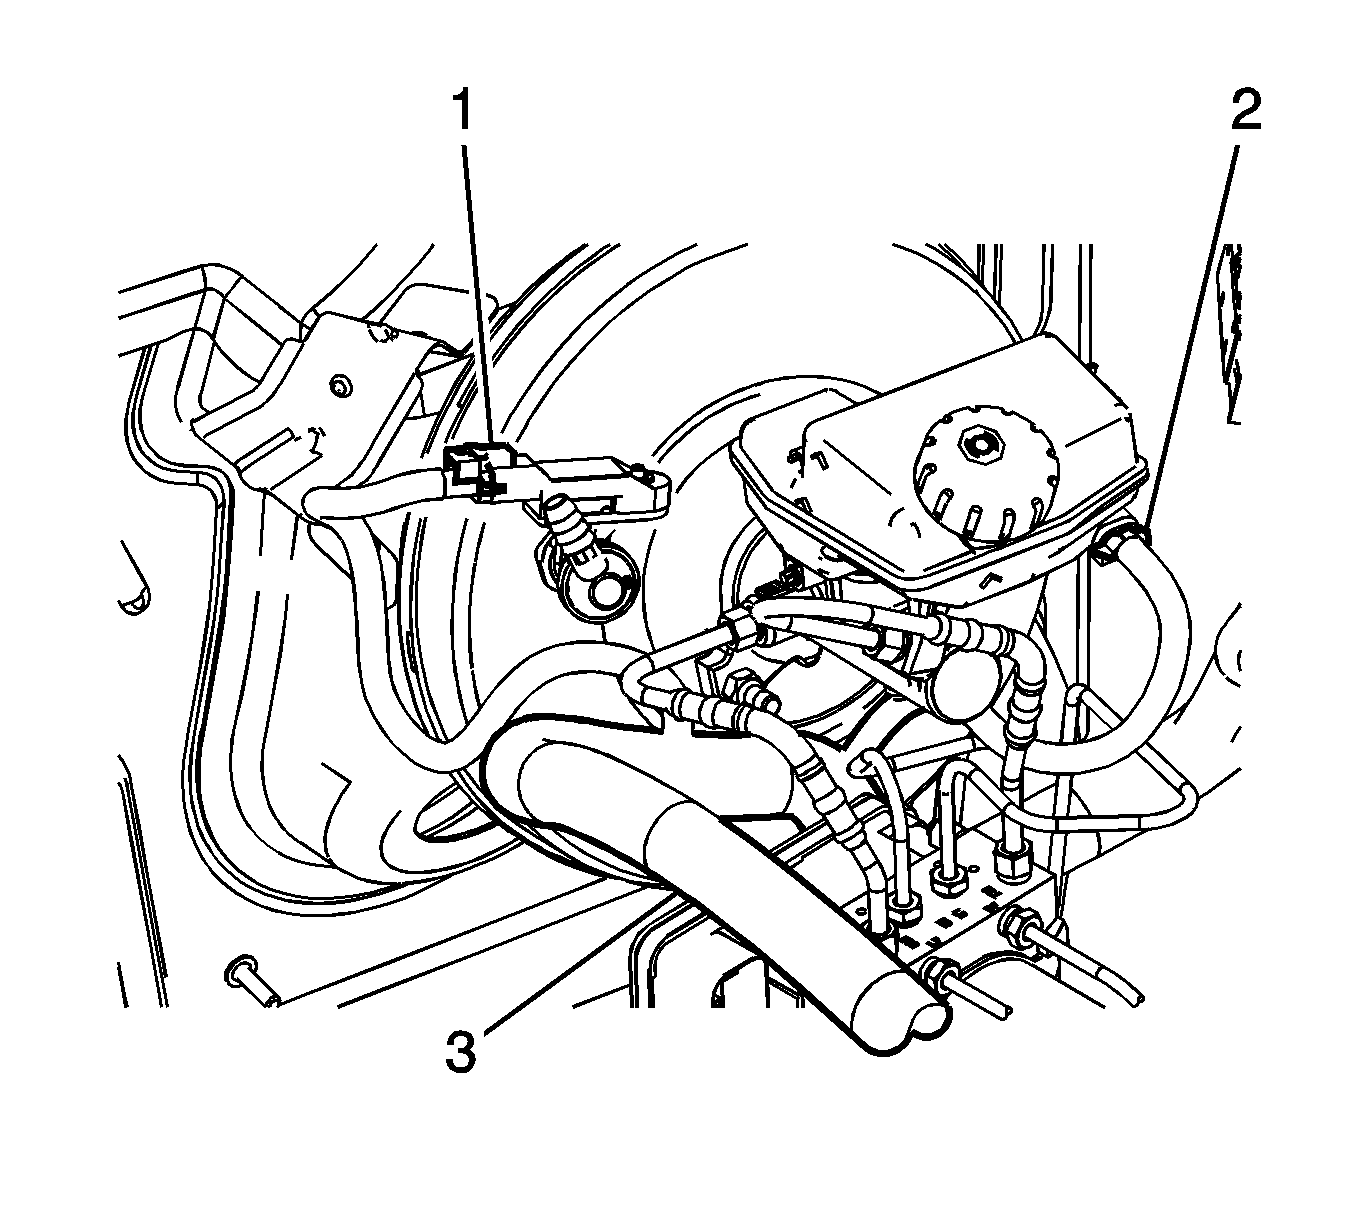
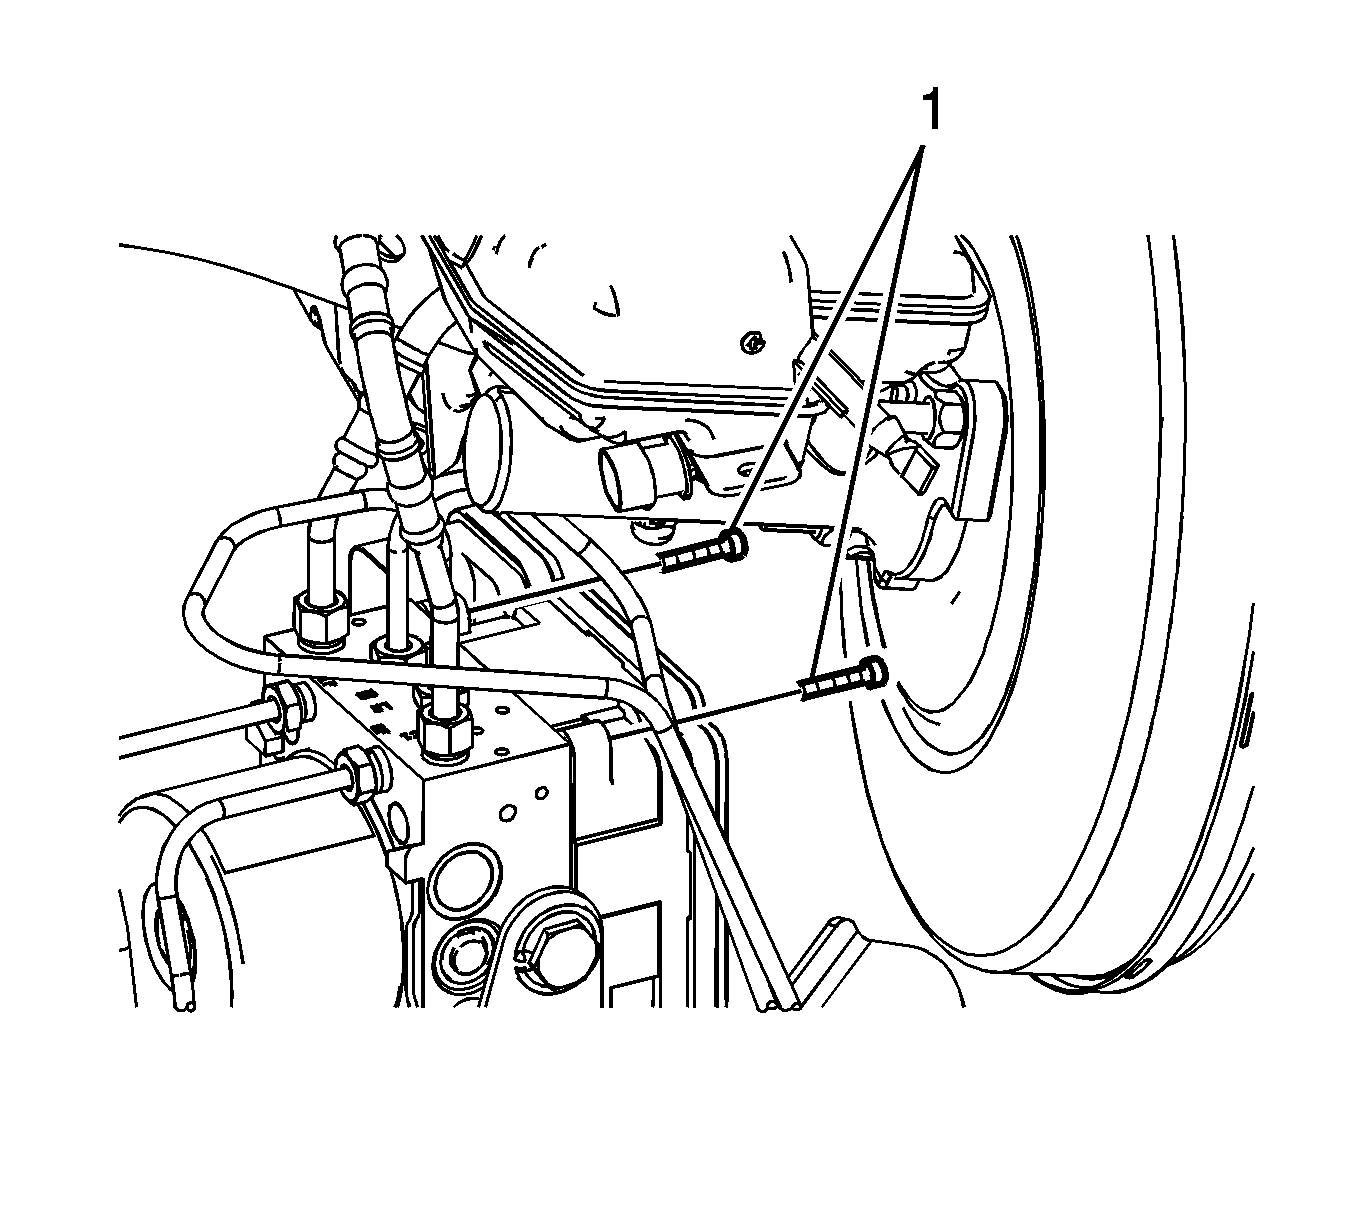
Do not pry the components apart.
Installation Procedure
- If installing a new EBCM, install the 12 EBCM seals (1).
- While aligning the brake pressure sensor to the BPMV, carefully install the EBCM (1) to the BPMV.
- Install the 2 lower EBCM bolts (1).
- Install the 2 upper EBCM bolts (1).
- Position the engine wiring harness upward and connect the power brake booster vacuum sensor electrical connector (1).
- Connect the brake fluid level indicator switch electrical connector (2).
- Install the engine wiring harness (3) retaining clip to the master cylinder mounting stud.
- Position the EBCM electrical connector (1) to the EBCM.
- If installing a new EBCM, program the EBCM. Refer to Control Module References.
- Perform the Diagnostic System Check - Vehicle.
- Observe the brake pedal feel after performing the diagnostic system check. If the pedal now feels spongy, air may have been introduced into the secondary hydraulic circuit of the brake modulator which then may have been introduced into the primary circuit. If the pedal feels spongy, perform the Antilock Brake System Automated Bleed Procedure.


Do not force the components together.
Notice: Refer to Fastener Notice in the Preface section.

Tighten
Tighten the bolts to 2.3 N·m (20 lb in).

Tighten
Tighten the bolts to 2.3 N·m (20 lb in).


Lower the lever until the locking tabs are fully engaged.
Electronic Brake Control Module Replacement w/JL4
Removal Procedure
Notice: Always connect or disconnect the wiring harness connector from the EBCM/EBTCM with the ignition switch in the OFF position. Failure to observe this precaution could result in damage to the EBCM/EBTCM.
- Turn the ignition switch to the OFF position.
- Thoroughly clean the electronic brake control module (EBCM) to brake pressure modulator valve (BPMV) area of any accumulated dirt and foreign material.
- Disconnect the EBCM electrical connector (1) by lifting the locking tabs on the lower edge of the lever.
- Position the electrical connector toward the front of the vehicle.
- Disconnect the power brake booster vacuum sensor electrical connector (1).
- Disconnect the brake fluid level indicator switch electrical connector (2).
- Release the engine wiring harness retaining clip from the master cylinder mounting stud and position the harness (3) downward.
- Remove the 2 upper EBCM bolts (1).
- Remove the 2 lower EBCM bolts (1).
- Carefully separate the EBCM (1) from the BPMV.
- If installing a new EBCM, remove the 12 EBCM seals (1).
- Clean the sealing surface of the BPMV with denatured alcohol and a clean shop cloth and allow to dry.


Do not pry the components apart.

Installation Procedure
- If installing a new EBCM, install the 12 EBCM seals (1).
- While aligning the brake pressure sensor to the BPMV, carefully install the EBCM (1) to the BPMV.
- Install the 2 lower EBCM bolts (1).
- Install the 2 upper EBCM bolts (1).
- Position the engine wiring harness upward and connect the power brake booster vacuum sensor electrical connector (1).
- Connect the brake fluid level indicator switch electrical connector (2).
- Install the engine wiring harness (3) retaining clip to the master cylinder mounting stud.
- Position the EBCM electrical connector (1) to the EBCM.
- If installing a new EBCM, program the EBCM. Refer to Electronic Brake Control Module Programming and Setup .
- Perform the Diagnostic System Check - Vehicle .
- Observe the brake pedal feel after performing the diagnostic system check. If the pedal now feels spongy, air may have been introduced into the secondary hydraulic circuit of the brake modulator which then may have been introduced into the primary circuit. If the pedal feels spongy, perform the Antilock Brake System Automated Bleed Procedure .


Do not force the components together.
Notice: Refer to Fastener Notice in the Preface section.

Tighten
Tighten the bolts to 2.3 N·m (20 lb in).

Tighten
Tighten the bolts to 2.3 N·m (20 lb in).


Lower the lever until the locking tabs are fully engaged.
