Removal Procedure
- Apply masking tape to the door frame applique.
- Remove the rear door trim panel. Refer to Rear Side Door Trim Panel Replacement .
- Remove the rear door water deflector. Refer to Rear Side Door Water Deflector Replacement .
- Remove the rear door window weatherstrip. Refer to Rear Side Door Window Weatherstrip Replacement .
- Position the window to the full down position.
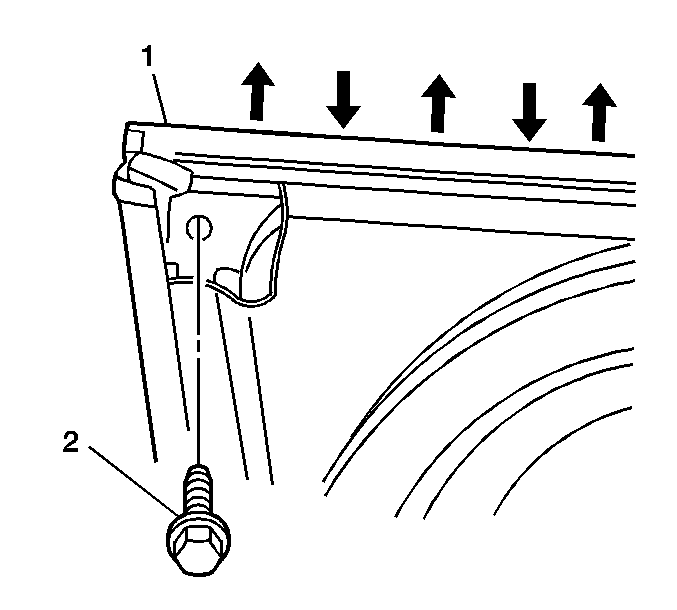
- Remove the screw (2) from the top corner of the inside door frame.
- Remove the rear door inner belt sealing strip. Refer to Rear Side Door Window Inner Sealing Strip Replacement .
- Pull forward to release the rear door stationary window from the door frame. Refer to Rear Side Door Stationary Window Replacement .
- Remove the rear door outer belt sealing strip. Refer to Rear Side Door Window Outer Sealing Strip Replacement .
- Remove the window channel weatherstrip by grasping the center and pulling downward to expose the rivets.
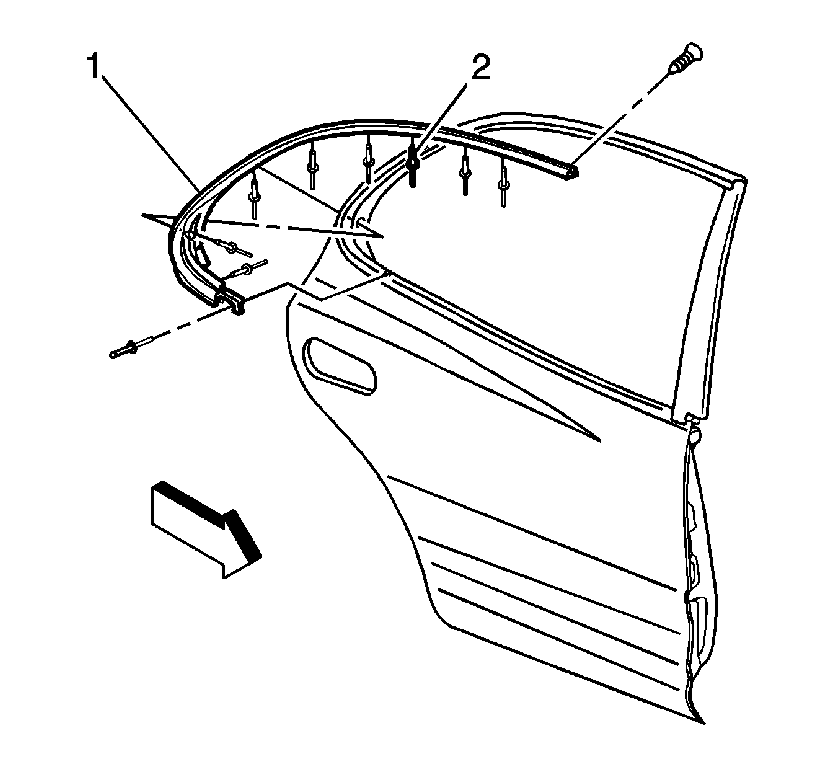
- Drill out the 4 mm (5/32 in) rivets (2) along the inside edge of the window channel retainer (1).
- Remove the window channel retainer from the door.
Notice: To avoid paint damage, protect the area surrounding the part which you are removing or installing.


Installation Procedure
- Install the window channel retainer to the door.
- Install the new 4 mm (5/32 in) rivets (2) along the inside edge of the window channel retainer.
- Install the window channel weatherstrip by working it around the door frame. Ensure that the weatherstrip is fully seated into the window channel retainer.
- Install the screw (2) to the top corner of the inside door frame.
- Install the rear door outer belt sealing strip. Refer to Rear Side Door Window Outer Sealing Strip Replacement .
- Push rearward to reset the rear door stationary window into the door frame. Refer to Rear Side Door Stationary Window Replacement .
- Install the rear door inner belt sealing strip. Refer to Rear Side Door Window Inner Sealing Strip Replacement .
- Install the rear door window weatherstrip. Refer to Rear Side Door Window Weatherstrip Replacement .
- Remove the masking tape.
- Inspect the window for proper operation.
- Install the rear door water deflector. Refer to Rear Side Door Water Deflector Replacement .
- Install the rear door trim panel. Refer to Rear Side Door Trim Panel Replacement .


Notice: Use the correct fastener in the correct location. Replacement fasteners must be the correct part number for that application. Fasteners requiring replacement or fasteners requiring the use of thread locking compound or sealant are identified in the service procedure. Do not use paints, lubricants, or corrosion inhibitors on fasteners or fastener joint surfaces unless specified. These coatings affect fastener torque and joint clamping force and may damage the fastener. Use the correct tightening sequence and specifications when installing fasteners in order to avoid damage to parts and systems.
Tighten
Tighten the screw to 2 N·m (18 lb in).
