Causes of Slow Moving Window

Caution: Disconnect the power window switch when working inside the driver door.
When operated, the Express Up/Down Feature allows the door window to move
very quickly, without stopping, which could cause personal injury.
Important: Owners may comment that the windows operate slowly when going up or down.
- Listed below are conditions that may cause a slow moving window .
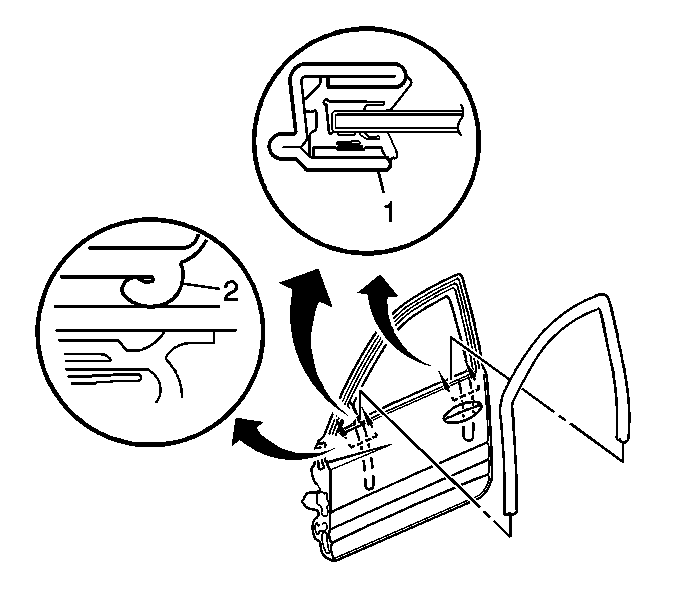
| • | The window run channel outboard lip at the rearview mirror is rolled over or the window run channel outboard lip at the rear of door frame (2). |
| • | The window is not seated in the run channel. |
| • | The window is misaligned in the opening. |
| • | The regulator is misaligned causing misalignment of the window . |
- After inspecting the conditions above, do the following:
Remove the front door trim panel. Refer to
Front Side Door Trim Panel Replacement .
- Remove the front door water deflector. Refer to
Front Side Door Water Deflector Replacement .

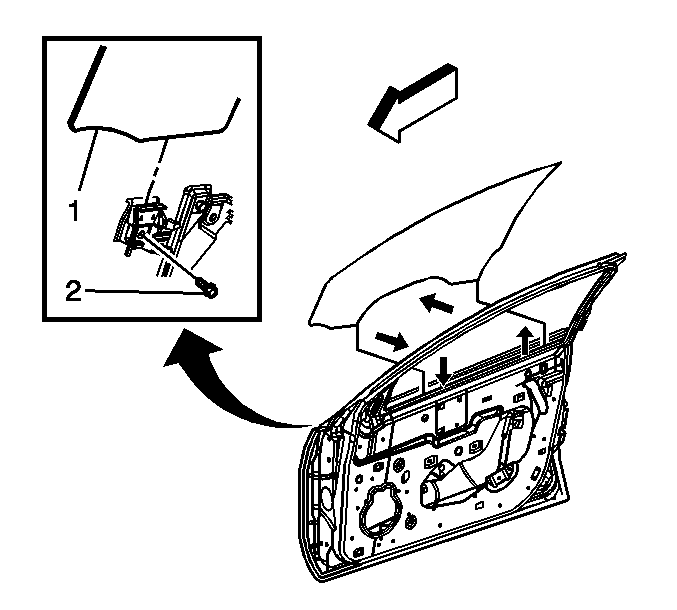
- Loosen the bolts (2) that attach the window guide channel to the window.
Ensure that the window is fully seated in the window guide channel.
- Inspect the window for equal distance between the front and rear run channels.
Notice: Use the correct fastener in the correct location. Replacement fasteners
must be the correct part number for that application. Fasteners requiring
replacement or fasteners requiring the use of thread locking compound or sealant
are identified in the service procedure. Do not use paints, lubricants, or
corrosion inhibitors on fasteners or fastener joint surfaces unless specified.
These coatings affect fastener torque and joint clamping force and may damage
the fastener. Use the correct tightening sequence and specifications when
installing fasteners in order to avoid damage to parts and systems.
- Tighten the bolts (2) that attach the window guide channel to the window.
Tighten
Tighten the bolts to 10 N·m (89 lb in).
- Inspect the window for alignment.
Adjustment Procedure

- Inspect for the following conditions before making adjustments.
| • | Using a flat-bladed tool, straighten the run channel lip by pulling it out to its correct position. |
| • | Use a flat-bladed tool to push the run channel rearward to seat it in the door frame. |
| • | Inspect the window guide channel to window bolts to ensure that they are in the proper slots and the window is not tilted forward. |
| • | Inspect the window to be straight up and down position. |
| • | Loosen the window guide channel to window bolts. |
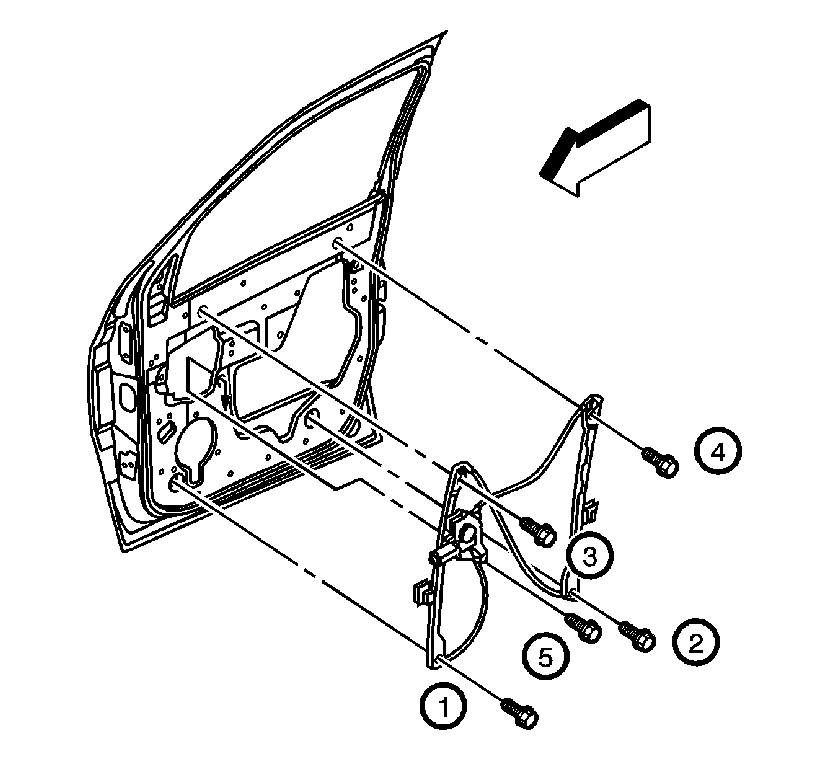
| • | Loosen the bolts that attach the window regulator to the inner door panel, in the specified sequence (1, 2, 3, 4). |
Notice: Use the correct fastener in the correct location. Replacement fasteners
must be the correct part number for that application. Fasteners requiring
replacement or fasteners requiring the use of thread locking compound or sealant
are identified in the service procedure. Do not use paints, lubricants, or
corrosion inhibitors on fasteners or fastener joint surfaces unless specified.
These coatings affect fastener torque and joint clamping force and may damage
the fastener. Use the correct tightening sequence and specifications when
installing fasteners in order to avoid damage to parts and systems.
- Tighten the window guide channel to window bolts.
Tighten
Tighten the bolts to 10 N·m (89 lb in).
- Loosen the bolts that attach the window regulator to the inner door panel in the specified sequence (1, 2, 3, 4).
Tighten
Tighten the bolts to 10 N·m (89 lb in).
- Inspect the window for proper operation.
- Install the front door water deflector. Refer to
Front Side Door Water Deflector Replacement .
- Install the front door trim panel. Refer to
Front Side Door Trim Panel Replacement .


