CAMPAIGN: SHOULDER BELT BRKT. INSTALL NEW ROTATION BRKT.

Models: 1990 Chevrolet Lumina Sedans 1990 Pontiac Grand Prix Sedans 1990 Oldsmobile Cutlass Supreme Sedans 1991 Buick Regal Sedans
General Motors of Canada has determined that a defect which relates to motor vehicle safety exists in certain 1990 Lumina, Grand Prix, Cutlass Supreme and 1991 Regal model vehicles. The front seat shoulder belt webbing in these vehicles may separate at the front seat shoulder belt upper guide loops (driver and/or passenger side). Separation of the webbing would occur without prior warning and could increase the risk of injury to belted front outboard occupants in a high energy vehicle crash. During a high energy crash event, this condition may occur if the front seat shoulder belt upper guide loop "dumps" the seat belt webbing into one corner of the guide loop and cuts the webbing.
To prevent this condition from occurring, dealers will install a controlled rotation bracket on both the driver and passenger side front seat shoulder belt guide loops. This bracket will limit the front seat shoulder belt upper guide loop's range of travel, preventing the webbing from being cut.
VEHICLES INVOLVED:
Involved are certain 1990 Chevrolet Lumina Sedan, Pontiac Grand Prix Sedan, Oldsmobile Cutlass Supreme Sedan and 1991 Buick Regal Sedan model vehicles built within the following VIN breakpoints:
Plant Year Model Plant Code From Through ----- -------- ------ ------ ------- --------- 1990 Lumina Oshawa 1&9 SOP EOP Grand Prix Fairfax F LF200003 LF328073 Cutlass Supreme Doraville D LLD300004 LD419305 1991 Regal Oshawa 1 M1400052 M1800044
All affected vehicles have been identified by the VIN listing provided to involved dealers with this bulletin. Any dealer not receiving a listing was not shipped any of the affected vehicles.
DEALER CAMPAIGN RESPONSIBILITY:
Dealers are to perform this campaign on all involved vehicles at no charge to owners, regardless of kilometres traveled, age of vehicle, or ownership, from this time forward.
Whenever a vehicle subject to this campaign is taken into your new or used vehicle inventory, or it is in your dealership for service, you are to ensure the campaign correction has been made before selling or releasing the vehicle.
Owners of vehicles recently sold from your new vehicle inventory are to be contacted by the dealer, and arrangements made to make the required modification according to instructions contained in this bulletin.
CAMPAIGN PROCEDURE:
Refer to Section 4 of the Service Policies and Procedures Manual for the detailed procedure on handling Product Campaigns. Dealers are requested to complete the campaign on all transfers as soon as possible.
OWNER NOTIFICATION:
All owners of record at the time of campaign release are shown on the attached computer listing and have been notified by first class mail from General Motors. The listings provided are for campaign activity only and should not be used for any other purpose.
PARTS INFORMATION:
Parts required to complete this campaign should be ordered through regular channels, as follows:
NOTICE: DURING THE EARLY STAGES OF THIS PRODUCT SAFETY CAMPAIGN, PARTS DEPARTMENT CENTRES MAY RESTRICT THE NUMBER OF KITS WHICH MAY BE REQUESTED ON ANY ONE ORDER DUE TO AVAILABLE PARTS QUANTITIES.
Part Number Description Quantity/Vehicle ---------- --------------------------- ----------------- 10192005 Controlled Rotation Bracket Kit - 1 Each Kit Contains 2 Brackets & 2 Nuts
SPECIAL TOOLS
Each dealer will be shipped a Shoulder Belt Guide Loop Holder tool, J-39049, during the week of February 25, 199 1. The tool is being furnished at no charge to the dealer. Each tool package will be identified with Campaign Number 1D02. Additional tools, if required, may be ordered from Kent-Moore.
PARTS AND LABOUR CLAIM INFORMATION:
Credit for the campaign work performed will be paid upon receipt of a properly completed campaign claim card or DCS transmission in accordance with the following:
Repair Code Description Time Allowance ---------- ------------------------ --------------- 2A Install CRB on Left and Right Seat Belts .5
Time allowance includes 0. 1 hour for dealer administrative detail associated with this campaign. Parts credit will be based on dealer net plus 30% to cover parts handling.
SERVICE PROCEDURE:
Tools Required: J-39049 Shoulder Belt Guide Loop Holder
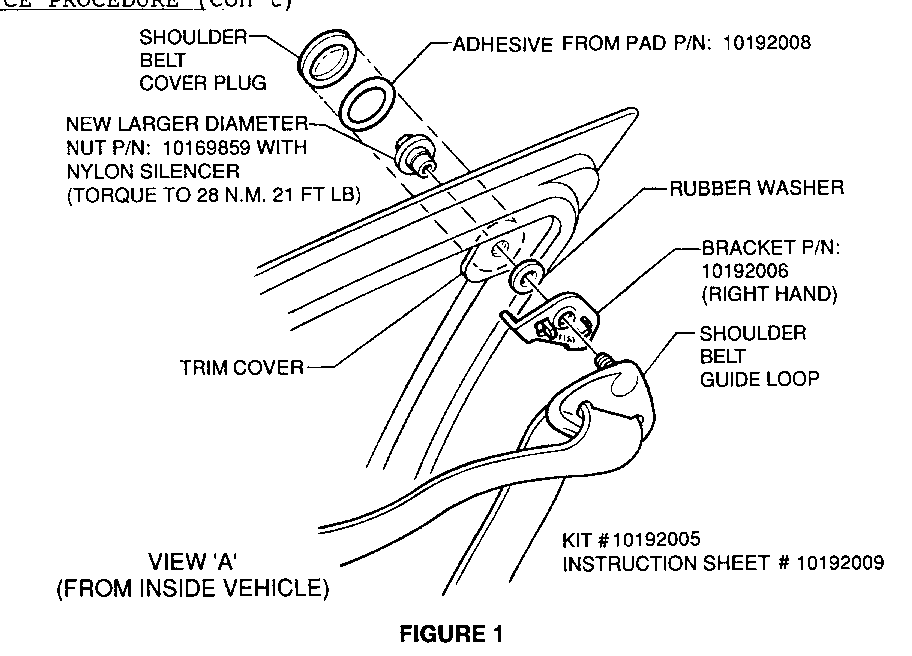
NOTICE: Figure 1 below illustrates all required parts/changes to complete the campaign procedure. Figures 2-4 of this procedure are found on pages 5-7. All parts required for this procedure are included in the service kit.
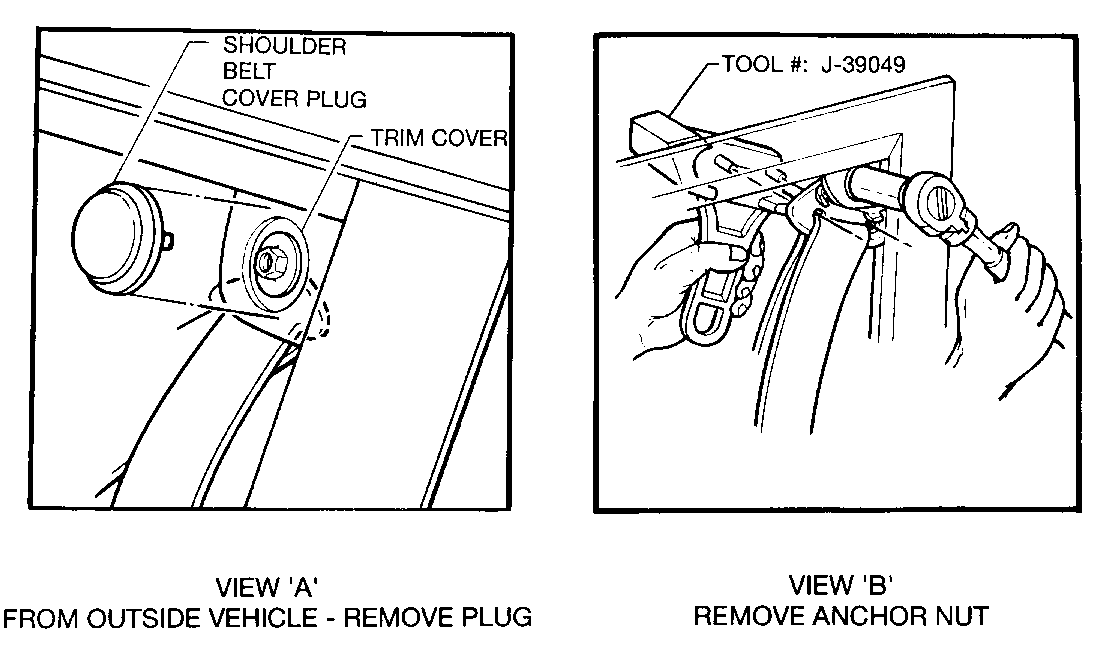
1. Lower front door window glass and remove (pry off) plastic shoulder belt plug cover working from the outside of vehicle (Fig. 2, View "A").
2. Remove nut and rubber washer from guide loop stud using tool J-39049 (Fig. 2, View "B") to prevent guide loop from turning while removing nut. Retain rubber washer for reinstallation.
NOTICE: Certain early production vehicles may utilize a shoulder on the trim cover in place of rubber washer. This condition is normal. For vehicles with this style trim cover, disregard references to rubber washer and proceed with remainder of repair.
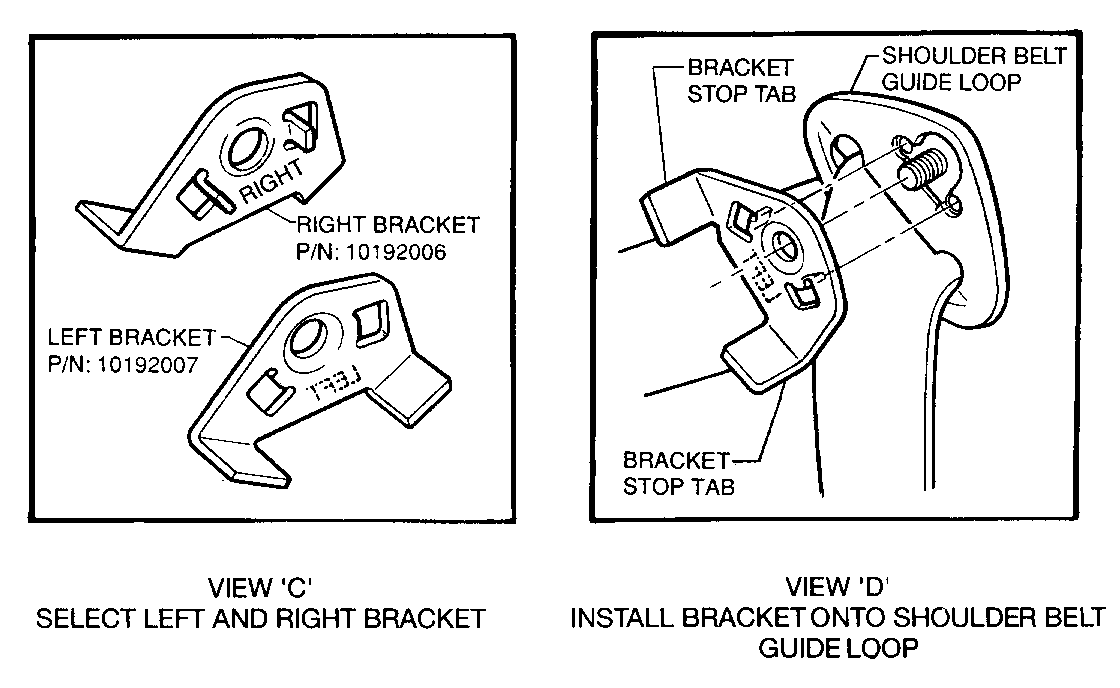
3. Select bracket designated by the word "LEFT" for the driver's side front door and the bracket designated by the word "RIGHT" for the passenger's side front door (Fig. 2, View "C").
4. Working on the outside of vehicle, install appropriate bracket for the door being repaired onto back side of shoulder belt guide loop. Insert locators on bracket into the depressions in the back of the shoulder belt guide loop (Fig. 2, View "D").
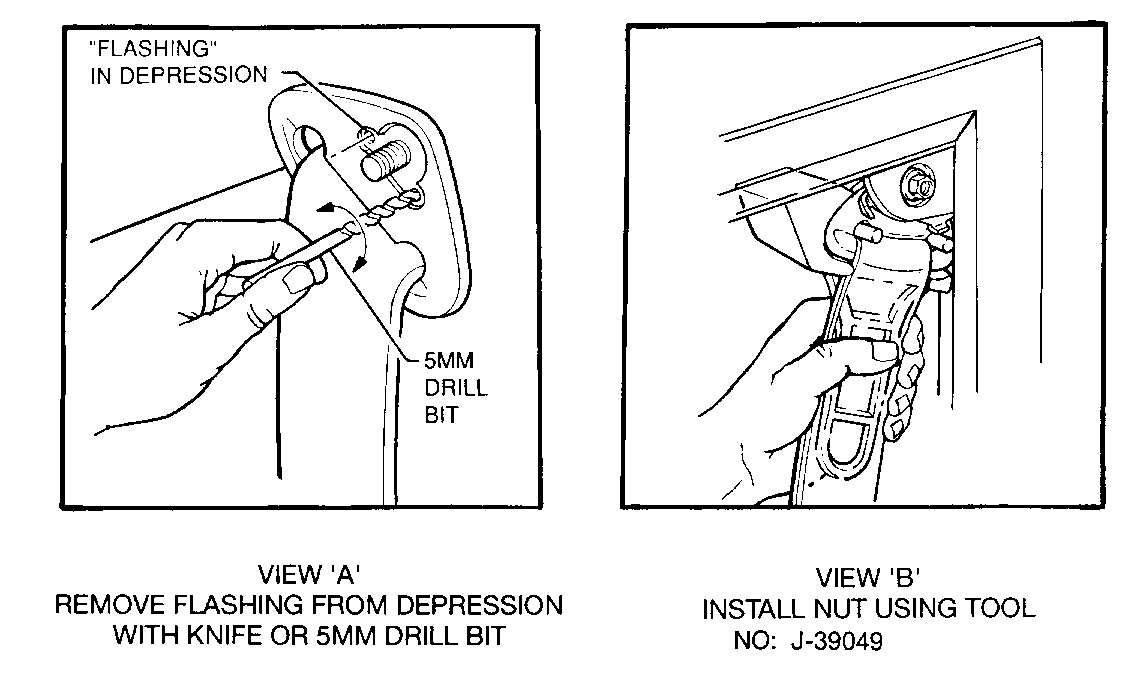
NOTICE: If the depressions in the back of the shoulder belt guide loop have plastic "flashings" in the holes from the moulding process, it will be necessary to remove these "flashings" with a drill bit (5 mm) or a knife. This allows the bracket to sit flat against the shoulder belt guide loop. If a drill bit is used for this procedure, turn the drill bit by hand. Do not drill through front of guide loop (Fig. 3, View "A").
5. Insert new, larger diameter nut (with plastic silencer) through anchor plate and place rubber washer over shoulder of nut (between anchor plate and guide loop with bracket installed).
6. Put guide loop with bracket into place and thread new nut onto the guide loop stud (Fig. 3, View "B"). Torque nut to 28 N.m (21 lb. ft).
NOTICE: To prevent guide loop from turning while installing nut, use tool J-39049. DO NOT USE BRACKET STOP TABS TO HOLD SHOULDER BELT GUIDE LOOP WHILE TIGHTENING NUT AS THIS MAY DAMAGE THE BRACKET.
7. Rotate safety belt guide loop and verify that it rotates freely between the bracket stop tabs.
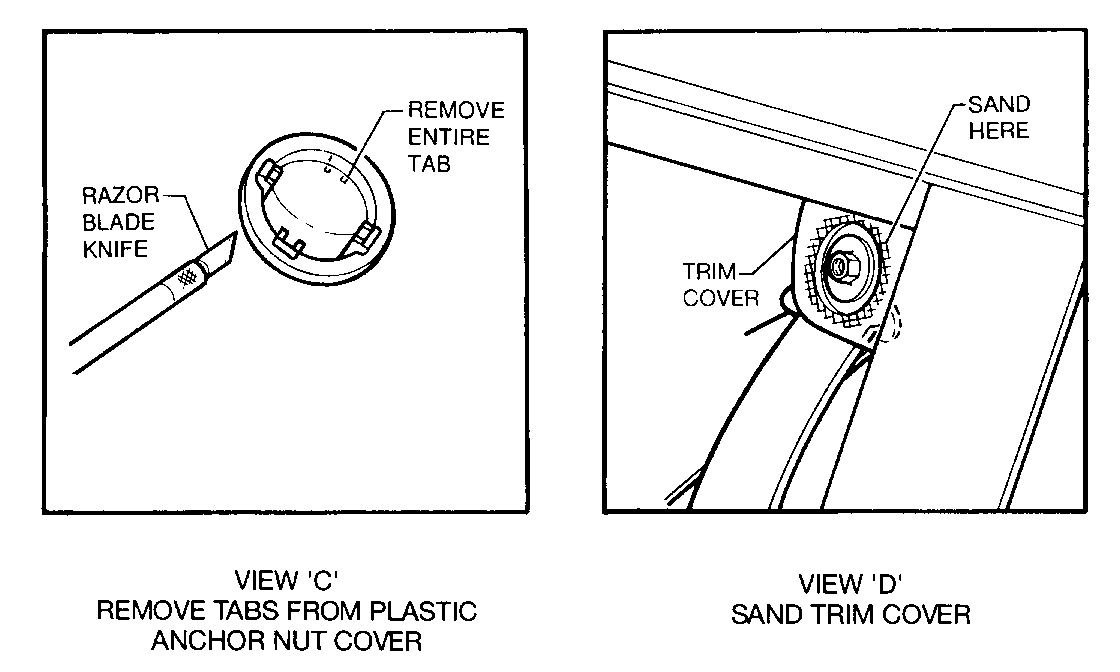
8. Using a sharp knife or razor blade, remove retaining tabs from plastic anchor nut cover. Be sure to remove entire tab so that a flat surface remains as shown in Figure 3, View "C."
9. Lightly sand face of shoulder belt cover plug so that surface is flat and fire of burrs.
10. Lightly sand face of trim cover as shown in Figure 3, View "D." Take care to sand only where the shoulder belt
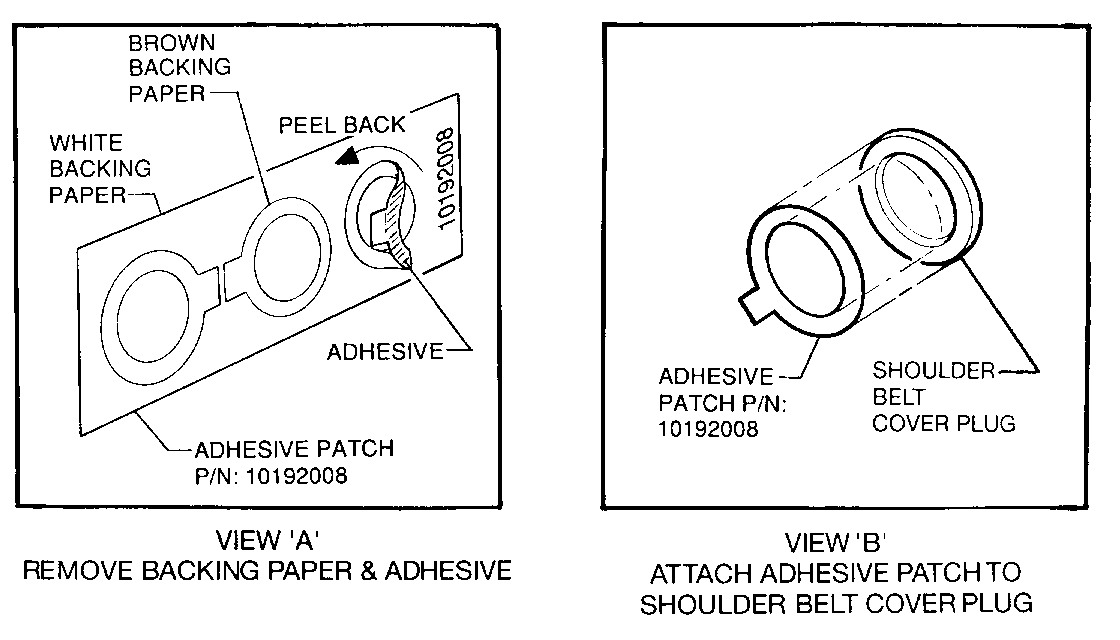
11. Apply adhesive to plastic shoulder belt cover plug by placing the brown backing paper with adhesive onto the shoulder belt cover plug and press firmly. Carefully remove brown backing paper. Be sure adhesive remains on the shoulder belt cover plug.
NOTICE: THE ADHESIVE PATCH IS VERY DELICATE. TAKE CARE TO HANDLE ONLY THE BACKING PAPER. DO NOT TOUCH ADHESIVE AS IT MAY BE DAMAGED.
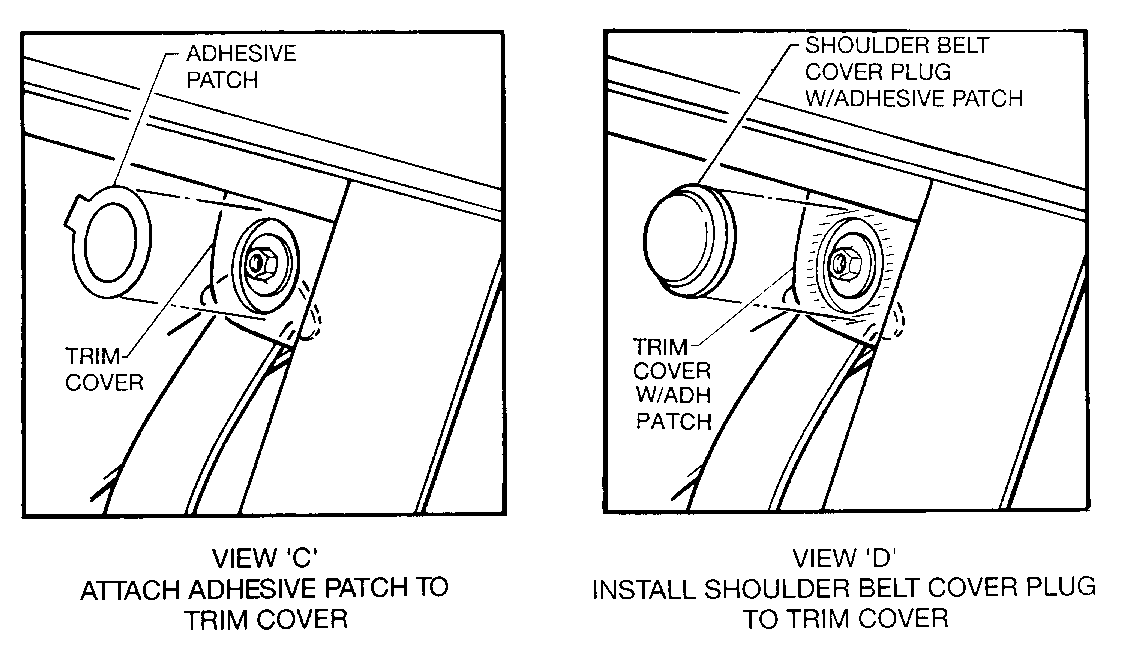
12. Apply the adhesive to trim cover by placing brown backing paper with adhesive onto the trim cover and press firmly. Carefully remove brown backing paper. Be sure adhesive remains on trim cover (Fig. 4, Views "A", "B" and "C").
13. Affix plastic shoulder belt cover plug to the trim cover, taking care to centre cap over hole and adhesive area (Fig. 4, View "D").
14. Repeat above steps 1- 13 for opposite front door of vehicle.
15. Install Campaign Identification Label.
INSTALLATION OF CAMPAIGN IDENTIFICATION LABEL
Clean surface of radiator upper mounting panel and apply a Campaign Identification Label. Make sure the correct campaign number is inserted on the label. This will indicate that the campaign has been completed.
Dear General Motors Customer:
General Motors of Canada has determined that a defect which relates to motor vehicle safety exists in certain 1990 Chevrolet Lumina Sedan, Pontiac Grand Prix Sedan, Oldsmobile Cutlass Supreme Sedan and 1991 Buick Regal Sedan model vehicles. The front seat shoulder belt webbing in these vehicles may separate at the front seat shoulder belt upper guide loops (driver and/or passenger side). Separation of the webbing would occur without prior warning and could increase the risk of injury to belted front outboard occupants in a high energy vehicle crash. During a high energy crash event, this condition may occur if the front seat shoulder belt upper guide loop "dumps" the seat belt webbing into one comer of the guide loop and cuts the webbing.
To prevent this condition from occurring, your General Motors dealer will install a controlled rotation bracket on both the driver and passenger side front seat shoulder belt guide loops. This bracket will limit the front seat shoulder belt upper guide loop's range of travel, preventing the webbing from being cut.
This service will be performed for you at no charge.
Please contact your GM dealer as soon as possible to arrange a service date and so the dealer may order the necessary parts for the repair. Instructions for making this correction have been sent to your dealer and parts will be available beginning March 18, 1991.
This letter identifies your vehicle. Presentation of this letter to your dealer will assist their Service personnel in completing the necessary correction to your vehicle in the shortest possible time.
Further assistance, if required, may be obtained from our Customer Assistance Centre, toll free, by calling 1-800-263-3777, or if you live in Quebec, 1-800-263-7854.
We are sorry to cause you this inconvenience; however, we have taken this action in the interest of your continued satisfaction with our products.
General Motors bulletins are intended for use by professional technicians, not a "do-it-yourselfer". They are written to inform those technicians of conditions that may occur on some vehicles, or to provide information that could assist in the proper service of a vehicle. Properly trained technicians have the equipment, tools, safety instructions and know-how to do a job properly and safely. If a condition is described, do not assume that the bulletin applies to your vehicle, or that your vehicle will have that condition. See a General Motors dealer servicing your brand of General Motors vehicle for information on whether your vehicle may benefit from the information.
