TIRE TO PLASTIC WHEELHOUSE INTERFERENCE/ PROCEDURE

*VEHICLES AFFECTED: 1986-90 F-CAR
THIS BULLETIN HAS BEEN REVISED TO INCLUDE 1986, 1987 AND 1988 MODEL YEARS AND TO ADD THE IMPORTANT STATEMENT.
Some 1986 and 1990 Pontiac Firebird "Formula", "Trans Am" and "GTA" models with 16 inch rims may exhibit tire to wheelhouse contact during full turns. It is recommended that P/N 10166795, (a parts kit) and the following set of instructions be used to address this condition:
*IMPORTANT:
If the vehicle is an 1986, 1987 or 1988 model with 16 inch wheels, the existing wheelhouse liner will need to be removed and replaced with a modified version (rather than just modifying the existing liner as with the 1989 and 1990 models). This replacement requires the new liners, P/N 10139546 for right side, and 10118487 for the left side. The liner parts kit, P/N 10166795 and 8 plastic fasteners, P/N 10121502. A new liner which is already modified will be available when existing stock depleted. This new liner must be installed on ALL vehicles in the following fashion as necessary.
1. Raise vehicle on hoist with steering wheel unlocked. (It will be necessary to turn the wheels to obtain access to fasteners).
2. A). If the vehicle is a "Formula" model, remove the fastener which attaches the liner to the front air dam.
B). If the vehicle is a "Trans Am" or "GTA" model, remove the two screws holding the lower front facia to the fender flange.
3. Using diagonal pliers, cut the lower four (4) plastic fasteners at the rear of the liner, and the lower three (3) plastic fasteners at the front of the liner on the fender flange. On the "Trans Am" and "GTA" models, there is no fastener in the lower front hole, so removal of only two plastic fasteners is required on the front of the liner.
NOTICE: ATTEMPTING TO REMOVE THE FASTENERS BY PRYING THEM OUT MAY CAUSE FENDER FLANGE DISTORTION, AND IS NOT RECOMMENDED.
4. Remove the inboard attaching screws which holds the liner to the wheel housing.
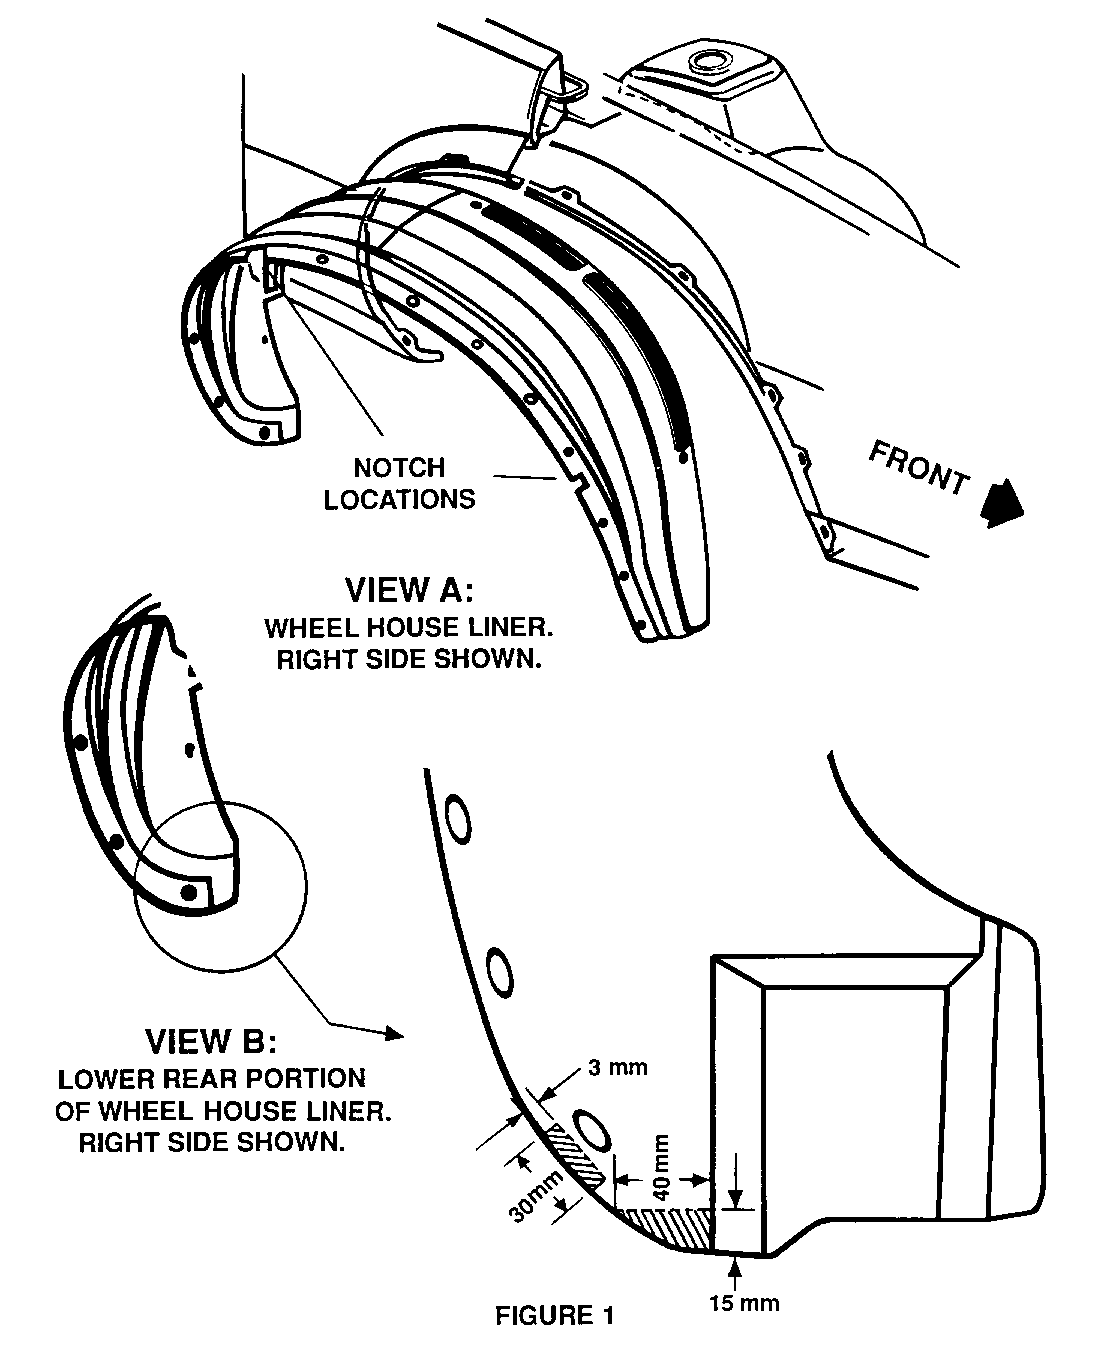
5. Using diagonal pliers, cut a notch in the liner approximately 3 mm (1/8 inch) wide and 20 mm (3/4 inch) deep midway between the third and fourth fastener holes in the front, and between the fourth and fifth holes in the rear. (Refer to Figure 1 View A).
6. Trim approximately 3 mm (1/8 inch) off of the edge of the liner next to the lower rear mounting hole. (Refer to Fig. 1 View B).
7. Trim away a section at the rear of the liner with approximate dimensions of 15 mm x 40 mm (112 inch x 1-1/2 inches) as shown in Figure 1 View B.
8. Install 7 J-nuts included in the kit to the liner at the vacant attachment holes. The J-nuts should be positioned such that the threaded portion is on the opposite side of the liner from the tire.
9. Tuck the unattached portion of the liner behind the fender flange and install 7 screws included in the kit through the flange holes into the J-nuts.
10. Reinstall the inner attaching screws which hold the liner to the wheel housing. An awl is helpful in aligning the liner holes with the holes in the housing. If holes will not align properly, new hole locations may be necessary.
11. On "Formula" models, install a new plastic fastener included in the kit to reattach the liner to the air dam.
12. Check fender flange for distortion. If distortion exists, straighten using a rubber mallet taking care not to damage paint.
13. On right side liner, tuck liner tab located toward the front inner wheelhouse into the pocket of the motor compartment side rail.
14. Inspect the appearance of the modification. The front of the wheelhouse liner should present a smooth transition from the liner to the front air dam. It may be necessary to trim the ends of the air dam to provide the proper appearance.
15. Repeat steps 2 through 14 for opposite side.
16. Lower vehicle and remove from hoist.
Use most applicable Labour Operation and Time from the Canadian Labour Time Guide.

General Motors bulletins are intended for use by professional technicians, not a "do-it-yourselfer". They are written to inform those technicians of conditions that may occur on some vehicles, or to provide information that could assist in the proper service of a vehicle. Properly trained technicians have the equipment, tools, safety instructions and know-how to do a job properly and safely. If a condition is described, do not assume that the bulletin applies to your vehicle, or that your vehicle will have that condition. See a General Motors dealer servicing your brand of General Motors vehicle for information on whether your vehicle may benefit from the information.
