REAR COMPARTMENT WATER LEAKS (NEW WEATHER STRIPS)

Subject: REAR COMPARTMENT WATERLEAKS (NEW WEATHERSTRIP AND SEAL KIT)
Models Affected: 1982-1991 FIREBIRD STYLES PRIOR TO VIN BREAKPOINTS
This bulletin has been revised to change the service procedure under Step #1.
Application: 1982-1991 Firebird (Less Convertibles) Prior To VIN Break ML240491
Condition:
----------- Waterleaks into the rear compartment area.
Cause:
------ Water entry may be in one or all of the following areas:
1. Between the weatherstrip and lift compartment window and or rear panel.
2. Between the weatherstrip and vertical mounting flange on the body.
3. Between the plastic seal and sealing area on the rear compartment lift lid that bridges the space between glass and rear panel.
Correction:
----------- 1991 models after the above VIN break will have new weatherstrips and seals on the rear compartment lift window. Past model vehicles may be repaired with these parts using the following procedure:
1. Replace the rear compartment opening weatherstrip with new P/N 10191818. This weatherstrip has a new section profile (additional upper lip), a clear mastic sealer for flange sealing and notches to be located at the rear panel seams to relieve any build up of water.
a. Loosen the compartment lid assist rod attaching screws at the lid end.
b. on 1991 models, disconnect the electrical wire for the Center High Mounted Stop Light at the rear body opening garnish molding on the roof.
c. While supporting the lid, remove the assist rod attaching screws and then the compartment weatherstrip.
d. Position the new weatherstrip in the opening (outboard of the assist rods) , reconnect and tighten the assist rod attaching screws.
e. Install the new weatherstrip to the flange with the following steps:
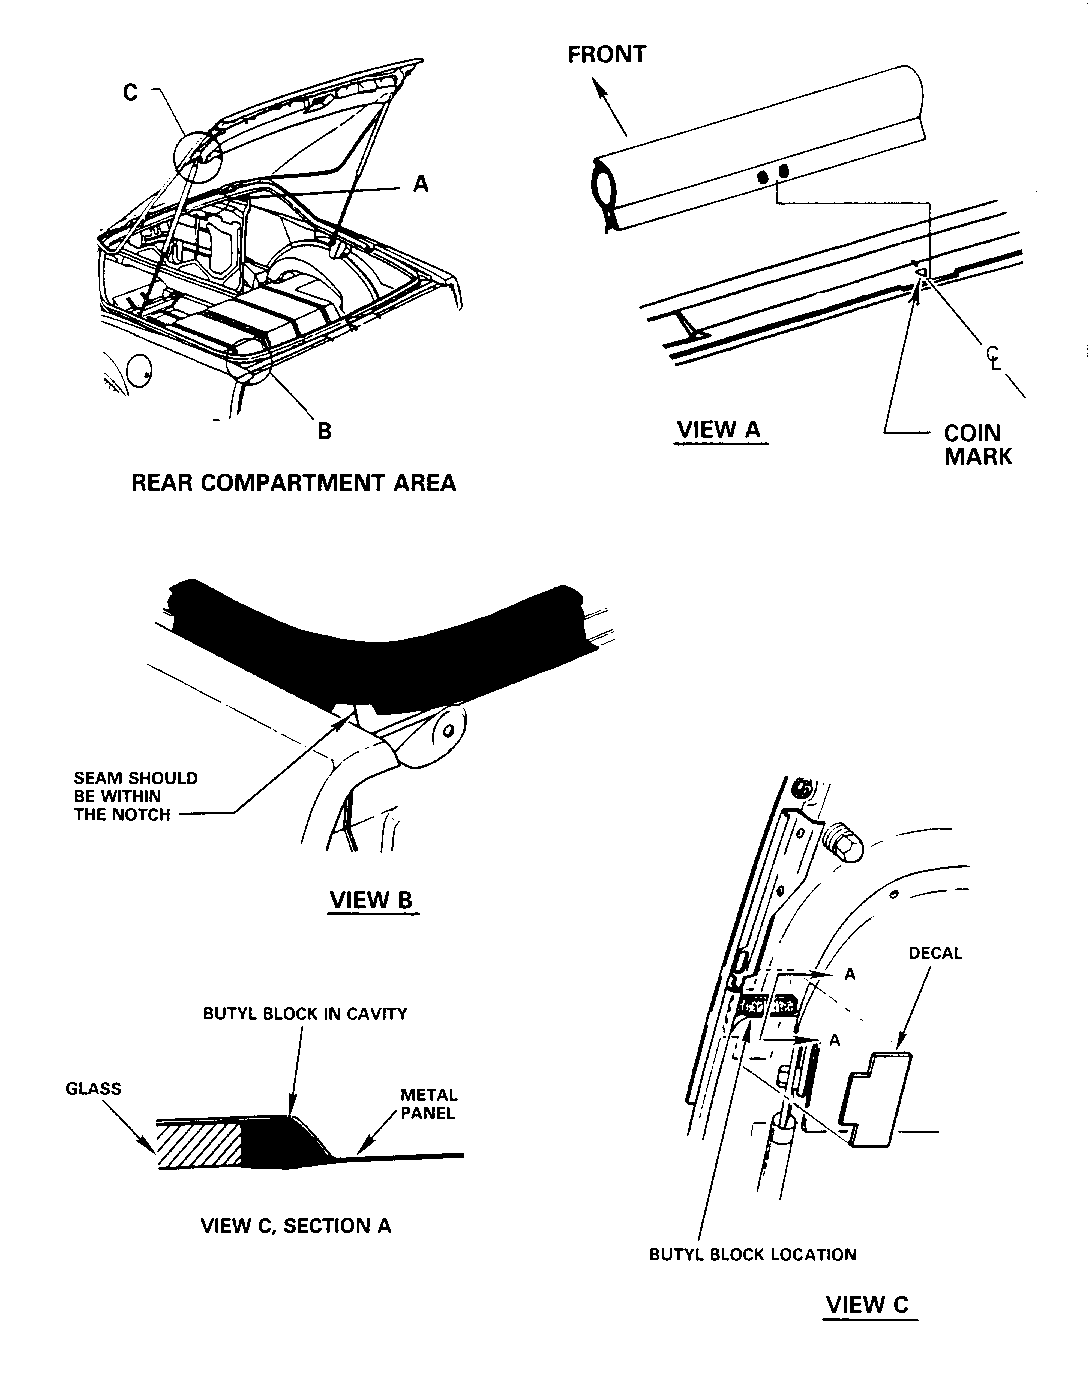
- Locate the new weatherstrip to centerline of car at front upper flange, (See Illustrations, View A).
a. Loosen the compartment lid assist rod attaching screws at the lid end.
b. On 1991 models, disconnect the electrical wire for the Center High Mounted Stop Light at the rear body opening garnish molding on the roof.
c. While supporting the lid, remove the assist rod attaching screws and then the compartment weatherstrip.
d. Position the new weatherstrip in the opening (outboard of the assist rods) , reconnect and tighten the assist rod attaching screws.
e. Install the new weatherstrip to the flange with the following steps:
- Locate the new weatherstrip to centerline of car at front upper flange, (See Illustrations, View A).
- Locate the notched areas on the weatherstrip at the rear end panel seams, (See Illustrations View B).
- Install remainder of weatherstrip onto the flange around the opening.
f. Reconnect electrical wire for the Center High Mounted Stop Light.
2. Replace the plastic seals on the compartment lift window using seal kit, P/N 12510809 with the following procedure:
a. Remove the original plastic seals from the underside of the lift window by carefully grasping the plastic piece with pliers while pulling and twisting.
b. Carefully cut away any excess urethane adhesive in the seal cavity with a utility knife or other suitable tool.
c. Carefully shave any excess urethane that may be on the glass or metal sealing surfaces.
SEAL KIT 12510809 CONSISTS OF 2 SEAL BLOCKS AND 2 SMALL DECALS
d. Remove seal blocks from release paper and press and mold into place until cavity is filled and sealing surfaces are flush. A slight bulge of the butyl above the sealing surface is acceptable, See View C, section A.
e. Remove the decals from the release paper and install over the seal location to provide a smooth sealing surface, See View C.
f. Watertest the rear compartment area to ensure a satisfactory repair.
Parts are currently available from GMSPO.
Labor Operation Number: Weatherstrip Use Published Operation and Allowance Install Kit T1703 Labor Time .4 Hours

General Motors bulletins are intended for use by professional technicians, not a "do-it-yourselfer". They are written to inform those technicians of conditions that may occur on some vehicles, or to provide information that could assist in the proper service of a vehicle. Properly trained technicians have the equipment, tools, safety instructions and know-how to do a job properly and safely. If a condition is described, do not assume that the bulletin applies to your vehicle, or that your vehicle will have that condition. See a General Motors dealer servicing your brand of General Motors vehicle for information on whether your vehicle may benefit from the information.
