POWER ANTENNA (ABOVE FENDER MAST SECTION REPLACEMENT)

Models Affected: 1989 FIREBIRD AND BONNEVILLE MODELS WITH POWER ANTENNA
A unique serviceability feature is utilized on the 1989 Firebird and Bonneville. The Delco power antenna is designed for above fender mast section replacement. It is not necessary to remove the antenna from the vehicle for mast section repair.
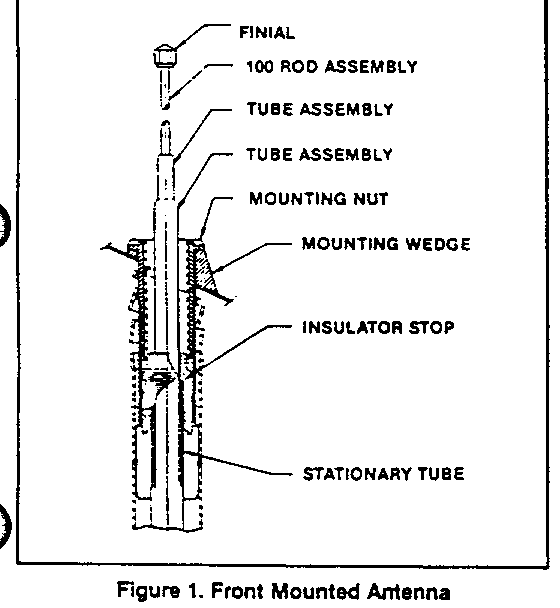
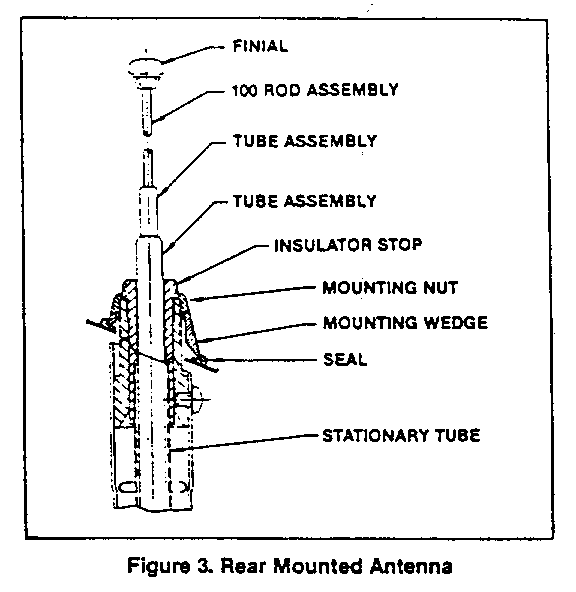
The service procedure is described in the attached instruction sheet (figure 1 - Firebird and Figure 3 - Bonneville) and the 1989 Service Manual. The service part numbers are as follows:
Firebird 22072184 Bonneville 22072186
Parts are currently available from GMSPO.
MAST SECTION REMOVAL
1. If antenna is fully down, have a helper turn radio on (ignition key in ACC position). When finial is extended approximately 25.4mm (1 inch), immediately disconnect power (either remove fuse or unplug power lead from relay).
2. If antenna is above fender, disconnect power per Step 1.
3. A. Front mounted (Figure 1).
Remove mounting nut with appropriate tool, then remove mounting wedge. Remove insulator stop using tool if provided, or an 11 m m thin wall, extra deep well, 12 point socket.
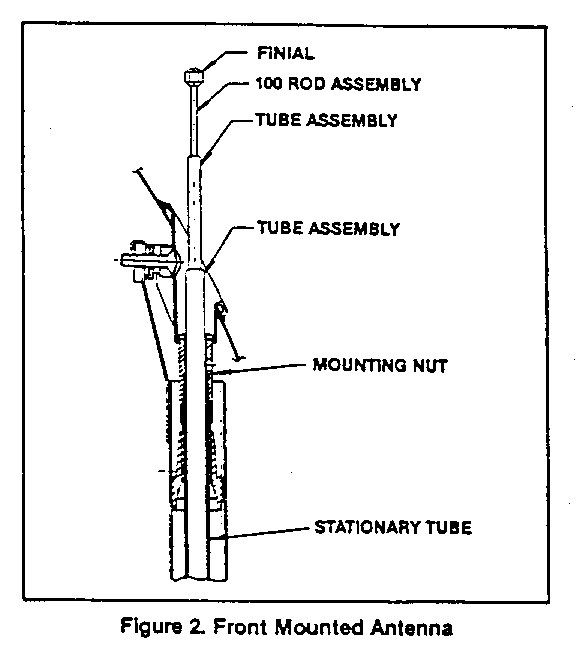
B. Front mounted (Figure 2). Remove mounting nut with tool provided.
C. Rear mounted (Figure 3).
Remove insulator stop using a 14mm deep well,12 point socket.
4. Remove finial using a wrench or suitable tool on flats of finial. Keep the 100 rod assembly from turning by gripping rod with pliers padded with cloth or rubber to prevent damage to rod surface. Do not bend 100 rod.
5. Using long nose pliers or fingers, remove the tube assemblies from the antenna, sliding them over the 100 rod assembly.
NOTE- Antennas may have two or three tube assemblies.
MAST SECTION INSTALLATION
1. Before assembling the new mast, lubricate the contactor with lubrication supplied.
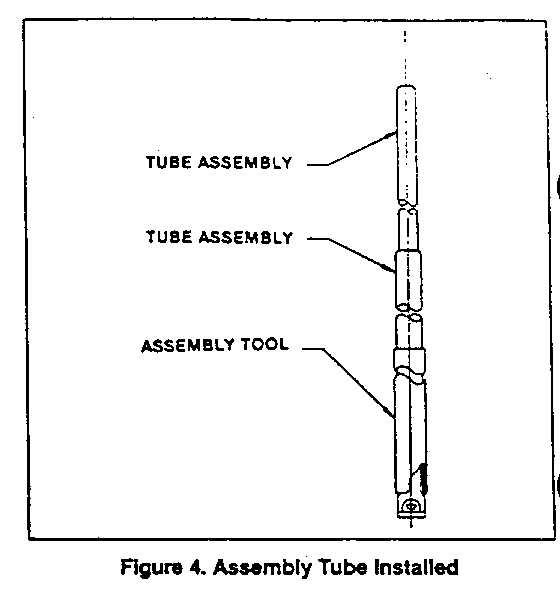
2. Slide the assembly tool over the contactor to compress its fingers (Figure 4). Slide the mast assemblies over the 100 rod and into the stationary tube, past the contactor fingers.
Remove the assembly tool, then bottom the mast in the stationary tube. Make sure the threaded top of the 100 rod is above the top of the first tube.
3. Reinstall (where applicable) seal, mounting wedge, mounting nut, insulator stop and finial in the reverse order of removal instructions.
4. Reconnect power.


General Motors bulletins are intended for use by professional technicians, not a "do-it-yourselfer". They are written to inform those technicians of conditions that may occur on some vehicles, or to provide information that could assist in the proper service of a vehicle. Properly trained technicians have the equipment, tools, safety instructions and know-how to do a job properly and safely. If a condition is described, do not assume that the bulletin applies to your vehicle, or that your vehicle will have that condition. See a General Motors dealer servicing your brand of General Motors vehicle for information on whether your vehicle may benefit from the information.
