POOR GLOVE BOX ALIGNMENT @ I/P (INSTALL RUBBER BOOT)

SUBJECT: POOR GLOVE BOX DOOR ALIGNMENT TO INSTRUMENT PANEL (INSTALL RUBBER BOOT)
VEHICLES AFFECTED: 1990 E
Some 1990 Oldsmobile Toronados and Trofeos may exhibit a condition of poor glove box door alignment to instrument panel. This condition may also contribute to current draw on the battery resulting in a low charge or no start condition due to the glove box light remaining on. Some vehicles may also experience interference of the inner bin with HVAC hoses or with the striker wire. To repair and/or prevent these conditions use the following procedure.
To perform outlined repair the following will be needed:
1. Two "U" nuts, part number #11513599.
2. One rubber boot, part number #3634824.
3. One side window defogger hose, part number #1626151.
4. One strap, part number #3522545.
5. One screw, part number #11508561.
6. One "U" nut, part number #1647785.
7. Two (71mm x 33mm) pieces of 1.5mm thick sheet metal cut from unpainted body shop flat stock.
8. one glove box door (optional), P/N #1647785.
NOTE: All steps must be followed in the order listed for effective correction.
1. Unseat support strap from glove box inner panel (bin) by removing expansion plug.
2. Remove glove box inner panel (bin) by removing seven screws.
3. Remove glove box door by removing four screws at hinges.
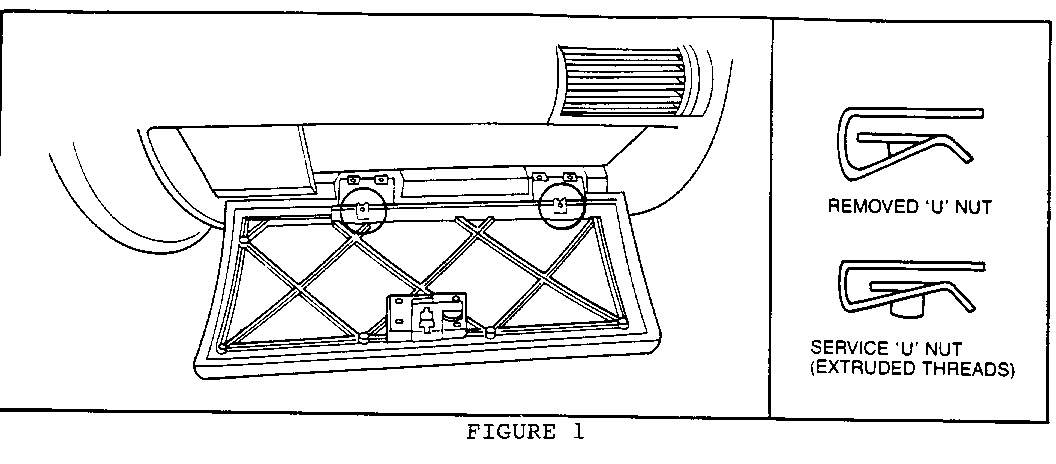
4. Replace the two Production "U" nuts located at base of bin attachment points with service "U" nuts (P/N #11513599). Refer to Figure 1.
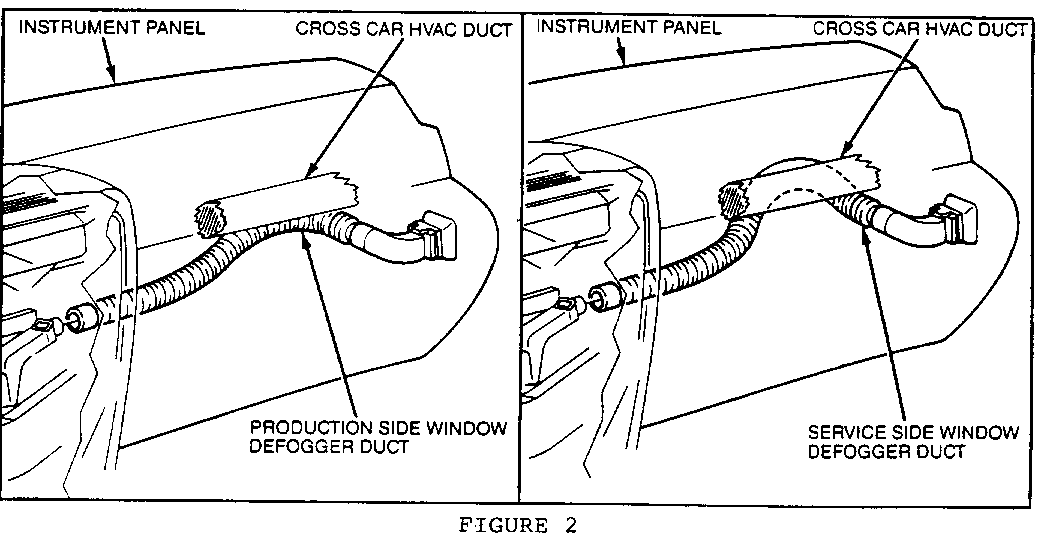
5. Replace the right side window defogger hose (large corrugated) with longer hose (P/N #1626151). Route new hose between the cowl and cross-car HVAC duct. Refer to Figure 2.
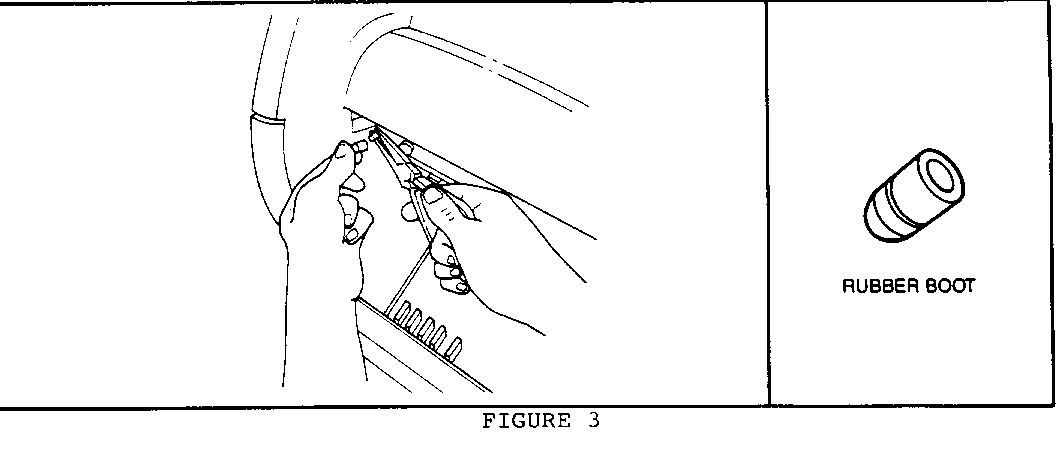
6. If light switch is located left of the trunk release button, hold light plunger firmly with a pair of needle-nose pliers and install rubber boot (P/N #03634824) to tip of light plunger. Refer to Figure 3.
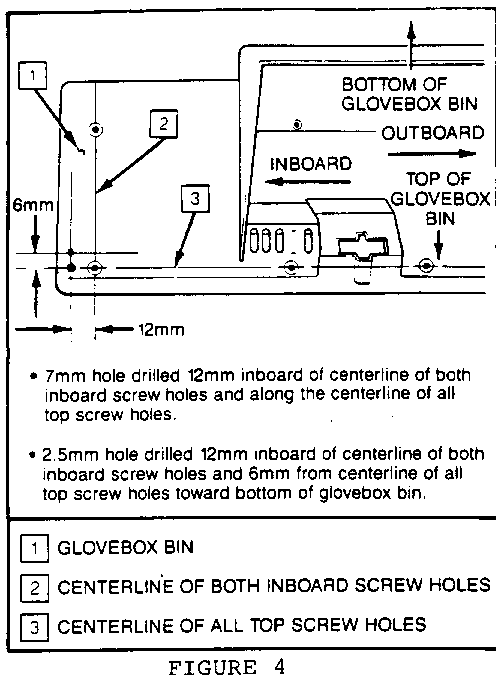
7. Drill a 7mm (9/32") and a 2.5MM (3/32") hole in the inner panel at the location illustrated. Refer to Figure 4.
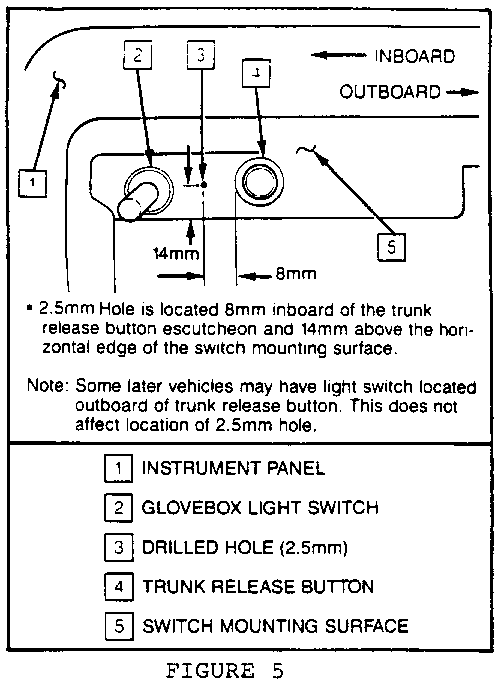
8. Drill a 2.5mm (3.32") hole in the instrument panel on the switch mounting surface. Refer to Figure 5.
9. Remove trunk release button from instrument panel switch mounting surface and let it hang freely.
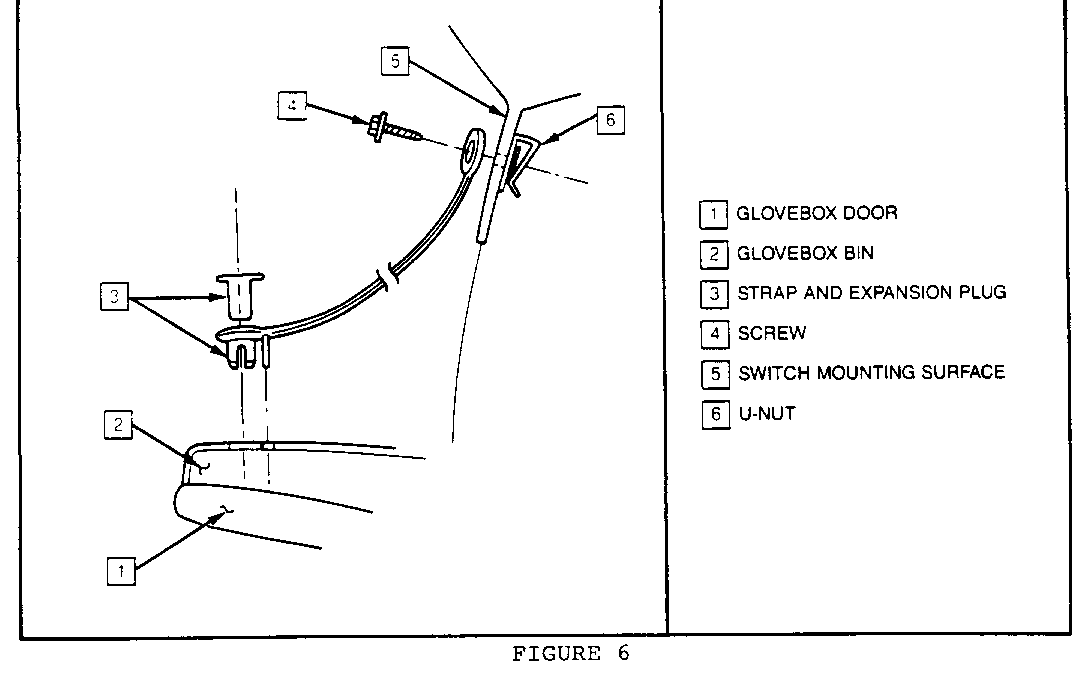
10. Install strap (P/N #3522545) to instrument panel on the switch mounting surface at the hole drilled in step 8 using screw (P/N #11508561) and "U" nut (P/N #1647785). Refer to Figure 6.
11. Install trunk release button to instrument panel switch mounting surface.
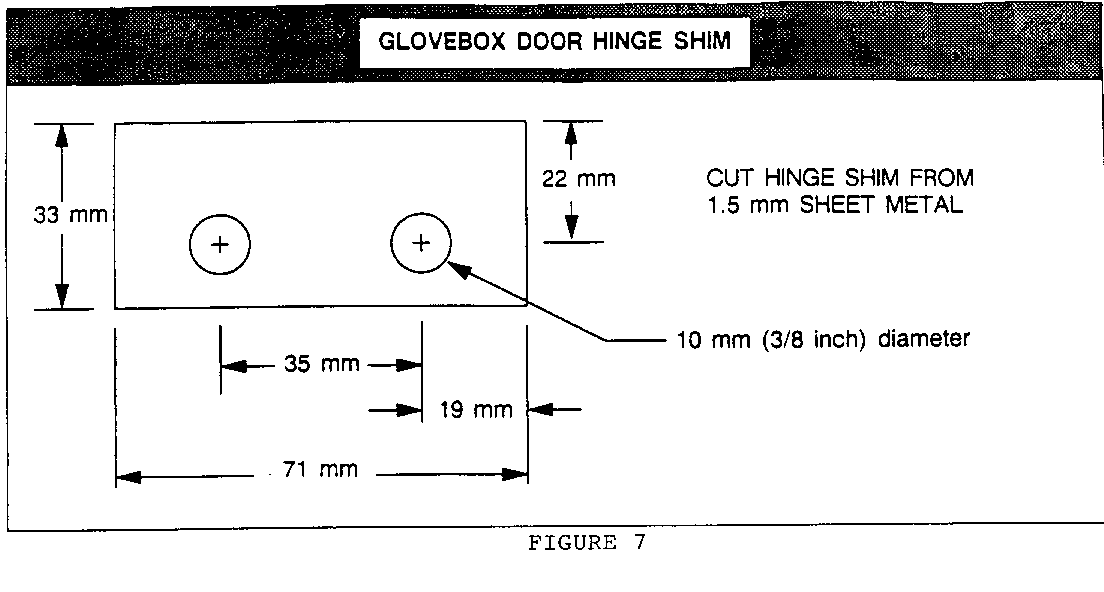
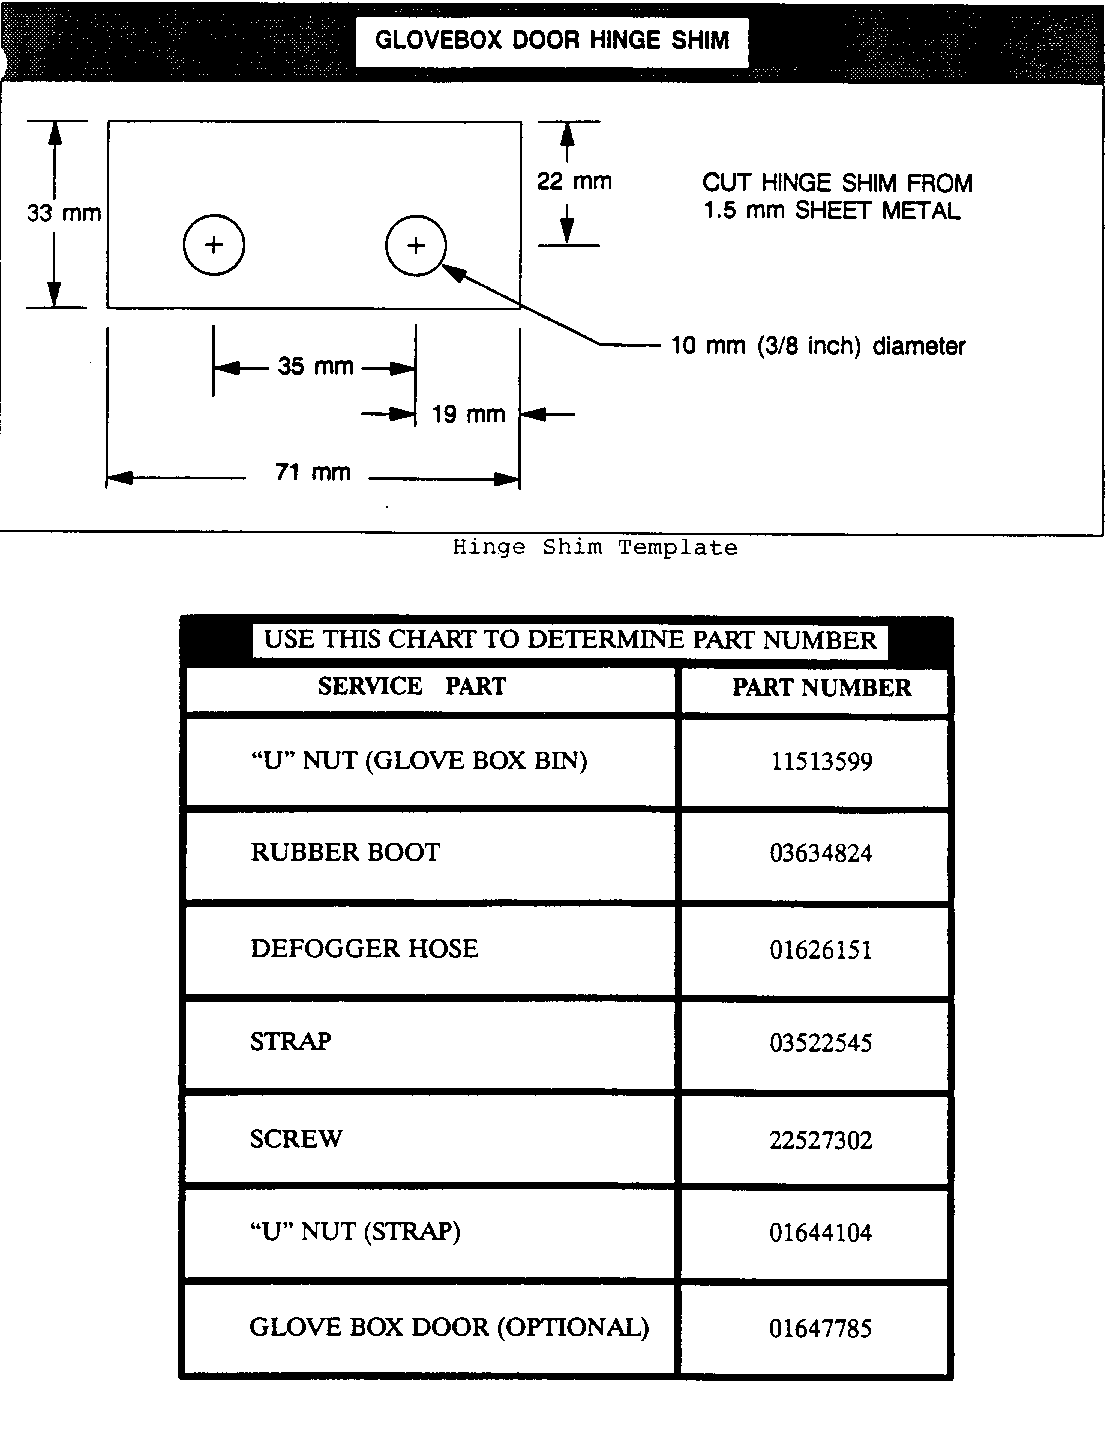
12. Cut two sheet metal hinge shims from 1.5mm unpainted body shop flat stock. Refer to Figure 7.
13. Drill two 10mm (3/8") holes in each shim. Refer to Figure 7.
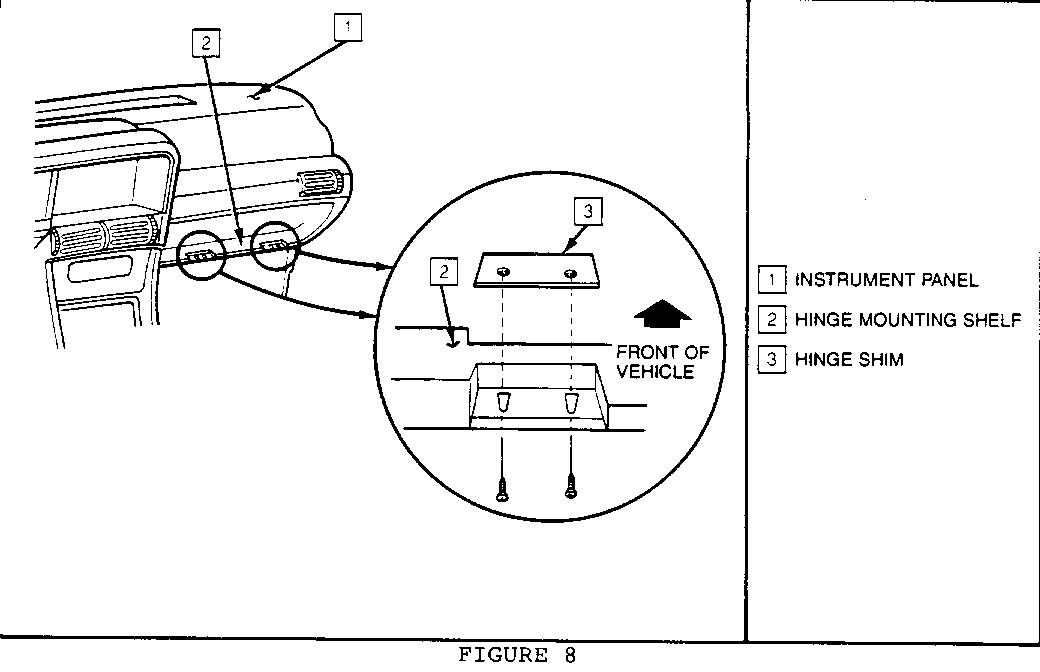
14. Place shims on hinge mounting shelf of instrument panel with holes toward rear of vehicle. Refer to Figure 8.
15. Install and align glove box door to instrument panel with four screws. Tighten screws to 2.0 N.m (1.5 ft.lbs.).
16. Install glove box inner panel (bin) to glove box door.
NOTICE: The sequence of fastener tightening is critical to the effectiveness of glove box door alignment. It is critical that the door be supported during installation of the fasteners, otherwise damage to hinges may result.
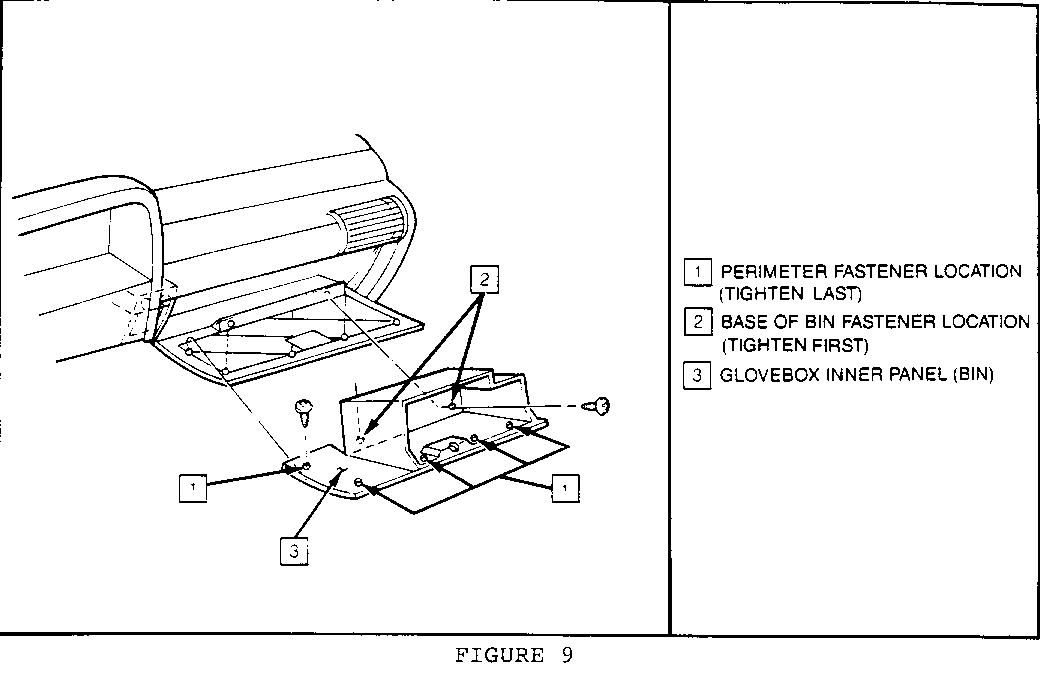
17. Tighten the two lower fasteners at base of bin to 1.5 N.m (1 ft.lbs.). Refer to Figure 9.
18. Tighten the five perimeter fasteners to 1.5 N.m (1 ft.lbs.). Refer to Figure 9.
19. Close glove box door and evaluate alignment and striker engagement.
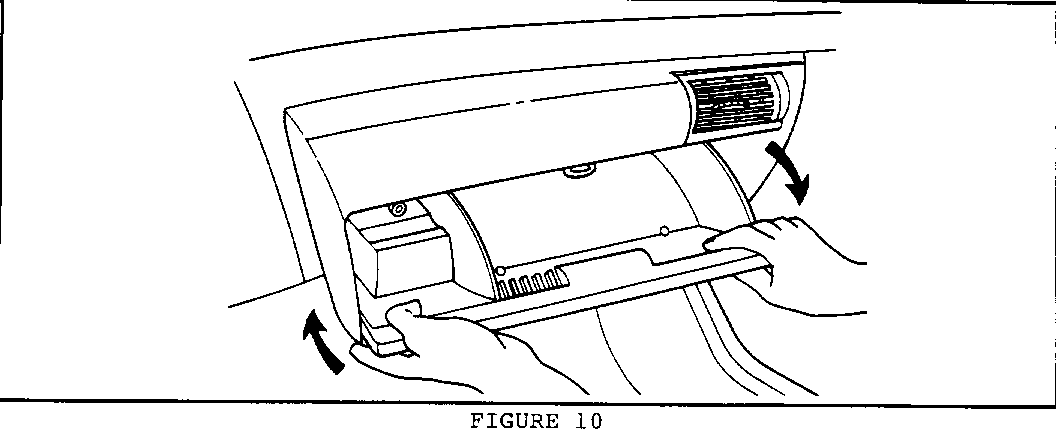
20. If alignment is not satisfactory, open glove box door.
21. Holding the corners of the door, twist the door to adjust the alignment. Refer to Figure 10.
22. Close glove box door and evaluate striker engagement.
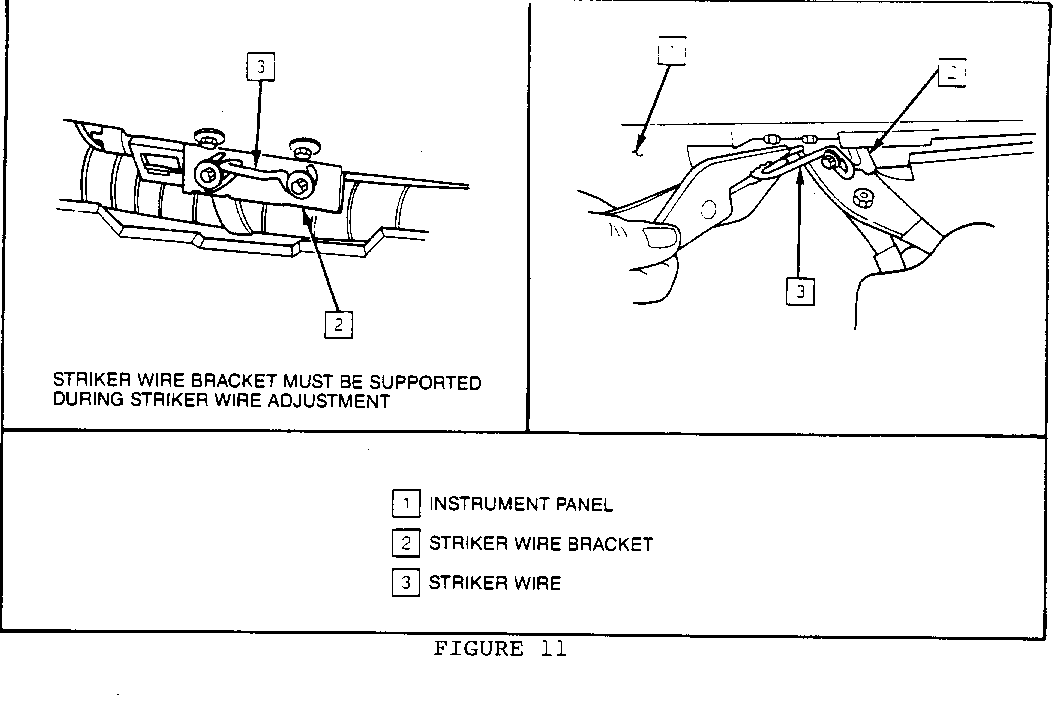
23. If striker interferes with glove box bin at latch opening or at striker, gently adjust the striker wire using pliers to stabilize the striker wire bracket. Refer to Figure 11.
NOTICE: Failure to stabilize the striker wire bracket during striker wire adjustment may damage the instrument panel beyond repair.
24. Steps 19 through 23 may be repeated to provide satisfactory fit and operation of the glove box door.
25. If the steps above fail to give a satisfactory fit of the glove box, replace glove box door with service P/N #1647785.
26. Install loose ends of support straps to glove box inner panel (bin) securing with expansion plugs. Refer to Figure 6.
General Motors bulletins are intended for use by professional technicians, not a "do-it-yourselfer". They are written to inform those technicians of conditions that may occur on some vehicles, or to provide information that could assist in the proper service of a vehicle. Properly trained technicians have the equipment, tools, safety instructions and know-how to do a job properly and safely. If a condition is described, do not assume that the bulletin applies to your vehicle, or that your vehicle will have that condition. See a General Motors dealer servicing your brand of General Motors vehicle for information on whether your vehicle may benefit from the information.
