BLISTERING AND/OR LIFTING OF I/P VINYL SKIN

SUBJECT: BLISTERING AND/OR REDUCED RETENTION OF I/P VINYL SKIN - REPLACE INSTRUMENT PANEL
MODELS/YEARS: 1990 TORONADO/TROFEO
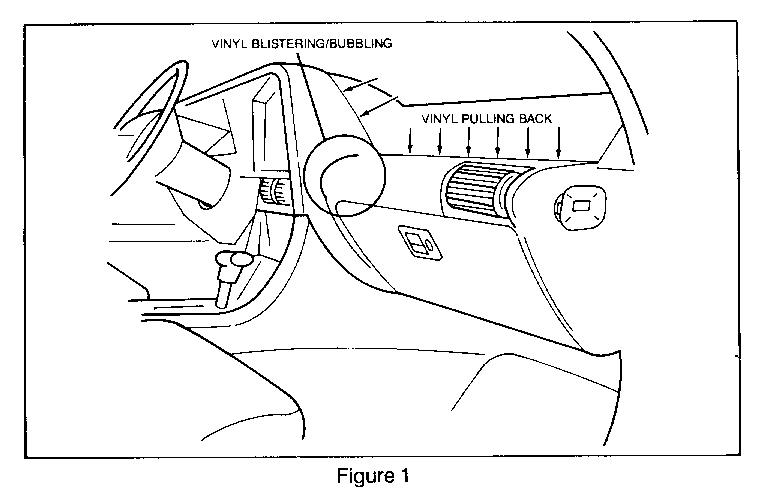
Some 1990 Toronados produced prior to VIN sequence number LU314627 may exhibit a condition, predominantly in hot climates, where the vinyl skin does not adhere to the instrument panel substrate fully. This condition may result in a blistering or bubbling appearance and/or pull back of the vinyl skin in the general areas indicated in Figure 1. At the time of this printing, no satisfactory method exists to repair and restore affected instrument panels to a level of acceptable quality. Replacement of the instrument panel is the only recommended method of servicing this condition.
Refer to the parts chart when ordering replacement parts. Instrument panels and knee bolsters will be stocked in color so no paint to match operation will be necessary.
CAUTION:
The procedures in this bulletin must be followed in the order listed to temporarily disable the Supplemental Inflatable Restraint (SIR) system and prevent false diagnostic codes from setting. Failure to follow procedures could result in possible air bag deployment, personal injury, or unneeded SIR system repairs.
To remove the instrument panel use the following procedure:
1. Disable the SIR system. Refer to procedures in Section 9J of the 1990 Toronado/Trofeo Service Manual.
2. Disconnect the battery negative cable.
3. Remove right sound insulator.
4. Remove knee bolster.
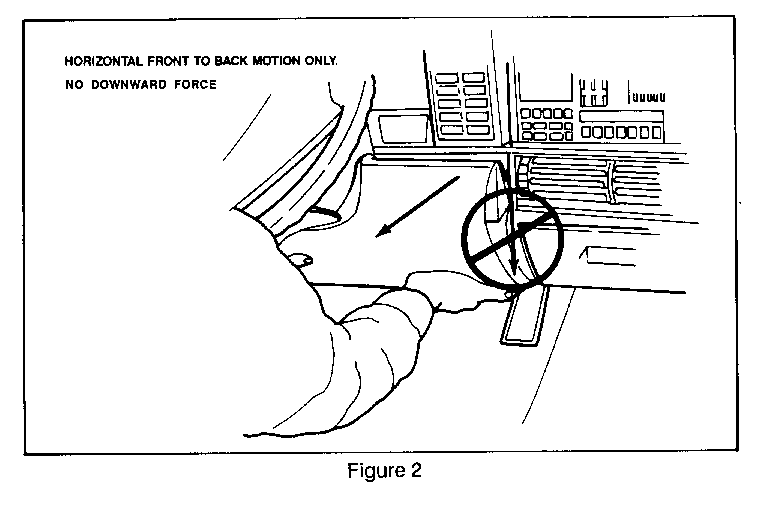
NOTICE: When removing the knee bolster, do not exert any downward force at the upper edge of the knee bolster on either side of the steering column. Only a front-to-back horizontal force should be used to unseat the two top fasteners from the instrument panel. Failure to follow these instructions may damage the knee bolster beyond repair. Update page 8C-6 of the 1990 Toronado/Trofeo Service Manual with this information. Refer to Figure 2.
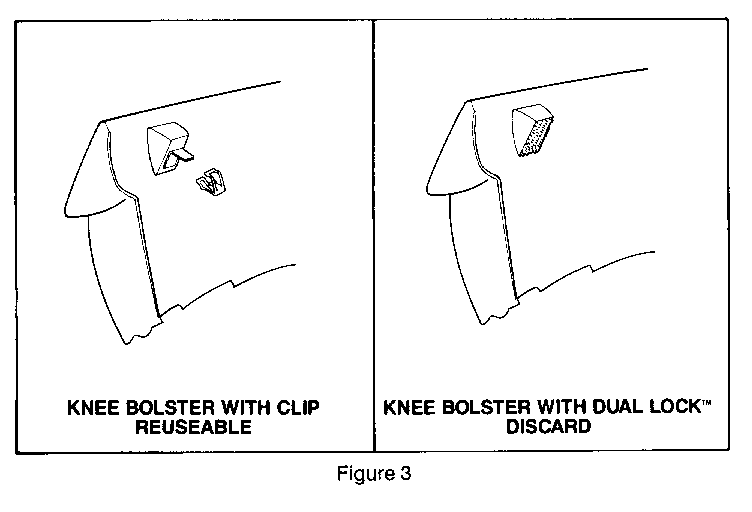
NOTE: If the knee bolster utilizes Dual Lock fasteners at the instrument panel interface, discard the knee bolster and replace it with a new service part. The service part will have clip-type fasteners which mate with the replacement instrument panel. Refer to parts chart if knee bolster replacement is necessary. Refer to Figure 3.
5. Remove instrument panel/steering column reinforcement plate.
6. Remove lower steering column bracket screw and nut holding lower column to vehicle. Refer to procedures in Section 3F4 of the 1990 Toronado/Trofeo Service Manual.
7. Remove upper steering column bracket screws and lower steering column so that it rests on the driver's seat. Refer to procedures in Section 3F4 of the 1990 Toronado/Trofeo Service Manual.
8. Remove instrument panel cluster trim plate.
9. Remove left and right switch assemblies.
10. Remove instrument panel cluster.
11. Remove electronic climate control head (vehicles without Driver Information Display).
12. Remove radio (vehicles without Driver Information Display).
13. Remove Driver Information Display (vehicles with Driver Information Display).
14. Remove center HVAC deflector assembly.
15. Remove windshield defroster grille.
16. Remove upper instrument panel mounting screws.
17. Remove lower left instrument panel retaining screw.
18. Remove hood release lever assembly.
19. Remove center instrument panel brace.
20. Remove glove box unit. Refer to procedures in Section 8C of the 1990 Toronado/Trofeo Service Manual.
21. Remove lower right instrument panel retaining screw.
22. Remove fuse panel from instrument panel.
23. Remove console assembly. Refer to procedures in Section 8C of the 1990 Toronado/Trofeo Service Manual.
24. Disconnect instrument panel electrical connectors.
25. Remove instrument panel assembly from vehicle.
26. Transfer harnesses and HVAC ducts to the replacement instrument panel.
To install the replacement instrument panel use the following procedure:
1. Align instrument panel into vehicle.
2. Connect electrical connectors.
3. Install console assembly. Refer to procedures in Section 8C of the 1990 Toronado/Trofeo Service Manual.
4. Install fuse panel from instrument panel.
5. Install lower right instrument panel retaining screw. Do not fully tighten at this time.
6. Install glove box unit. Refer to procedures in Section 8C of the 1990 Toronado/Trofeo Service Manual.
NOTE: Align and adjust the glove box door. Refer to Dealer Technical Bulletin number 90-T-173 for complete glove box door adjustment procedures.
7. Install center instrument panel brace. Do not fully tighten at this time.
8. Install hood release lever assembly.
9. Install lower left instrument panel retaining screw. Do not fully tighten at this time.
10. Install upper instrument panel mounting screws. Do not fully tighten at this time.
NOTE: Align the instrument panel to the console. Minimize the passenger side gap between the assemblies and assure that an even gap exists along the entire interface. Tighten all instrument panel mounting screws during the alignment procedure. Refer to Dealer Technical Bulletin number 90-T-150 for complete alignment procedures.
11. Install windshield defroster grille.
12. Install center HVAC deflector assembly.
13. Install Driver information Display (vehicles with Driver Information Display).
14. Install radio (vehicles without Driver Information Display).
15. Install electronic climate control head (vehicles without Driver Information Display).
16. Install instrument panel cluster.
17. Install left and right switch assemblies.
18. Install instrument panel cluster trim plate.
19. Install steering column to vehicle. Refer to procedures in Section 3F4 of the 1990 Toronado/Trofeo Service Manual.
20. Install instrument panel/steering column reinforcement plate.
21. Install knee bolster.
- Align the two clips at the top of the knee bolster with the two slots in the instrument panel. At the same time line up the lower right knee bolster edge (protruding) with the lower clip.
- Continue forward with the knee bolster until the two top clips are fully seated and the lower right knee bolster edge is supported in the lower clip.
22. Connect the battery negative cable.
23. Enable the SIR system. Refer to procedures in Section 9J of the 1990 Toronado/Trofeo Service Manual.
24. Install right and left sound insulators.
Use this chart to determine part number:
Service Part Color PIN ---------------- --------------------- ------- Instrument Panel (151) Dark Slate Gray 3634833 (i 91) Black 3634837 (201) Very Dark Sapphire 3634834 (651) Dark Antelope 3634835 (681) Dark Auburn 3634833(1) (781) Garnet Red 3634836
Knee Bolster (1 51) Dark Slate Gray 3524334 (191) Black 3524335 (201) Very Dark Sapphire 3524336 (651) Dark Antelope 3524337 (681) Dark Auburn 3524338(2) (781) Garnet Red 3524339
"J" Nut N/A 3523076
Knee Bolster Clip N/A 52351724
NOTES:
1. Instrument panels are not stocked in dark auburn color. Dark slate gray should be ordered, a paint- to-match operation performed, and a labor time allowance submitted.
2. Knee bolsters will initially be stocked in dark auburn color and should be ordered. When dark auburn knee bolsters are depleted, dark slate gray will be substituted by GMSPO. If a dark gray knee bolster is received, a paint-to-match operation should be performed, and a labor time allowance submitted.
Parts are currently available from GMSPO.
WARRANTY INFORMATION:
Labor Operation Number: T6492 Labor Time: 2.7 hours Trouble Code: 92


General Motors bulletins are intended for use by professional technicians, not a "do-it-yourselfer". They are written to inform those technicians of conditions that may occur on some vehicles, or to provide information that could assist in the proper service of a vehicle. Properly trained technicians have the equipment, tools, safety instructions and know-how to do a job properly and safely. If a condition is described, do not assume that the bulletin applies to your vehicle, or that your vehicle will have that condition. See a General Motors dealer servicing your brand of General Motors vehicle for information on whether your vehicle may benefit from the information.
