FRONT DOOR GLASS BINDING

Subject: BINDING BETWEEN FRONT DOOR WINDOW GLASS AND GLASS CHANNEL
Model and Year: 1989-91 GEO PRIZM
Some 1989-91 vehicles may experience a binding condition between the front door window glass and the glass channel when the window is rolled up. In severe cases the window glass may pivot forward in the frame. This may be accompanied by the glass tipping inboard of the window frame at the top front corner. This condition may occur on either the right hand or the left hand front door glass.
Repair Procedure:
1. Remove the door trim, water deflector and the door window glass as explained on page 10-5-5 of the Prizm Service Manual (#ST373-89/90).
2. Check the rubber seal in the door glass channel for any deformation. If the rubber seal is deformed it must be replaced.
IMPORTANT: To achieve the best seal alignment, install the top corners of the seal into the door header first.
3. If the original window regulator has been damaged or had the arms bent, replace the regulator as explained on page 10-5-5 of the Prizm Service Manual with a new regulator.
IMPORTANT: Do Not reinstall the equalizer arm bracket mounting bolts at this time.
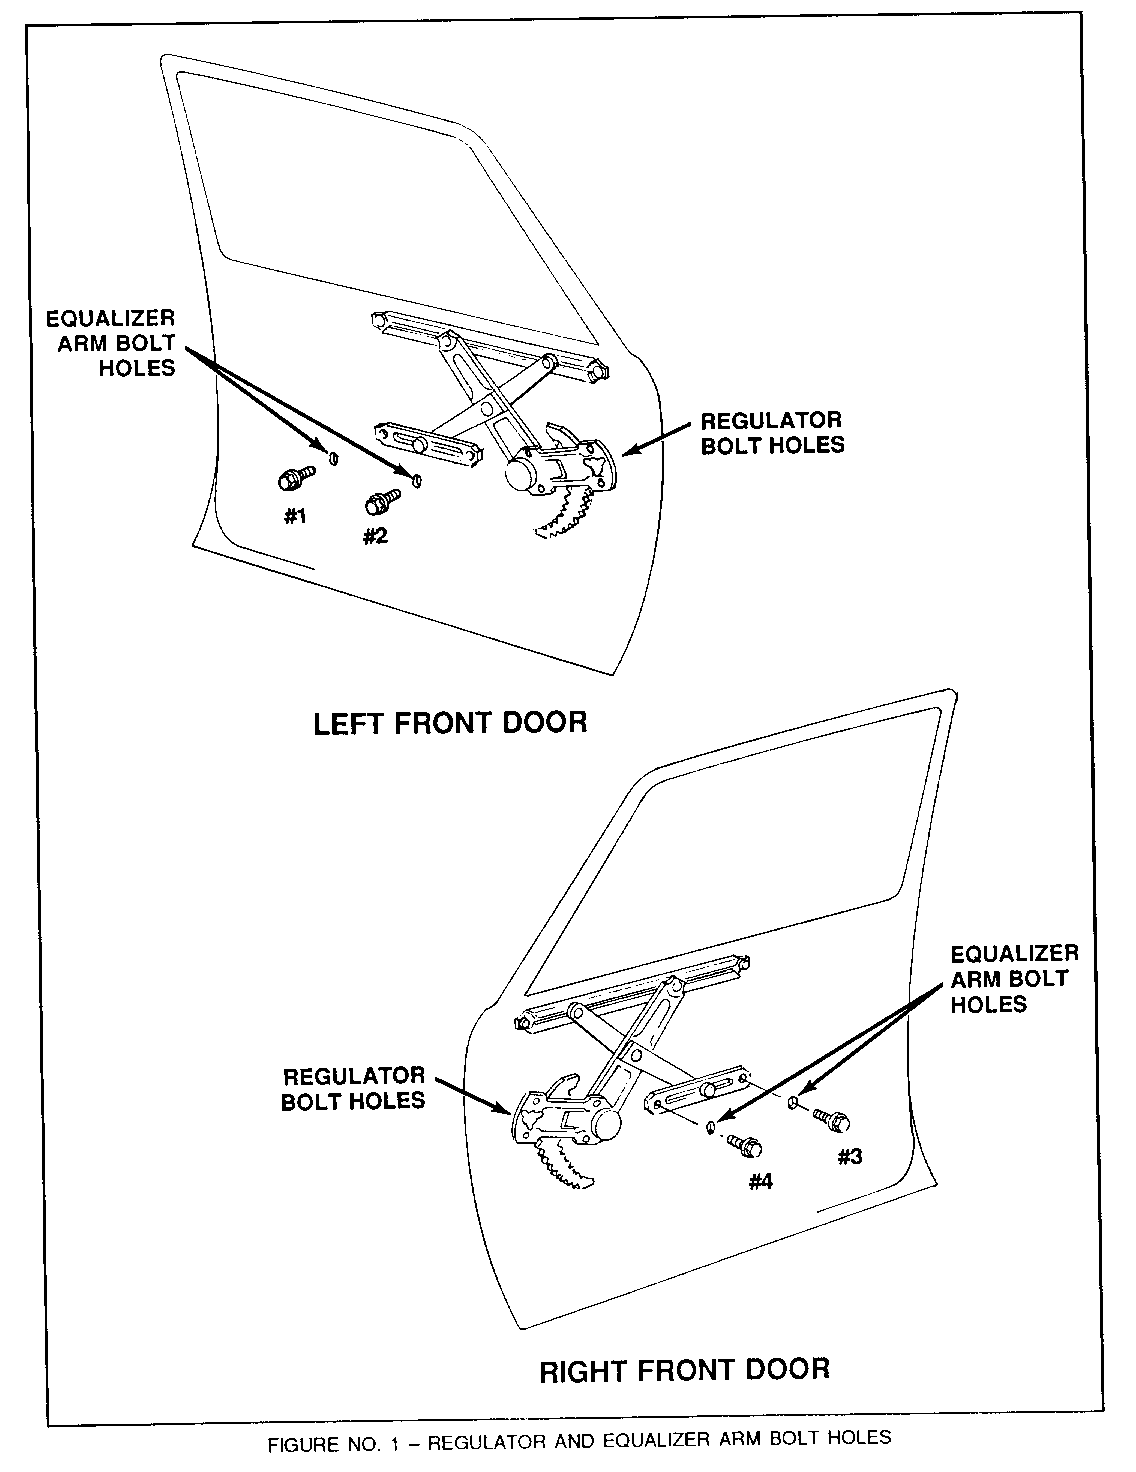
4. Referring to Figure 1, check to see if the regulator bolt holes have been enlarged (filed out). In many cases bare metal may be visible on the inner door panel around the bolt holes if the hole size has been altered. These holes should not have been altered. If they have been altered, the regulator must be set as close as possible to the original factory setting. Use the bolt head clamping marks on the inner door panel as a guide when reinstalling the regulator.
5. Referring again to Figure 1, the equalizer bolt hoies (holes #1, #2, #3 and #4) must be lengthened (filed out). These holes must be increased in length by a total of 6.0 mm per hole.
IMPORTANT: The rear holes (Holes #1 and #3) are actually slots. Using a round (rat tail) file, file out the bottom of each equalizer bolt hole so that the length of the holes are each increased by 6.0 mm. Total length of the holes will range from 10 to 17 mm.
All bare metal resulting from filing of the bolt holes should be touched-up with paint to prevent rust.
6. Reinstall the equalizer arm bracket mounting bolts. Position each bolt at the top of the slot, then lower the bolt by the amount specified in chart No. 1 and tighten. The amount of adjustment depends upon the vehicle identification number.
7. Reinstall the glass according to the specified Prizm Service Manual procedure.
V.I.N. DISTANCE FROM TOP POSITION BOLT NO. #1 #2 #3 #4 ------------------- ------ ------ ------ ------ KZ000000 - LZ067210 4.0 mm 3.5 mm 4.0 mm 3.5 mm LZ067211 - LZ078243 3.0 mm 3.5 mm 3.0 mm 3.5 mm LZ078244 - LZ164484 2.0 mm 1.0 mm 3.0 mm 3.5 mm LZ164485 - LZ190000 2.0 mm 1.0 mm 3.0 mm 2.0 mm MZ000000 - MZ002200 2.0 mm 1.0 mm 0.0 mm 0.0 mm
CHART NO. 1
8. This procedure will correct most window glass adjustment conditions. There are some cases in which the condition will be improved, but not corrected or the rolling effort will be increased to an unacceptable level. If this occurs, "Fine Tuning" of the glass adjustment will be required as described below.
Fine Tuning:
1. If the glass alignment is not correct, move both equalizer bolts downward in equal increments (0.5 - 1.0 mm per step). Tighten the bolts and check window operation. If the condition persists, repeat these "Fine Tuning" Steps.
2. If high rolling effort is encountered, move both equalizer bolts upward in equal increments (0.5 - 1.0 mm per step). Tighten the bolts and check window operation. If the condition persists, repeat these " Fine Tuning" Steps.
IMPORTANT: Adjusting the window glass back into the frame will increase the rolling effort of the window. "Fine Tuning" must be done in some cases to achieve the most acceptable compromise between window tracking and rolling effort.
9. Reinstall the door trim and water deflector as explained in the Prizm Service Manual.
Labor Operation Number: T1694
Labor Time: 0.7 Hours
Trouble Code: 92

General Motors bulletins are intended for use by professional technicians, not a "do-it-yourselfer". They are written to inform those technicians of conditions that may occur on some vehicles, or to provide information that could assist in the proper service of a vehicle. Properly trained technicians have the equipment, tools, safety instructions and know-how to do a job properly and safely. If a condition is described, do not assume that the bulletin applies to your vehicle, or that your vehicle will have that condition. See a General Motors dealer servicing your brand of General Motors vehicle for information on whether your vehicle may benefit from the information.
