For 1990-2009 cars only
Removal Procedure
- Open the hood.
- Disconnect the battery negative cable from the battery. Refer to Battery Cable Replacement in engine electrical.
- Remove the engine cover from the vehicle. Refer to Engine Cover Replacement in Interior Trim.
- Remove the air intake duct from the throttle body. Refer to Air Cleaner Assembly Replacement in Engine Controls-7.4L.
- Remove the air cleaner assembly from the vehicle. Refer to Air Cleaner Assembly Replacement in Engine Controls-7.4L.
- Remove the grill assembly from the vehicle. Refer to Grille Replacement .
- Remove the air conditioning condenser from the vehicle. Refer to Condenser Replacement in HVAC.
- Remove the radiator from the vehicle. Refer to Radiator Replacement .
- Remove the engine front cover from the engine block. Refer to Engine Front Cover Replacement .
- Remove the valve rocker arm covers from the cylinder heads. Refer to Valve Rocker Arm Cover Replacement .
- Remove the upper intake manifold from the lower intake manifold. Refer to Intake Manifold Replacement .
- Remove the lower intake manifold from the cylinder heads. Refer to Intake Manifold Replacement .
- Remove the push rods from the engine block. Refer to Valve Rocker Arm and Push Rod Replacement .
- Remove the valve lifters and guides from the engine block. Refer to Valve Lifter Removal .
- Remove the timing chain and sprockets. Refer to Timing Chain and Sprockets Removal .
- Remove the camshaft retainer bolts and the retainer.
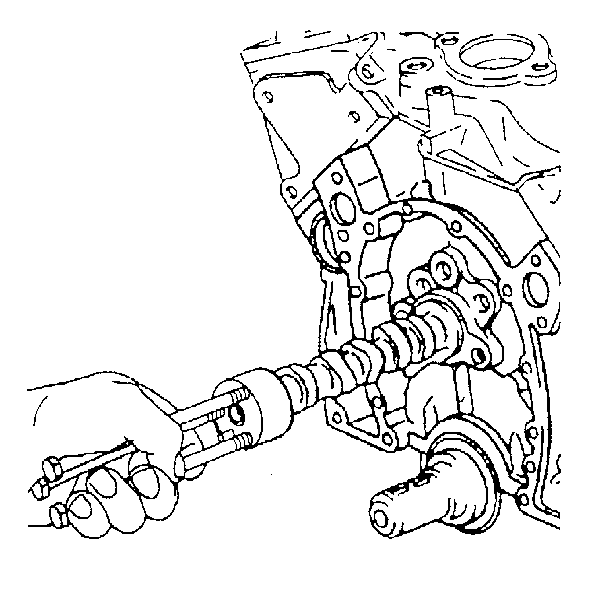
- Install three 5/16-18 bolts 4 to 5 inches long into the camshaft threaded holes. Use these bolts as a handle for the camshaft removal.
- Remove the camshaft from the block. Use care to prevent damage to the camshaft bearings.
- Remove the bolts used as a handle from the camshaft.


Installation Procedure
- Install two or three 5/16-18 bolts 4 to 5 inches long into the camshaft threaded holes. Use these bolts as a handle for the camshaft installation.
- Coat the camshaft lobes and the journals with engine oil supplement GM P/N 1052307 or equivalent.
- Install the camshaft into the engine. Handle the camshaft carefully to prevent damage to the camshaft bearings.
- Remove the 5/16-18 bolts from the camshaft.
- Install the camshaft retainer and the retainer bolts
- Install the timing chain and sprockets. Refer to Timing Chain and Sprocket Replacement .
- Install the engine front cover to the engine block. Refer to Engine Front Cover Replacement .
- Install the valve lifters and guides into the engine block. Refer to Valve Lifter Installation .
- Install the push rods into the engine block. Refer to Valve Rocker Arm and Push Rod Installation .
- Install the lower intake manifold to the cylinder heads. Refer to Intake Manifold Replacement .
- Install the upper intake manifold to the lower intake manifold. Refer to Intake Manifold Replacement
- Install the valve rocker arm covers. Refer to Valve Rocker Arm Cover Replacement .
- Install the radiator to the vehicle. Refer to Radiator Replacement in Engine Cooling.
- Install the air conditioning condenser to the vehicle. Refer to Condenser Replacement in HVAC.
- Install the grille assembly to the vehicle. Refer to Grille Replacement .
- Install the air intake duct to the throttle body. Refer to Air Cleaner Assembly Replacement in Engine Control-7.4L.
- Install the air cleaner assembly. Refer to Air Cleaner Assembly Replacement in Engine Controls-7.4L.
- Connect the battery negative cable. Refer to Battery Cable Replacement in Engine Cooling.
- Fill the cooling system with the proper quantity and grade of coolant. Refer to Cooling System Draining and Filling in Engine Cooling.
- Recharge the air conditioning system. Refer to Refrigerant Recovery and Recharging in HVAC.
- Change the oil and the oil filter. Refer to Engine Oil and Oil Filter Replacement .


Notice: Use the correct fastener in the correct location. Replacement fasteners must be the correct part number for that application. Fasteners requiring replacement or fasteners requiring the use of thread locking compound or sealant are identified in the service procedure. Do not use paints, lubricants, or corrosion inhibitors on fasteners or fastener joint surfaces unless specified. These coatings affect fastener torque and joint clamping force and may damage the fastener. Use the correct tightening sequence and specifications when installing fasteners in order to avoid damage to parts and systems.
Tighten
Tighten the camshaft retainer bolts to 14 N·m (10 lb ft).
