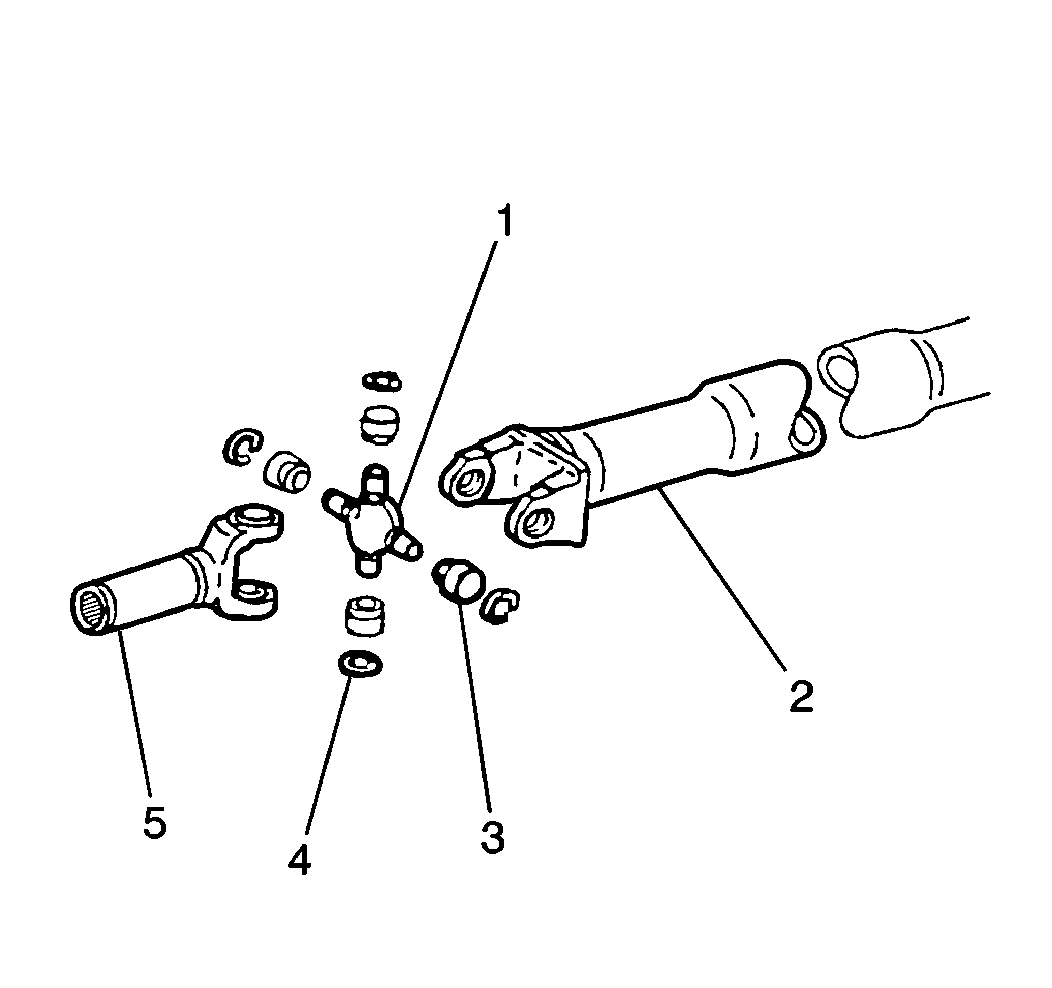
Removal Procedure

- Raise and support the
vehicle with safety stands. Refer to
Lifting and Jacking the Vehicle
in General Information.
- Remove the propeller shaft. Refer to
Propeller Shaft Replacement
or
Two-Piece Propeller Shaft Replacement
or
Three-Piece Propeller Shaft Replacement
.
- Remove the retainer rings (4).
Important: Do not pound on the yoke ears of the propeller shaft or the slip yoke.
Pounding on the yoke ears may damage the components.
- Remove the bearing cups (3) from the propeller shaft (2).
| • | Using two sockets (one with a diameter just smaller than the bearing
cup, the other with an opening large enough to accept a bearing cup) drive
out the bearing cups by pressing them out using a vise or press. |
| • | If you are replacing the rear universal joint, go to step 1 of
the installation procedure. |
| • | If you are replacing the front universal joint, repeat the first
part of step 3 in order to remove the bearing cups from the slip yoke (5). |
Installation Procedure

- Install the bearing cups.
| • | Set the trunnion (1) in between the yoke ears of the propeller
shaft (2) and start installing both bearing cups (3) by hand. Continue driving
the bearing cups inward by squeezing the bearing cups together using
a press or vise. |
| • | Use a socket with a smaller diameter than the cup and drive the
cup past the retainer ring groove. |
- Install the retainer ring (4).
| • | Drive the opposite bearing cup past the retainer ring groove. |
- Install the retainer ring.
- Set the slip yoke (5) over the trunnion and install as outlined
in steps 1-3.
- Install the propeller shaft. Refer to
Propeller Shaft Replacement
or
Two-Piece Propeller Shaft Replacement
or
Three-Piece Propeller Shaft Replacement
.
- Remove the safety stands and lower the vehicle. Refer to
Automatic Transmission Fluid and Filter Replacement


