CMVSS Noncompliance - Fog Lamp Compliance

| Subject: | 00060 -- Fog Lamp Compliance |
| Models: | 1999-2000 Chevrolet 4WD Tahoes |
| Equipped with Sport Package (YF3) or Off-Road Chassis Package (Z71) |
Condition
General Motors has decided that certain 1999-2000 Chevrolet 4WD Tahoes equipped with the sport package (YF3) or the off-road chassis package (Z71) fail to conform to Canada Motor Vehicle Safety Standard (CMVSS) 108, "Lighting Equipment." These vehicles have fog lamps that can be activated without the park lamps, tail lamp, and license plate lamps being activated in conjunction with the front fog lamps, as required.
Correction
Dealers are to install a jumper harness that turns on the required lamps when the fog lamps are activated.
Vehicles Involved
Involved are 1999-2000 Chevrolet Tahoes equipped with the sport package (YF3) or the off-road chassis package (Z71) built within these VIN breakpoints:
Year | Division | Model | Plant | From | Through |
|---|---|---|---|---|---|
1999 | Chevrolet | K Util | Arlington | XR148554 | XR154879 |
2000 | Chevrolet | K Util | Arlington | YR101045 | YR197210 |
Important: Dealers should confirm vehicle eligibility through GM Access Screen before beginning campaign repairs. [Not all vehicles within the above breakpoints may be involved.]
Involved vehicles have been identified by Vehicle Identification Number. Computer listings containing the complete Vehicle Identification Number, customer name and address data have been prepared, and are being furnished to involved dealers with the campaign bulletin. The customer name and address data furnished will enable dealers to follow-up with customers involved in this campaign. Any dealer not receiving a computer listing with the campaign bulletin has no involved vehicles currently assigned.
These dealer listings may contain customer names and addresses obtained from Motor Vehicle Registration Records. The use of such motor vehicle registration data for any other purpose is a violation of law in several states/provinces/countries. Accordingly, you are urged to limit the use of this listing to the follow-up necessary to complete this campaign.
Parts Information
Parts required to complete this campaign are to be obtained from General Motors Service Parts Operations (GMSPO). Please refer to your "involved vehicles listing" before ordering parts. Normal orders should be placed on a DRO=Daily Replenishment Order. In an emergency situation, parts should be ordered on a CSO=Customer Special Order.
Part Number | Description | Qty |
|---|---|---|
15059247 | Harness Asm., Park Lp Wrg | 1 |
Service Procedure
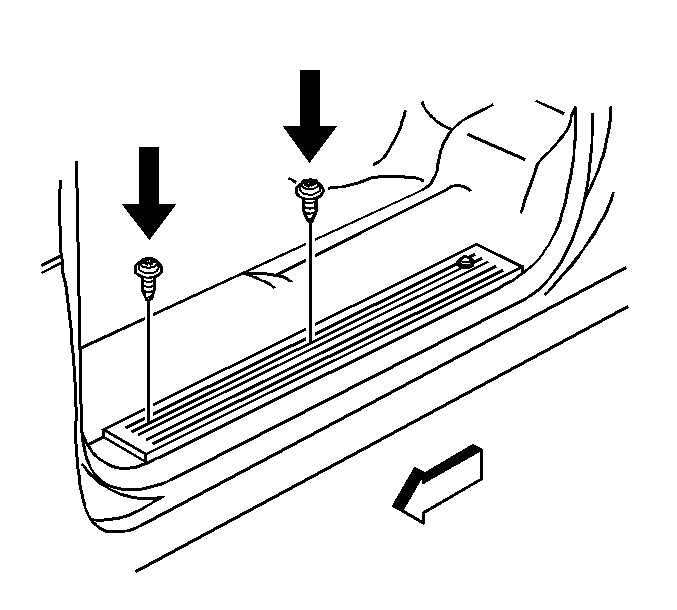
- Remove the two front LH doorsill moulding screws. Refer to Figure 1.
- Remove the LH kick panel moulding by first lifting up on the door sill moulding and grabbing the kick panel at the top and bottom near the door jamb. Pull back until free. Then reach in towards the bulkhead, grab the kick panel and pull back until free. Refer to Figure 2.
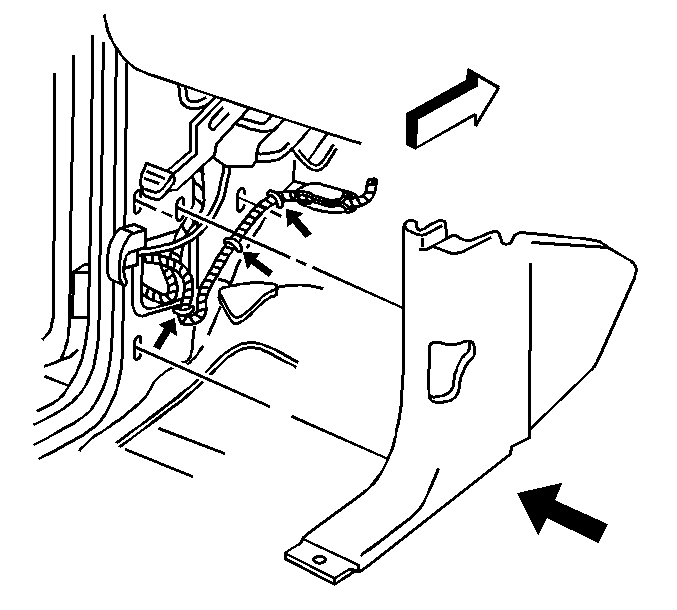
- Locate the harness containing the light gray six-pin connector inside the A-pillar (1). Remove the harness from inside of the A-pillar making sure not to damage the other wiring harnesses. Refer to Figure 3.
- Separate the wire harness connector making sure not to damage the plastic connectors (1). Refer to Figure 4.
- Install the jumper harness. Connect the male end of the fog lamp jumper harness to the female end of the body harness and snap in place. Connect the female end of the fog lamp jumper harness to the male end of the body harness and snap in place. MAKE SURE CONNECTORS ARE FULLY SNAPPED TOGETHER. Refer to callout 1, Figure 5.
- Remove the green connector (1) from the plug on the convenience centre labeled "DRK GRN." Refer to Figure 6.
- Remove the terminal lock from the green connector.
- Remove the brown wire and terminal from the green connector.
- Install the terminal lock back in to the green connector (1). Refer to Figure 7.
- Install the green connector back into the convenience centre opening from which it was removed (labeled "DRK GRN").
- Separate the black connector on the jumper harness lead. Remove the male connector (1) from the female connector (2). Refer to Figure 8.
- Open the separated male connector lock (4). Be careful not to damage the connector.
- Install the brown wire (3) and terminal previously removed into the connector cavity labeled "A." MAKE SURE THE TERMINAL SNAPS INTO PLACE.
- Close the connector lock making sure it snaps shut.
- Install the male connector back into the female connector from which it was removed. MAKE SURE THE CONNECTOR SNAPS INTO PLACE. Apply foam tape to assembled connectors (5).
- Apply foam tape to the six-pin connectors (1). Place the six-pin jumper and body harness back into the A-pillar (2). Replace all harnesses removed from the A-pillar to their original location. MAKE SURE NOT TO PLACE JUMPER HARNESS LEAD INTO THE A-PILLAR. Refer to Figure 9.
- Tie strap the jumper harness lead to the body harness at three (3) places, as shown. Refer to Figure 10.
- Install the LH kick panel moulding by first lifting up on the doorsill moulding. Guide the hood release handle through the opening in the kick panel and under the doorsill moulding. Line up clips on the kick panel with the holes in the body. Apply pressure to the kick panel in the areas of the clips until the clips snap into place. Refer to Figure 11.
- Install the two front LH doorsill moulding screws.
- Install the GM Campaign Identification Label.
Important: Plastic parts are very fragile. Use care when handling these components.
Figure 1

Figure 2
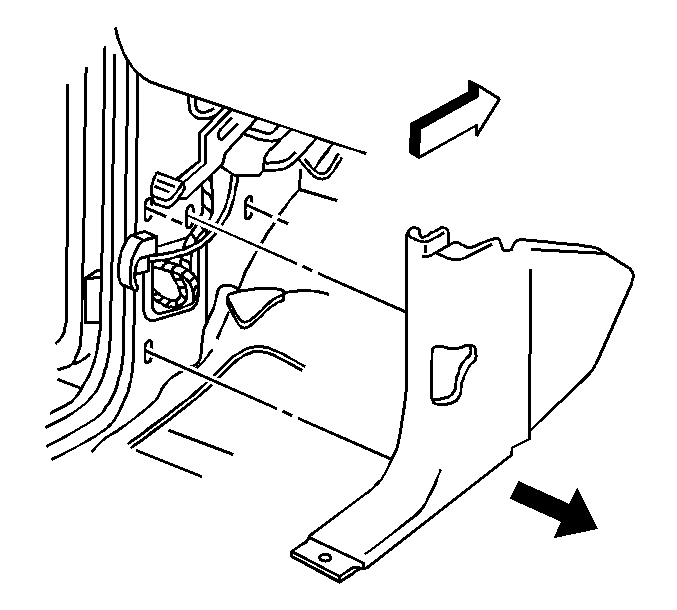
Figure 3
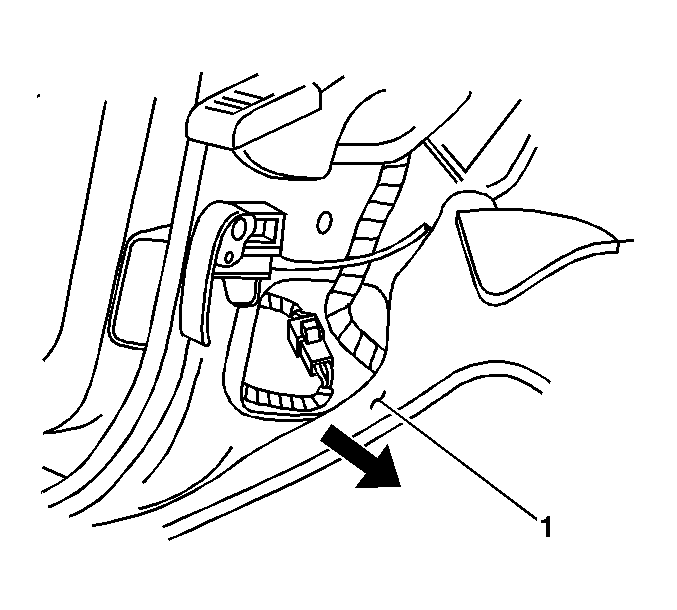
Figure 4
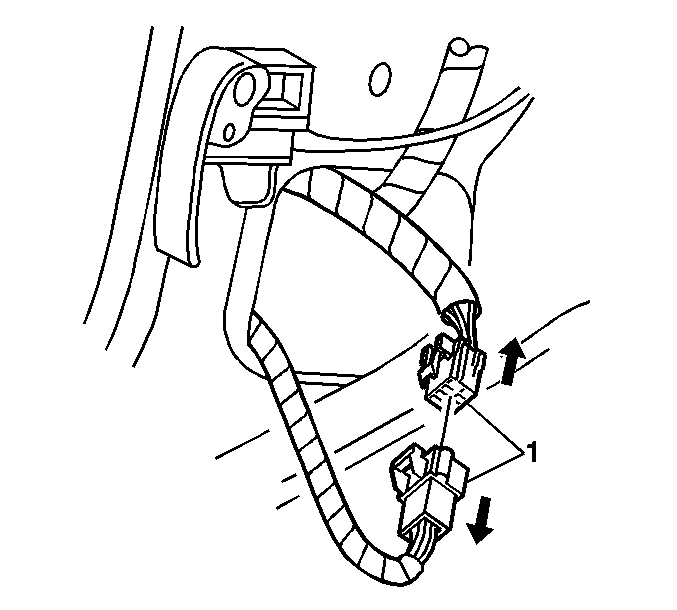
Figure 5
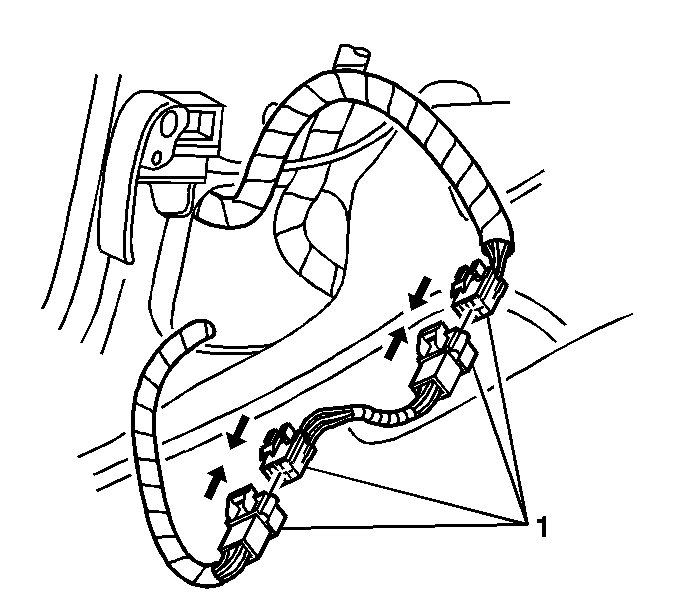
Figure 6
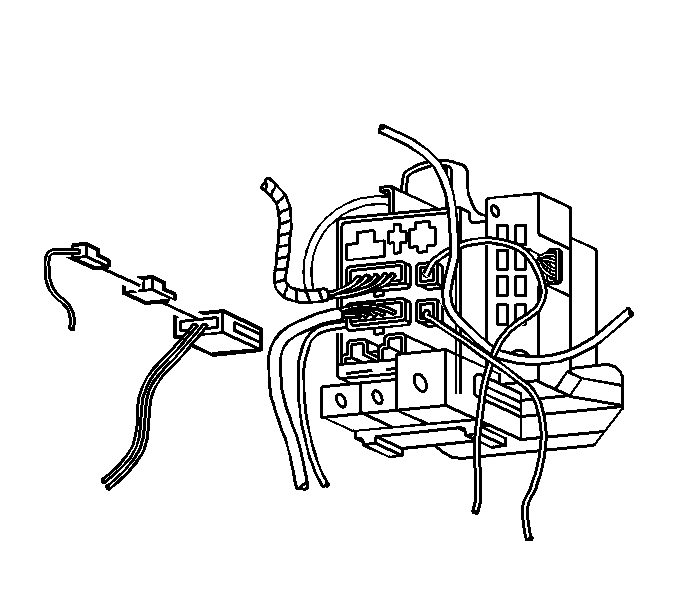
Figure 7
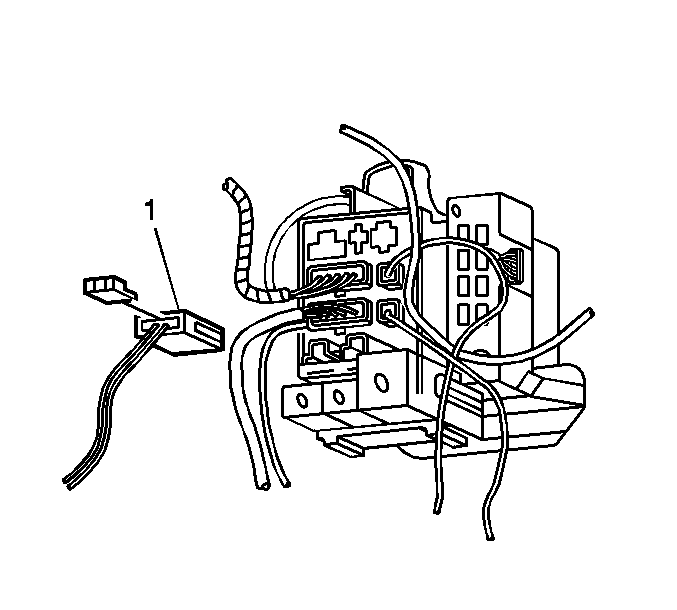
Figure 8
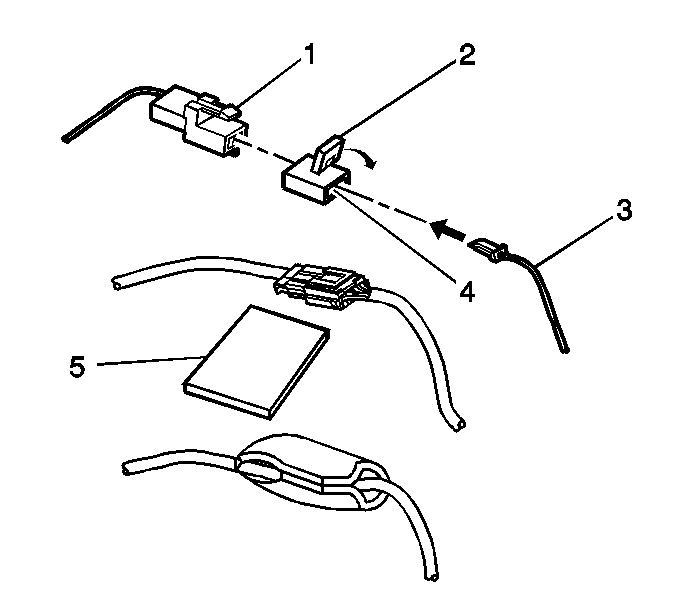
Figure 9
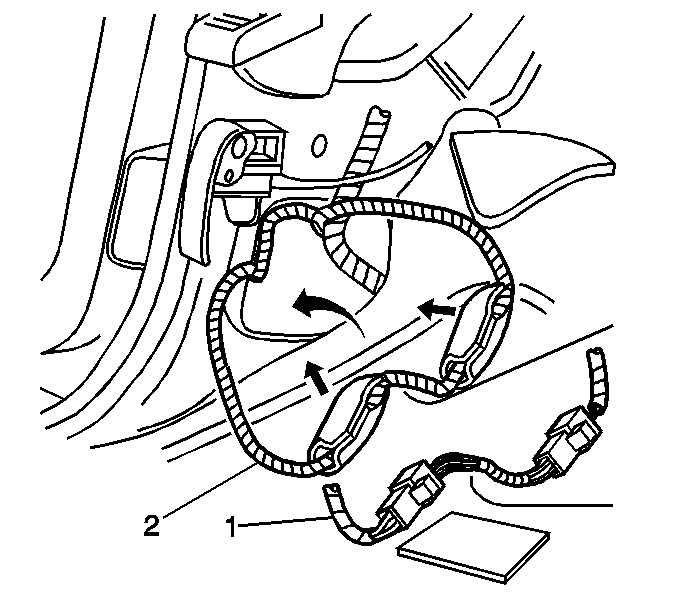
Figure 10
Important: Plastic parts are very fragile. Use care when handling these components.
Figure 11
Tighten
Tighten the screws to 2 N·m (18 lb in).
Campaign Identification Label
Place a Campaign Identification Label on each vehicle in accordance with the instructions outlined in this Product Campaign Bulletin. Each label provides a space to include the campaign number and the five (5) digit dealer code of the dealer performing the campaign service. This information may be inserted with a typewriter or a ball point pen.
Put the Campaign Identification Label on a clean and dry surface of the radiator core support in an area that will be visible to people servicing the vehicle. Additional Campaign Identification Labels for Canadian dealers can be obtained from DGN by calling 1-800-668-5539 (Monday-Friday, 8:00 am to 5:00 pm EST). Ask for Item Number GMP 91 when ordering.
Claim Information
Submit a Product Campaign Claim with the information indicated below:
Repair Performed | Part Count | Part No. | Parts Allow | CC-FC | Labor Op | Labor Hours* |
|---|---|---|---|---|---|---|
Install Jumper Harness | 1 | -- | ** | MA-96 | V0551 | 0.4 |
* -- For Campaign Administrative Allowance, add 0.1 hours to the "Labor Hours". ** -- The "Parts Allowance" should be the sum total of the current GMSPO Dealer Net price plus applicable Mark-Up for the harness assembly needed to complete the repair. | ||||||
Refer to the General Motors WINS Claim Processing Manual for details on Product Campaign Claim Submission.
Customer Notification
Customers will be notified of this campaign on their vehicles by General Motors (see copy of customer letter included with this bulletin)
Dealer Campaign Responsibility
All unsold new vehicles in dealers' possession and subject to this campaign MUST be held and inspected/repaired per the service procedure of this campaign bulletin BEFORE customers take possession of these vehicles.
Dealers are to service all vehicles subject to this campaign at no charge to customers, regardless of mileage, age of vehicle, or ownership, from this time forward.
Customers who have recently purchased vehicles sold from your vehicle inventory, and for which there is no customer information indicated on the dealer listing, are to be contacted by the dealer. Arrangements are to be made to make the required correction according to the instructions contained in this bulletin. This could be done by mailing to such customers a copy of the customer letter accompanying this bulletin. Campaign follow-up cards should not be used for this purpose, since the customer may not as yet have received the notification letter.
In summary, whenever a vehicle subject to this campaign enters your vehicle inventory, or is in your dealership for service in the future, please take the steps necessary to be sure the campaign correction has been made before selling or releasing the vehicle.
September, 2000Dear General Motors Customer:
General Motors has decided that certain 1999-2000 Chevrolet four-wheel drive Tahoes equipped with the sports package or the off-road chassis package fail to conform to Canada Motor Vehicle Safety Standard (CMVSS) 108, "Lighting Equipment." These vehicles have fog lamps that can be activated without the park lamps, tail lamp, and license plate lamps being activated in conjunction with the front fog lamps, as required.
Your GM dealer will install a jumper harness that turns on the required lamps when the fog lamps are activated. This service will be performed for you at no charge.
You may be contacted by a dealer other than the dealer who sold or is currently servicing your vehicle. Please be advised that you may take your vehicle to the General Motors dealership of your choice to have the recall service work completed. Please contact your dealer as soon as possible to arrange a service date.
If parts are required, ask your dealer for details regarding their availability. If parts are not in stock, they can be ordered before scheduling your service date.
This letter identifies your vehicle. Presentation of this letter to your dealer will assist their Service personnel in completing the necessary correction to your vehicle in the shortest possible time.
We sincerely regret any inconvenience this causes you; however, we have taken this action in the interest of your continued satisfaction with our products.
Customer Support Department
General Motors of Canada Limited
