REAR MAIN SEAL REPLACEMENT 1984'J'SERIES CARS & S/T TRUCK

Model and Year 19841/2 CAVALIER AND "S/T" TRUCK LQ5, LQ2 AND LR9
In December, 1983, a new "thick" rear main seal went into production in 19841/2 Cavalier and "S/T" trucks with 2.0L L4, LQ5, LQ2 and LR9 engines.
New rear seal -- starting VIN'S:
Lordstown December 5, 1983
Chevrolet 1G1AD69P8E7141224
Janesville December 12, 1983
Chevrolet 1G1AE77P5EJ172567
Vehicles assembled after the VIN's shown above will have engines with this new seal. (Note: verification of the block casting identifier is recommended).
This new seal is sold as part of service kit, P/N 14085829.
Before replacing a rear main seal, care should be taken in determining the exact source of leak. If it has been determined that the rear main oil seal is the cause of the leak, it will be necessary to identify the type of seal required to service the engine. Refer to Figure 1 for the identification mark.
If it is determined that a rear main seal replacement is required, use the following procedure. (Note: replacement of this new seal under warranty will require zone authorization):
1. Support engine.
2. Remove transmission as outlined in the transmission section of the shop manual.
3. Remove flywheel. At this time, check to confirm rear seal leak.
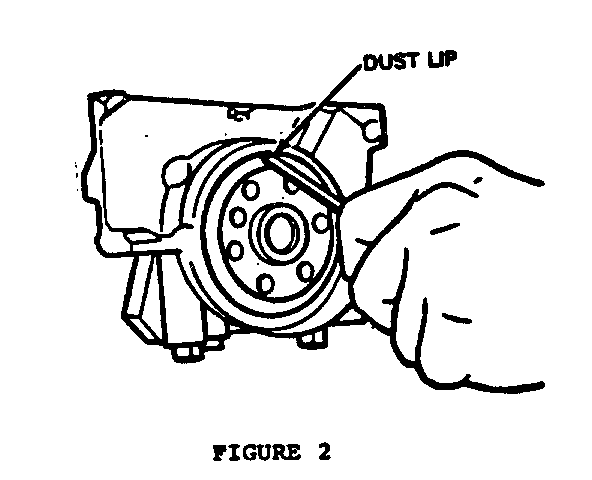
4. Remove seal by inserting a screwdriver or similar tool in through the dust lip at an angle as shown in Figure 2. Pry seal out by moving handle of screwdriver towards the end of the crankshaft pilot. Repeat as required around the seal until seal is removed. Care must be taken not to damage crankshaft O.D. surface.
5. Check I.D. of bore for knicks or burrs and correct as required. Inspect crankshaft for burrs or nicks on surface which contacts seal. Repair or replace crankshaft as required.
6. Install new seal using tool J-34686 (Figure 3).
7. Install seal over mandril, slide the seal on the mandril until dust lip (back of seal) bottoms squarely against collar of tool (Figure 4).
8. Align dowel pin of tool with dowel pin hole in crank-shaft and attach tool to crankshaft by hand, or torque attaching screws to 2-5 ft. lbs.
9. Turn "T" handle of tool so that collar pushes seal the the bore, turn handle until the collar is tight against case. This will insure the seal is seated properly.
10. Loosen the "T" handle of the tool until it comes to a stop. This will insure that the collar will be in the proper position for installing a new seal. Remove attaching screws.
11. Check seal, making sure seal is seated squarely in bore.
12. Install flywheel.
13. Start engine, check for leaks.
14. Install transmission.
Use applicable labor operations.


General Motors bulletins are intended for use by professional technicians, not a "do-it-yourselfer". They are written to inform those technicians of conditions that may occur on some vehicles, or to provide information that could assist in the proper service of a vehicle. Properly trained technicians have the equipment, tools, safety instructions and know-how to do a job properly and safely. If a condition is described, do not assume that the bulletin applies to your vehicle, or that your vehicle will have that condition. See a General Motors dealer servicing your brand of General Motors vehicle for information on whether your vehicle may benefit from the information.
