Front Inner Hinge Pillar Reinforcement Sectioning Impala
Removal Procedure
Important: Sectioning of the inner reinforcement panel (3) can only take place with outer door frame replacement or sectioning procedures. Sectioning the outer door (1) frame at the front hinge pillar requires a 25 mm (1 in) offset from the inner reinforcement sectioning joint. The inner reinforcement can serve as a backing plate for the outer panel sectioning.
- Visually inspect and restore as much of the damage as possible to factory specifications.
- Remove all related panels and components.
- Position all wiring out of the way to prevent damage and for best access to vehicle.
- Remove all sealers and anti-corrosion materials as necessary.
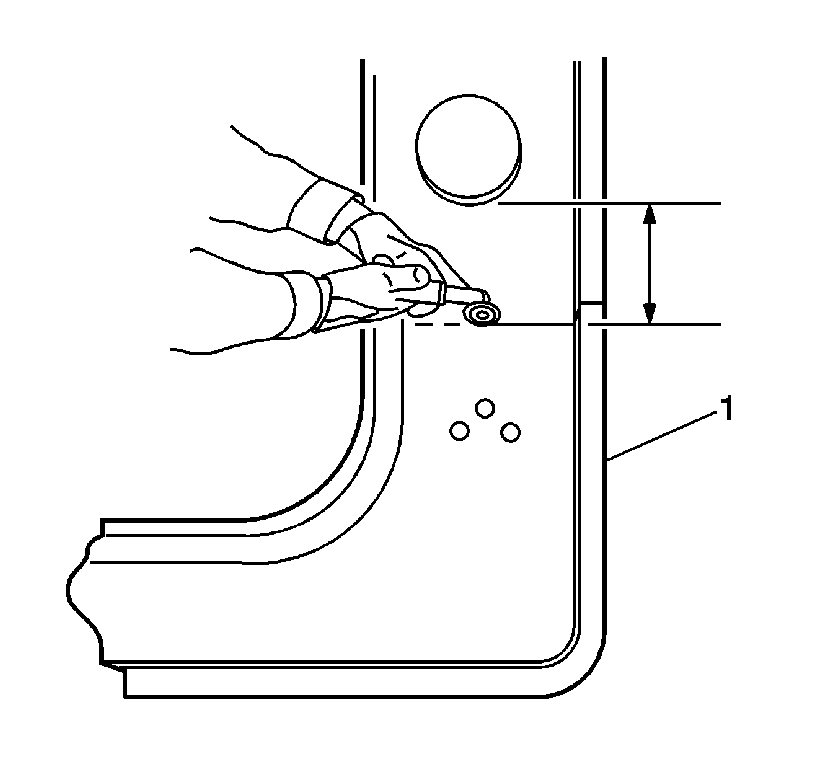
- On the original reinforcement panels (1) measure down 90 mm (3 9/16 in) from the large wiring harness hole in the pillar and mark a horizontal line.
- Cut the inner reinforcement along this line for sectioning.
- Locate and mark all factory welds. Note the number and location of welds for installation of the service part.
- Drill out all factory welds as necessary.
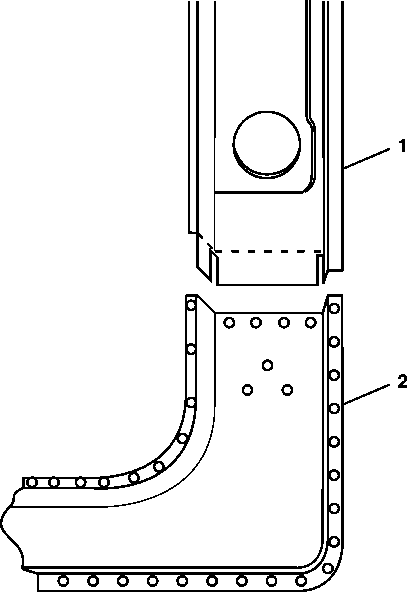
- Remove the damaged section of the inner reinforcement (2).
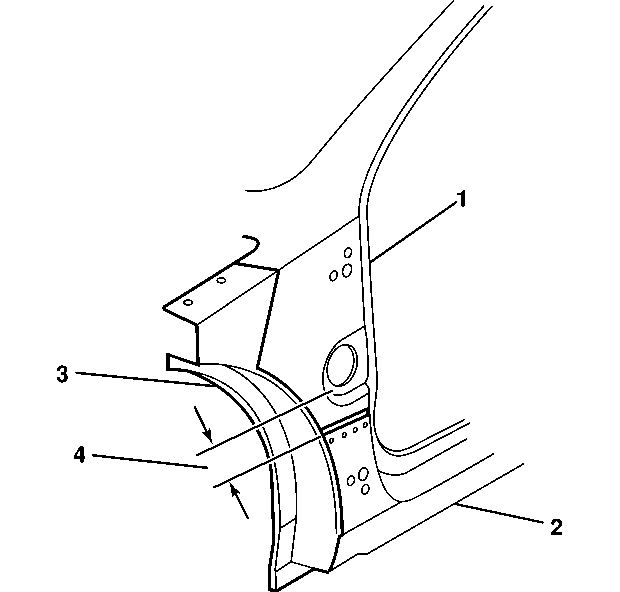
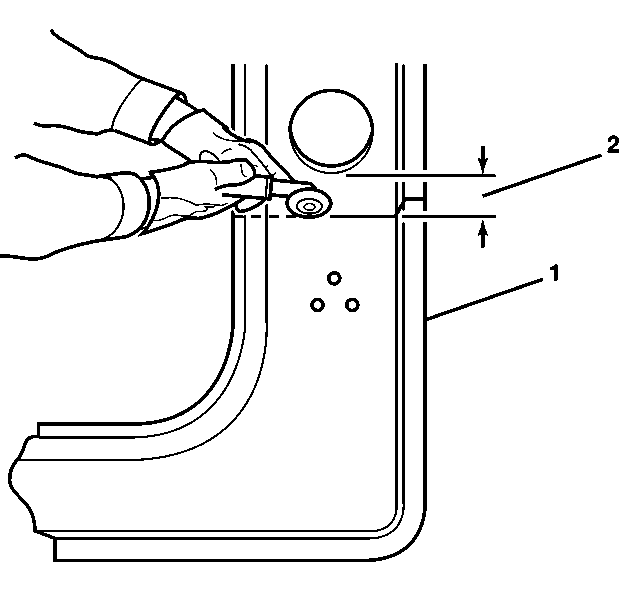
Important: Note the locations of the sound-deadening foam for installation.
Installation Procedure
- Cut and remove 30 mm (1 3/16 in) from the flanges on either side of the remaining section of the original hinge pillar to create a 30 mm (1 3/16 in) flange.
- Cut 5 mm (3/16 in) wide gaps in the bottom corners.
- Step the tabs inward to allow the door frame inner reinforcement service section to fit over the original inner reinforcement.
- Weld the tabs together along the edges (1).
- On the service part (1) measure 60 mm (2 3/8 in) down from the large wiring harness hole in the hinge pillar and mark a horizontal line.
- Cut the hinge pillar along this line.
- Drill 8 mm (5/16 in) plug weld holes as necessary in the locations noted from the original panel.
- Drill plug weld holes along the sectioning cut of the service part (2).
- Prepare mating surfaces and position the service section (2) over the stepped tab on the original inner reinforcement (1).
- Check and make sure the door hinge bolt holes are properly located.
- Plug weld accordingly.
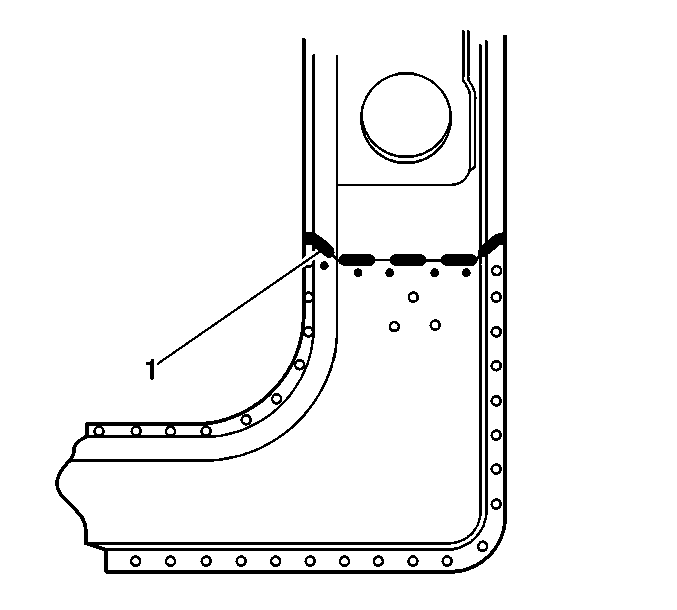
- Stitch weld along the entire joint (1).
- Make 25 mm (1 in) welds along the seam with 25 mm (1 in) gaps between.
- Go back and complete the stitch weld. This will create a solid joint with minimal heat distortion.
- Clean and prepare welded surfaces.
- Prime with 2-part catalyzed primer.
- Apply sealers and anti-corrosion materials as necessary.
- Install all related panels and components.
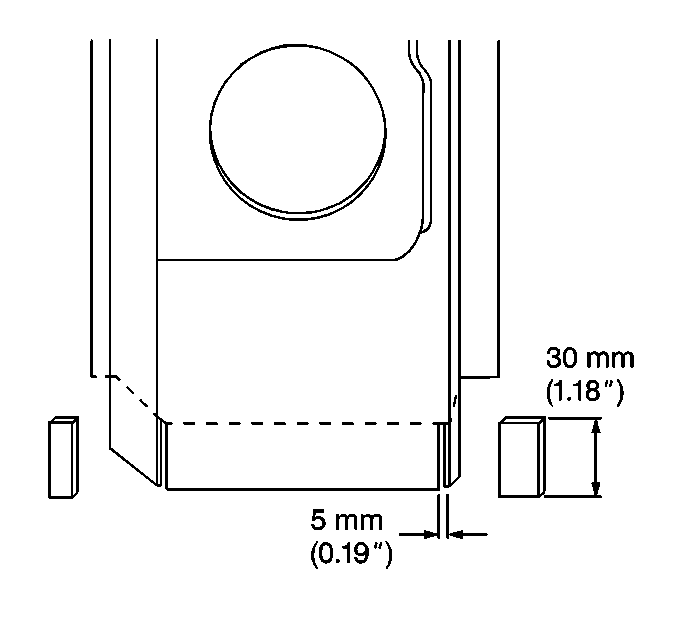
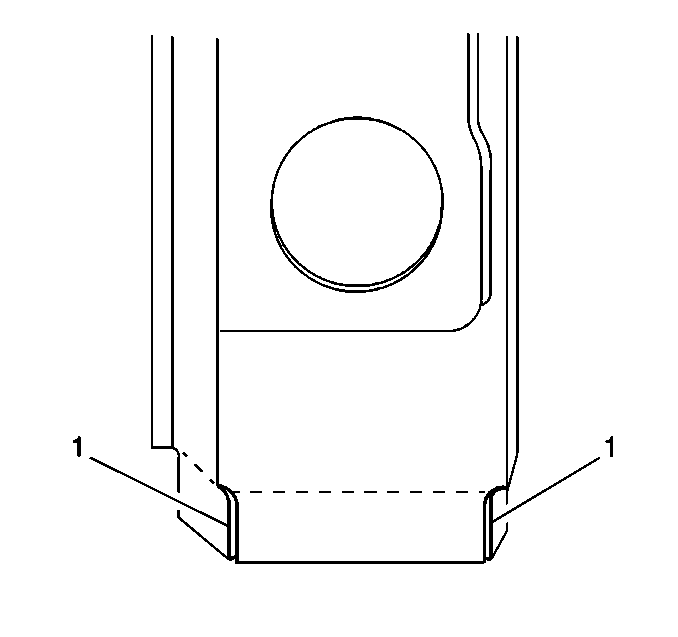
Important: Prior to refinishing, refer to GM 4901MD-99 Refinish Manual for recommended products. Do not combine paint systems. Refer to paint manufacturer's recommendations.
Important: It is important to re-apply the sound-deadening foam in the locations noted from the removal process.
Front Inner Hinge Pillar Reinforcement Sectioning Monte Carlo
Removal Procedure
Important: Sectioning of the inner reinforcement panel (3) can only take place with outer door frame replacement or sectioning procedures. Sectioning the outer door (1) frame at the front hinge pillar requires a minimum of a 25 mm (1 in) offset from the inner reinforcement sectioning joint. The inner reinforcement can serve as a backing plate for the outer panel sectioning.
- Visually inspect and restore as much of the damage as possible to factory specifications.
- Remove all related panels and components.
- Position all wiring out of the way to prevent damage and for best access to vehicle.
- Remove all sealers and anti-corrosion materials as necessary.
- On the original reinforcement panels (1) measure down 120 mm (4 3/4 in) from the large wiring harness hole in the pillar and mark a horizontal line.
- Cut the inner reinforcement along this line for sectioning.
- Locate and mark all factory welds. Note the number and location of welds for installation of the service part.
- Drill out all factory welds as necessary.
- Remove the damaged section of the inner reinforcement (2).

Important: Note the locations of the sound-deadening foam for installation.
Installation Procedure
- Cut and remove 30 mm (1 3/16 in) from the flanges on either side of the remaining section of the original hinge pillar to create a 30 mm (1 3/16 in) flange.
- Cut 5 mm (3/16 in) wide gaps in the bottom corners.
- Step the tabs inward to allow the door frame inner reinforcement service section to fit over the original inner reinforcement.
- Weld the tabs together along the edges (1).
- On the service part (1) measure 90 mm (3 1/2 in) down from the large wiring harness hole in the hinge pillar and mark a horizontal line.
- Cut the hinge pillar along this line.
- Drill 8 mm (5/16 in) plug weld holes as necessary in the locations noted from the original panel.
- Drill plug weld holes along the sectioning cut of the service part (2).
- Prepare mating surfaces and position the service section (2) over the stepped tab on the original inner reinforcement (1).
- Check and make sure the door hinge bolt holes are properly located.
- Plug weld accordingly.
- Stitch weld along the entire joint (1).
- Make 25 mm (1 in) welds along the seam with 25 mm (1 in) gaps between.
- Go back and complete the stitch weld. This will create a slid joint with minimal heat distortion.
- Clean and prepare welded surfaces.
- Prime with 2-part catalyzed primer.
- Apply sealers and anti-corrosion materials as necessary.
- Install all related panels and components.


Important: Prior to refinishing, refer to GM 4901MD-99 Refinish Manual for recommended products. Do not combine paint systems. Refer to paint manufacturer's recommendations.
Important: It is important to re-apply the sound-deadening foam in the locations noted from the removal process.
