General Waterleak Diagnosis Guide

| Subject: | General Waterleak Diagnosis Guide |
| Models: | 1999-2002 Chevrolet Malibu |
| 1999-2001 Oldsmobile Alero |
| 1999-2001 Pontiac Grand Am |
This bulletin is being revised to add new conditions. Please discard Corporate Bulletin Number 01-08-57-007 (Section 08--Body & Accessories).
This bulletin contains information on various waterleak conditions. Refer to the following table for a quick reference to the various conditions and corresponding illustrations.
Condition | Best Described in Condition |
|---|---|
Front Floor Wet (Driver Side Only) | 9, 11 |
Front Floor Wet (Passenger Side Only) | 2 |
Front Floor Wet (Driver Side or Passenger Side) | 3, 4, 5, 6, 10 |
Front Floor or Rear Floor Carpet Wet | 1, 7, 8 |
Rear Floor Carpet Wet | 12, 13, 14, 15 |
Lower "A" Pillar Wet | 3, 4 |
Headliner Wet | 4 |
Trunk Wet | 12, 13, 14, 15 |
Important: U.S. Dealers -- For additional information, reference the June 2001 IDL broadcast service product issues for N-Car waterleaks.
Condition 1 (Alero, Grand Am, Malibu)
Some customers may comment about a mildew odor or that the front or rear floor carpet is wet.
Cause
The door water deflector under the door pad may have voids, buckles, or other areas where the adhesive sealer is not adhered properly to the door metal (front floor or rear floor).
Correction
Remove and dispose of the door water deflector. DO NOT reuse the original door water deflector. The adhesive surface must be clean, dry and free of dirt or contaminants. Clean the door surface (around the perimeter of the water deflector) with one of the cleaners listed below or an equivalent. Install the new water deflector using the procedure below.
For vehicles built with the auxiliary water deflector, follow Steps 1-4 (Olds and Pontiac sedans only).
- With the original water deflector removed, verify installation of the auxiliary water deflector.
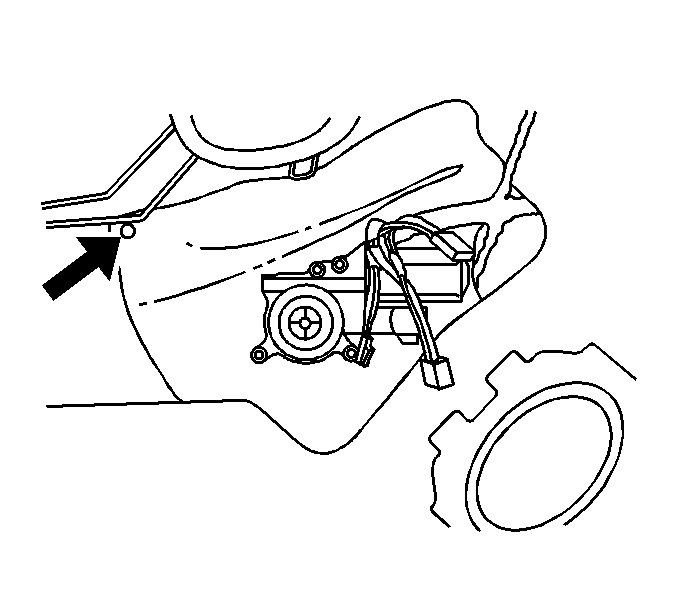
- For the Oldsmobile Alero, locate the auxiliary water deflector off of the nut on the inner panel. Refer to the arrow in the illustration above.
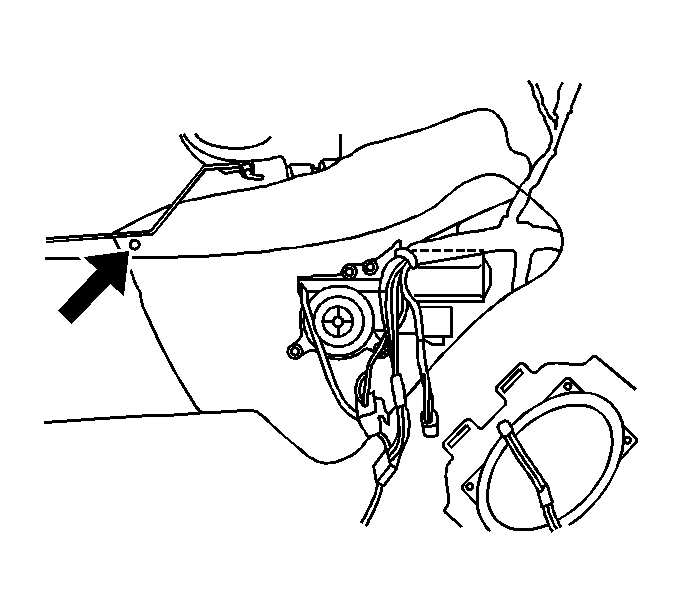
- For the Pontiac Grand Am, locate the auxiliary water deflector off of the hole on the inner panel. Refer to the arrow in the illustration above.
- Make sure the bottom of the auxiliary water deflector is tucked inboard of the inner panel. Refer to the illustrations above.
- Pull the harness connectors through their respective holes or slits.
- After the auxiliary water deflector is installed, install the new door water deflector.
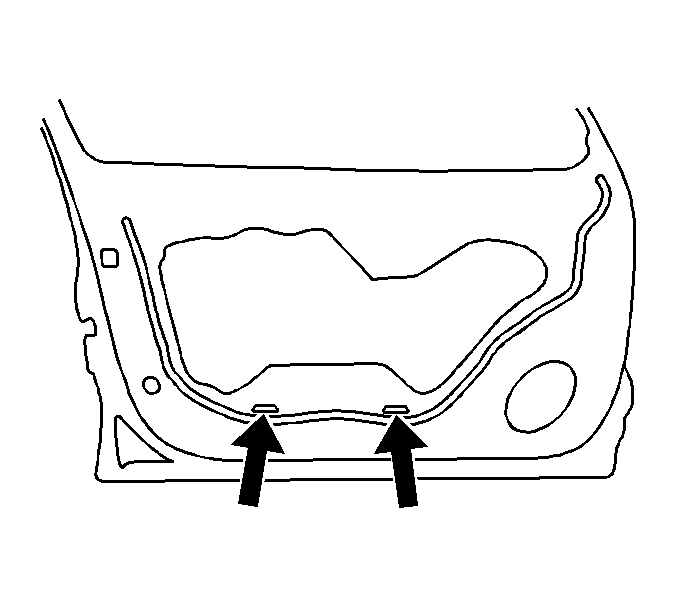
- Position the water deflector to the door inner panel by working from the bottom center outboard. Make sure the butyl adhesive is below the drain holes and does not cover them. Refer to the illustration above.
- Using a 50.8 mm (2 in) wallpaper roller, roll out the butyl adhesive. Do not over roll the butyl; the butyl should be rolled no more than two times its original width. Start at the bottom center and work outboard, up the right and left sides. A 50.8 mm (2 in) roller can be purchased at a hardware or wallpaper store.
Condition 2 (Alero, Grand Am)
Some customers may comment about a mildew odor or wet carpet on the passenger side.
Cause
This condition may be caused by water entering the fresh air inlet to the HVAC case due to poor sealing of the air inlet screen to the fresh air inlet opening.
Correction
Refer to Corporate Bulletin Number 01-08-57-003.
Condition 3 (Alero, Grand Am, Malibu)
Some customers may comment about a mildew odor or wet carpet on the driver or passenger side or that there is evidence of water in the right or left side bottom of the "A" pillar.
Cause
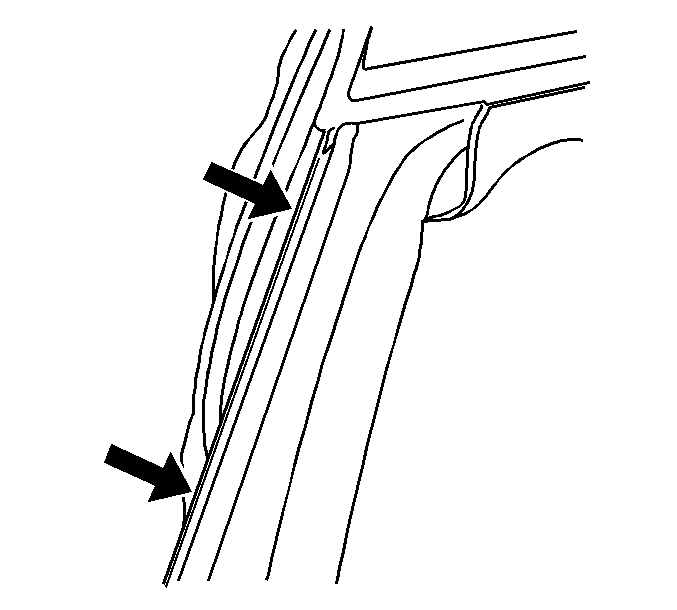
| • | There may be voids in the "A" pillar seam along the side of the windshield. Refer to the illustration above. |
| • | There may be a void in the urethane sealer to the windshield. |
Correction
- Clean the area with one of the cleaners listed below, or equivalent. Repair the area as necessary using seam sealer.
- Reseal the windshield.
Condition 4
Some customers may comment about a mildew odor or wet carpet on the driver or passenger side.
Cause
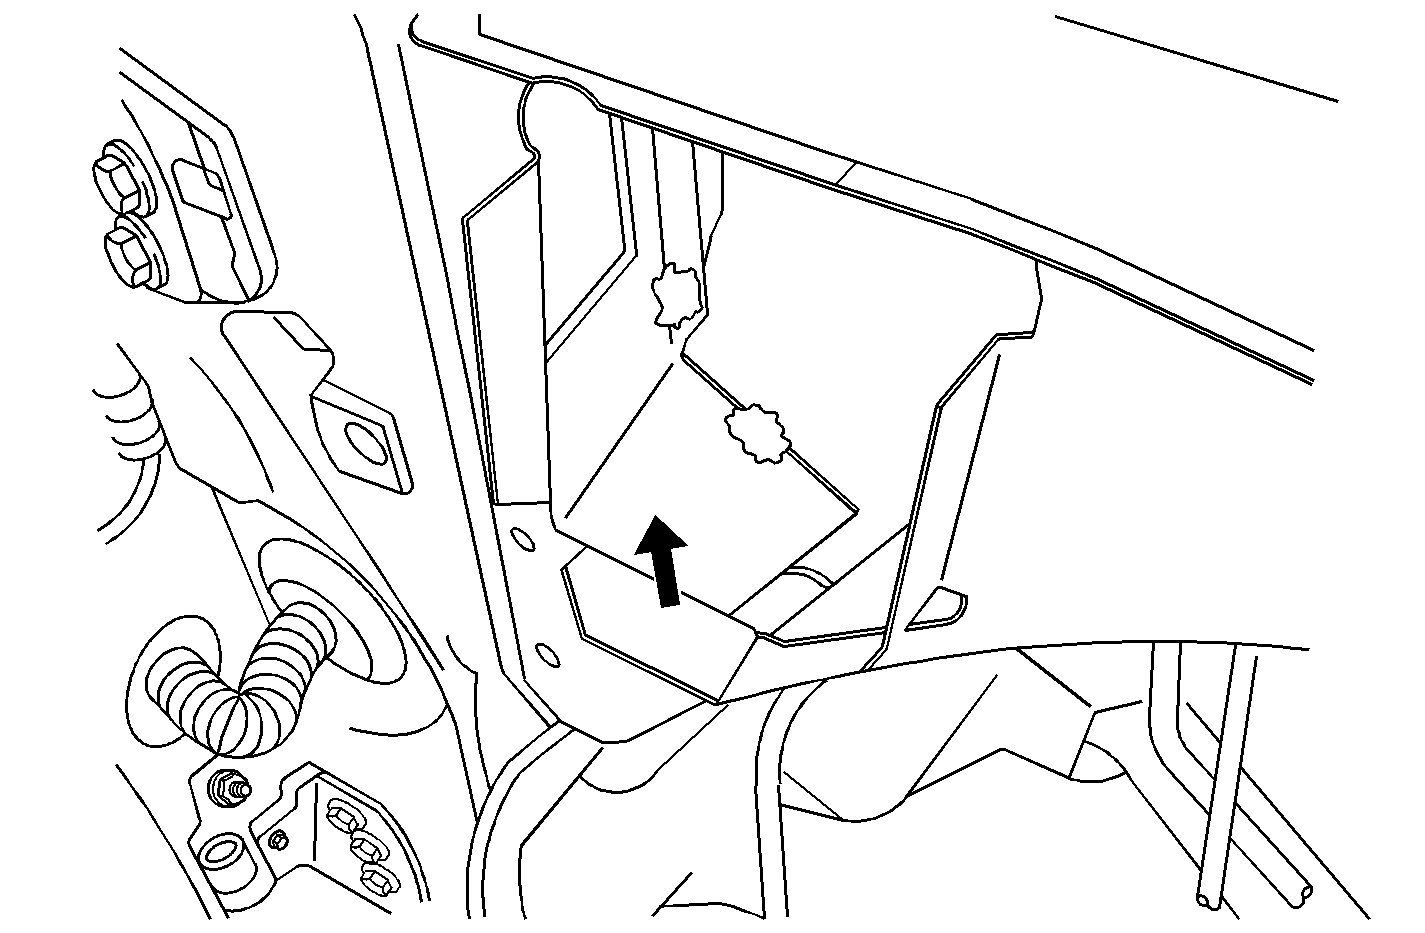
There may be a void in the seam sealer in the baffle area behind the right or left fender. Refer to the illustration above
Correction
Clean the area with one of the cleaners listed below, or equivalent. Repair the area as necessary using seam sealer.
Condition 5
Some customers may comment about a mildew odor or wet carpet on the driver or passenger side.
Cause
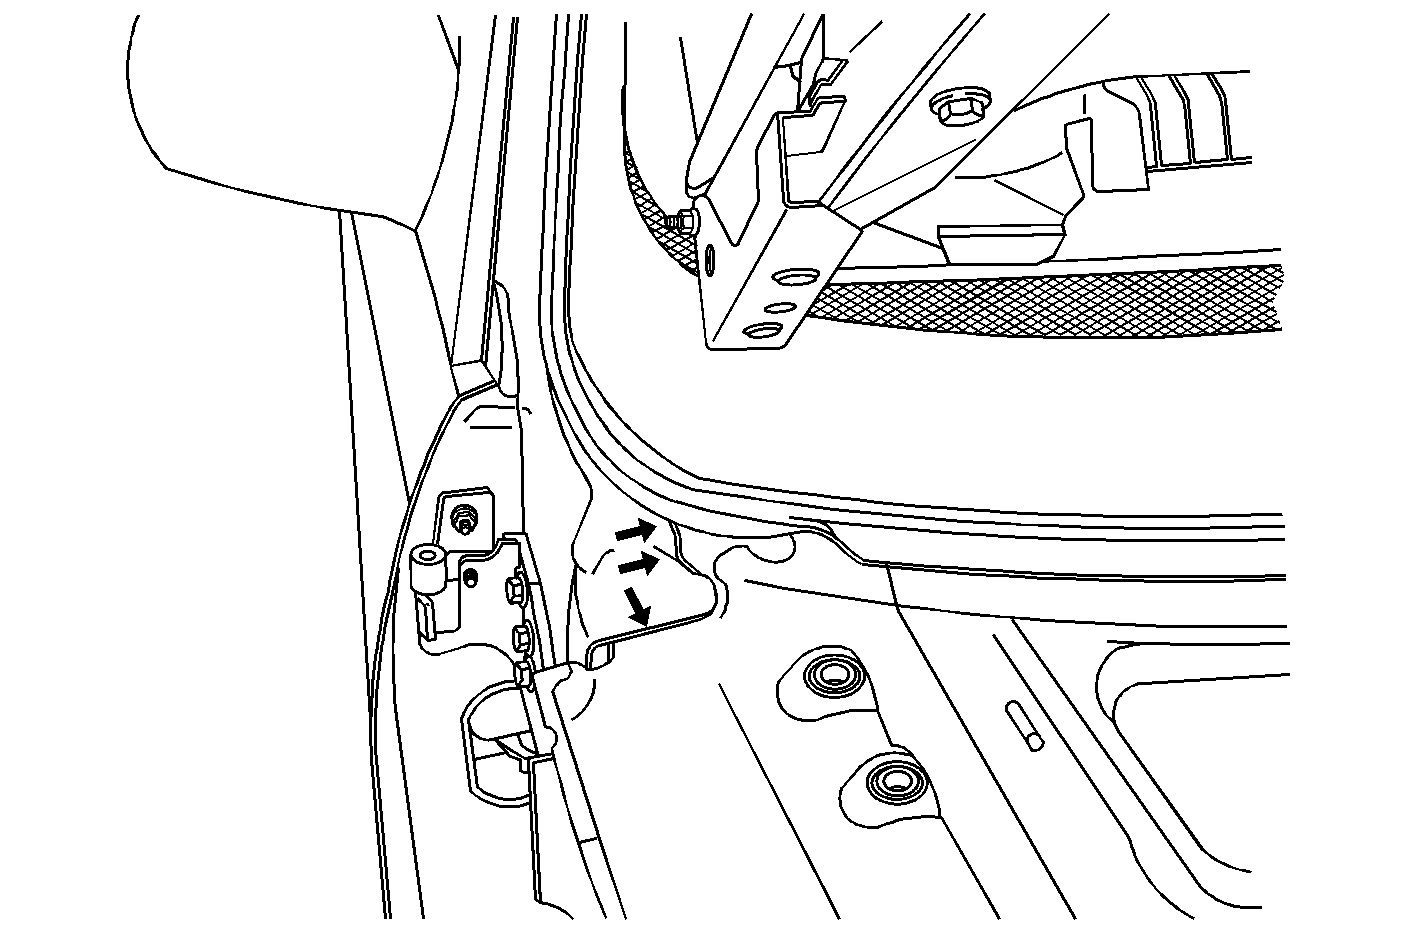
There may be a void in the seam sealer at the base of the windshield on the right or left side. Refer to the illustration above.
Correction
Clean the area with one of the cleaners listed below, or equivalent. Repair the area as necessary using seam sealer.
Condition 6
Some customers may comment about a mildew odor or wet carpet on the driver or passenger side.
Cause
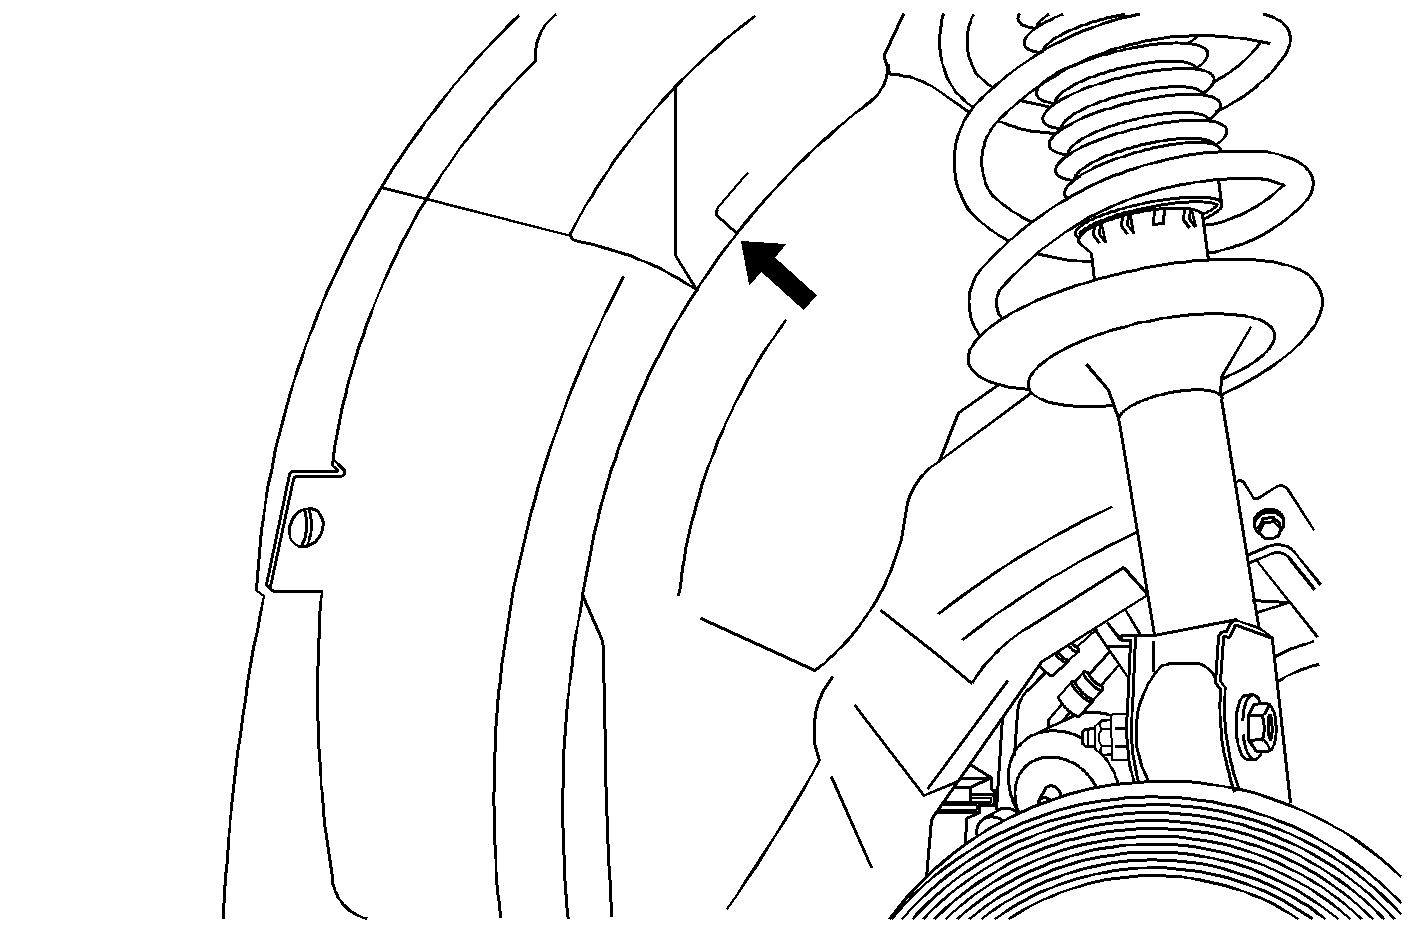
There may be a void in the seam sealer at the tab in the right or left wheelhouse. Refer to the illustration above.
Correction
Clean the area with one of the cleaners listed below, or equivalent. Repair the area as necessary using seam sealer.
Condition 7 (Alero, Grand Am, Malibu)
Some customers may comment about the following conditions:
| • | a mildew odor |
| • | a wet headliner |
| • | wet front or rear floor carpet |
| • | evidence of water in the right or left side bottom of the "A" pillar |
Cause
| • | The sunroof drain hoses may not be attached properly or the drain hoses may be kinked or plugged. |
| • | The sunroof may be out of adjustment. |
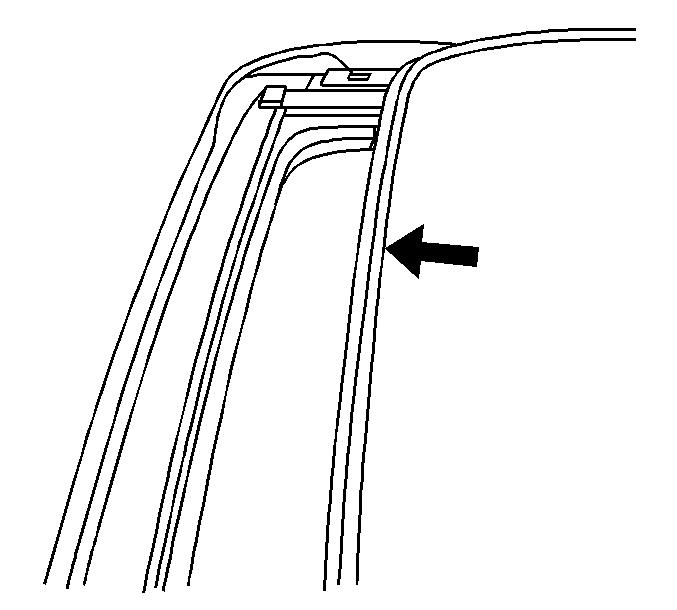
| • | The weatherstrip that surrounds the sunroof may not be sealed to the glass. Refer to the illustration above. |
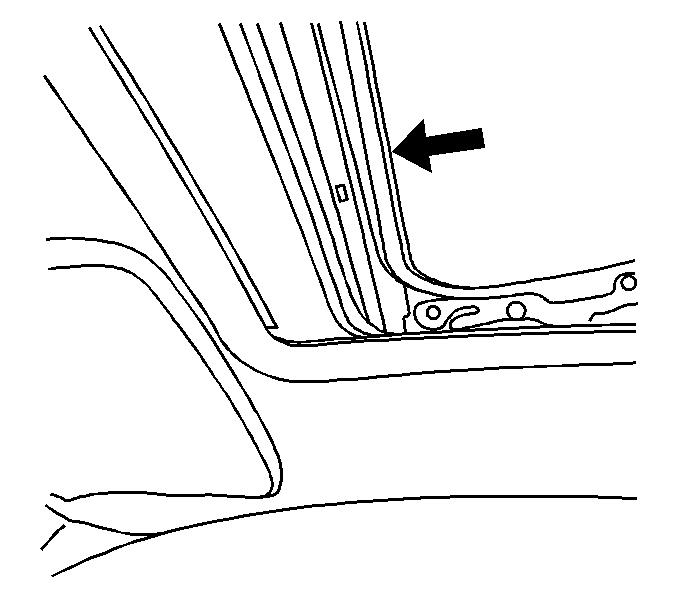
These voids may allow water to leak around to the inside of the glass and drip into the inner pocket of the sunroof assembly. Refer to the illustration above.
Correction
- Verify that the drain hoses are attached properly and not kinked or plugged.
- Adjust the sunroof for proper fit.
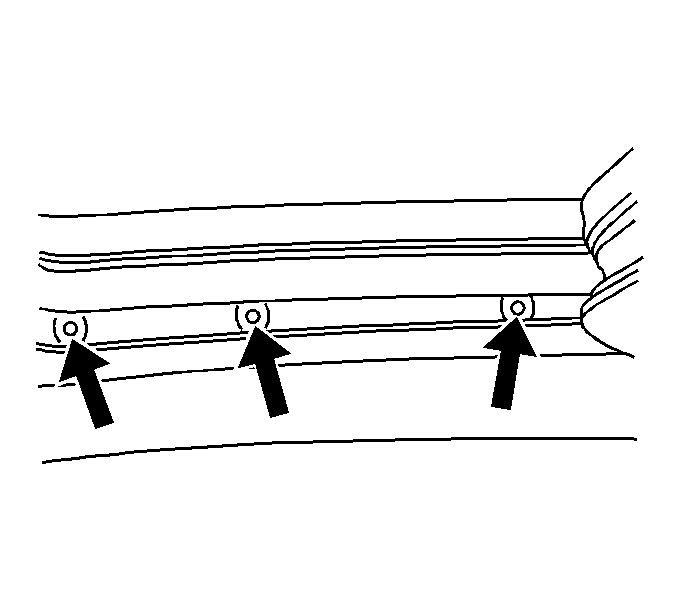
| 2.1. | Loosen the six adjustment fastener screws (three on each side). Refer to the illustration above. |
| 2.2. | Fully cycle the sunroof (fully opened and then closed). |
| 2.3. | Adjust the glass for flushness to the roof sheet metal. |
| 2.4. | Re-tighten the six adjustment fastener screws. |
| 2.5. | Cycle the sunroof several times to verify proper adjustment. |
The sunroof glass should be replaced and can be replaced separately from the assembly.
Condition 8 (Alero, Grand Am)
Some customers may comment about a mildew odor or that the front or rear floor carpet is wet.
Cause
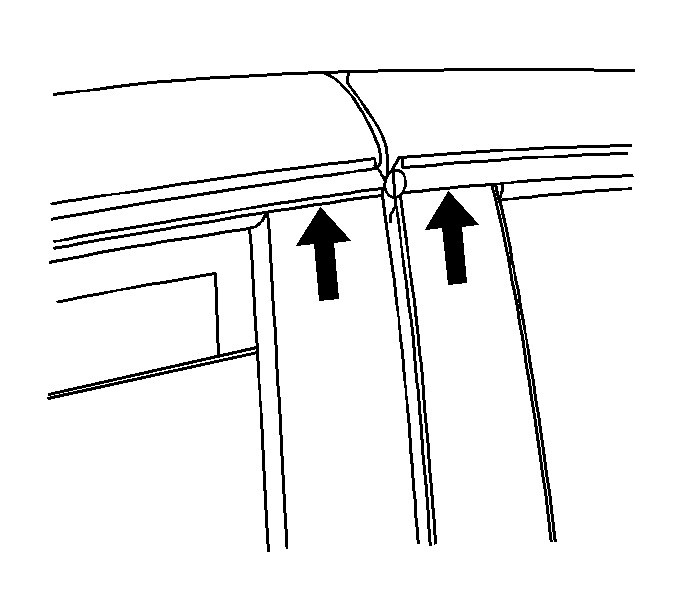
There may be a gap between the upper and the lower trim that will allow water to channel on the inside of the molding, across the top of the door frame and then down to the carpet area. Refer to the illustration above (front and rear door applique shown).
Correction
Repair the area by applying enough seam sealer to fill the gap. Loosen the top vertical molding screws and push the molding upward so that the top of horizontal molding shingles the vertical molding. Wipe away any excess sealer.
Condition 9 (Alero, Grand Am)
Some customers may comment about a mildew odor or wet carpet on the driver side.
Cause
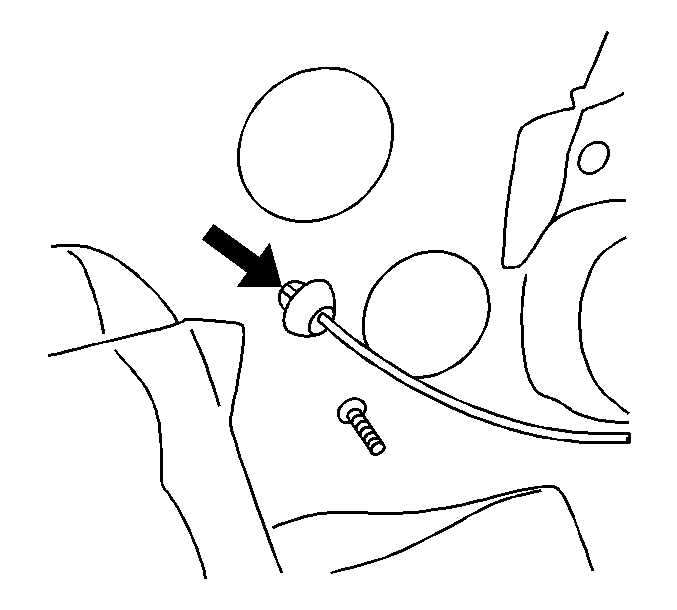
The manual transmission shift cable grommet may not be sealed at the front of dash. Refer to the illustration above.
Correction
Reposition the grommet to fit in the opening properly. If necessary, seal with GM Weatherstrip Adhesive, P/N 12345097 (in Canada, use P/N 10953479).
Condition 10 (Alero, Grand Am, Malibu)
Some customers may comment about a mildew odor or that the front floor carpet is wet.
Cause
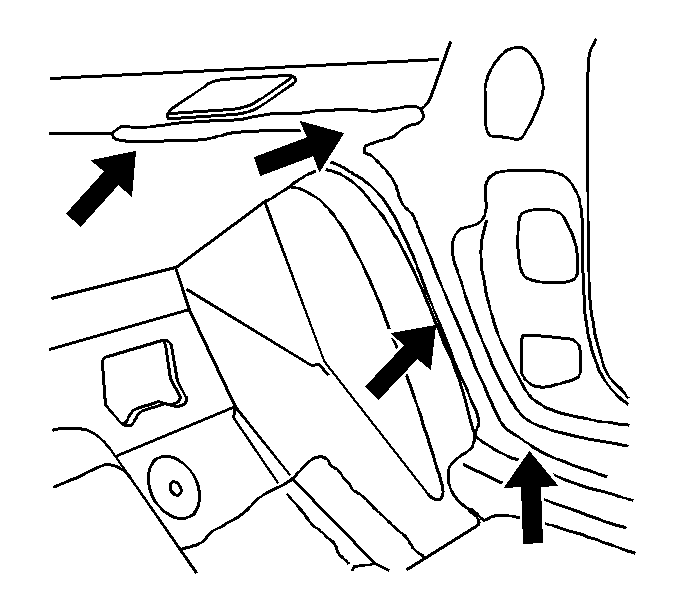
There may be voids in the seam sealer in the cowl (front of the door area on the driver or passenger side). Refer to the illustration above.
Correction
Repair the area by applying enough seam sealer to fill all the voids.
Condition 11 (Malibu)
Some customers may comment about a mildew odor or wet front floor carpet on the driver side.
Cause
The park brake stud may not be sealed properly.
Correction
Remove the park brake stud nut and add a sealer to the stud and reassemble.
Condition 12 (Alero, Grand Am, Malibu)
Some customers may comment about a mildew odor, wet rear floor carpet or wet carpet in the trunk.
Cause
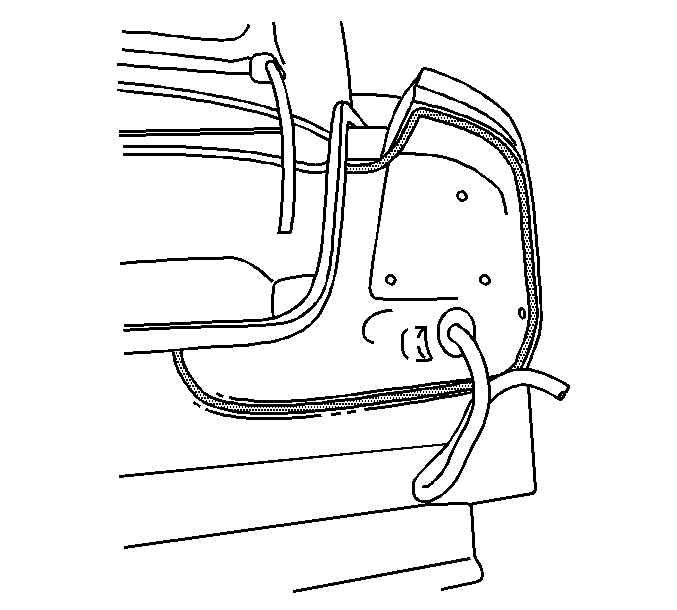
There may be voids in the tail lamp area seam sealer on the right or left side of the vehicle. Refer to the bold line in the illustration above.
Correction
Use a soapy water mix and apply liberally to the seam area. Using shop air from inside the trunk, direct the air at the seam from the bottom of the seal. Repair area as necessary using seam sealer.
Condition 13 (Alero, Grand Am, Malibu)
Some customers may comment about a mildew odor, wet rear floor carpet or wet carpet in the trunk.
Cause
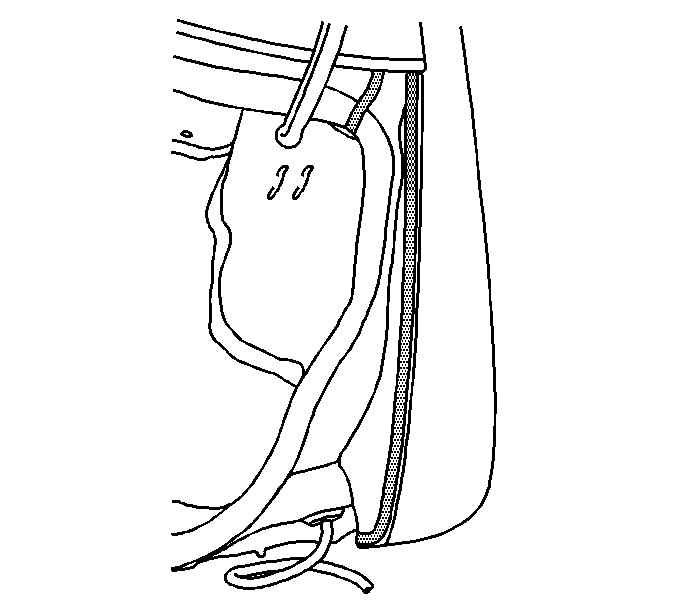
There may be voids in the trunk to fender seam sealer on the right or left side of the vehicle. Refer to the bold lines in the illustration above.
Correction
Use a soapy water mix and apply liberally to the seam area. Using shop air from inside the trunk, direct the air at the seam from the bottom of the seam. Repair the area as necessary using seam sealer.
Condition 14 (Alero, Grand Am, Malibu)
Some customers may comment about a mildew odor or wet carpet in the trunk.
Cause
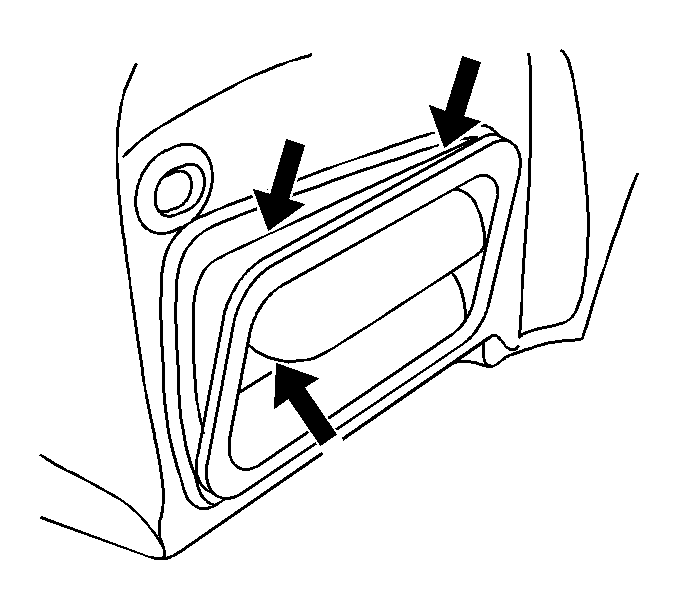
The pressure relief valve may be damaged, mispositioned or the rubber flap may be folded over on the right or left side of the vehicle. Refer to the illustration above.
Correction
Repair or replace the valve as necessary. If it is necessary to replace the valve, remove and dispose of the original part. Clean the metal surface with one of the cleaners listed below. Install the new part, properly centering the part to the hole and depress the part firmly to the metal for proper adhesion.
Condition 15 (Alero, Grand Am, Malibu)
Some customers may comment about a mildew odor, wet rear floor carpet or wet carpet in the trunk.
Cause
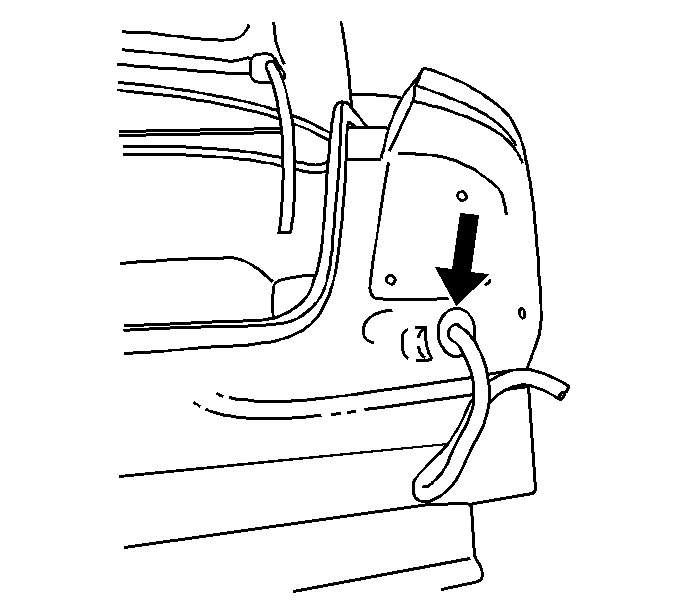
The tail lamp harness grommet may become mispositioned in the opening on the right or left side of the vehicle.
Correction
Reposition the grommet to fit in the opening properly. Also, inspect the harness inside the trunk behind the carpet trim. If the harness is too tight, release it from the retention clip. Route it in a manner so that it will not cause a future rattle noise or chafe on any sharp metal edge. Note that if the harness is not released from the retention clip and there is no slack, the condition may re-occur when objects are placed in the trunk in a manner that applies pressure to that harness.
Parts Information
Part Number | Description |
|---|---|
12345097 (US) 10953479 (Canada) | Weatherstrip Adhesive Gel (Black) |
Parts are currently available from GMSPO.
Cleaners
| • | 3M® General Purpose Adhesive Cleaner, P/N 08984 |
| • | Dominion Sure Seal, Sure Solve Stock BSS |
| • | Kent Acrosol™ |
Seam Sealers
| • | 3M® Ultropro™ Autobody Sealant |
| • | Kent High Tech Seam Sealer Clear 10200 |
| • | Dominion Sure Seal Heavy Duty Drip Check LCS Item #9019 |
