For 1990-2009 cars only
Lumbar Bladder Replacement First design
Removal Procedure
The first design lumbar bladders are serviced as a unit separately from the bolster bladders.
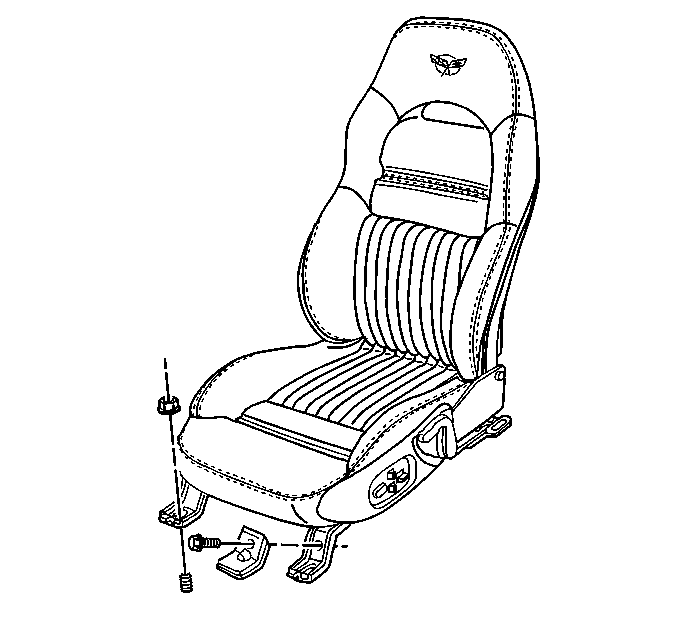
- Remove the seat. Refer to Seat Replacement - Power with Adjuster .
- Remove the seatback insert pillow. Refer to Front Seat Back Cushion Cover and Cushion Pad Replacement .
- Disconnect the lumbar bladder hose connector from the pump.
- Remove the lumbar bladders.
- Slide the air hoses from under the seatback cover.
- Remove the bladders with hoses.
Remove the seat cushion cover. Refer to Seat Cushion Trim Cover and Pad Replacement .
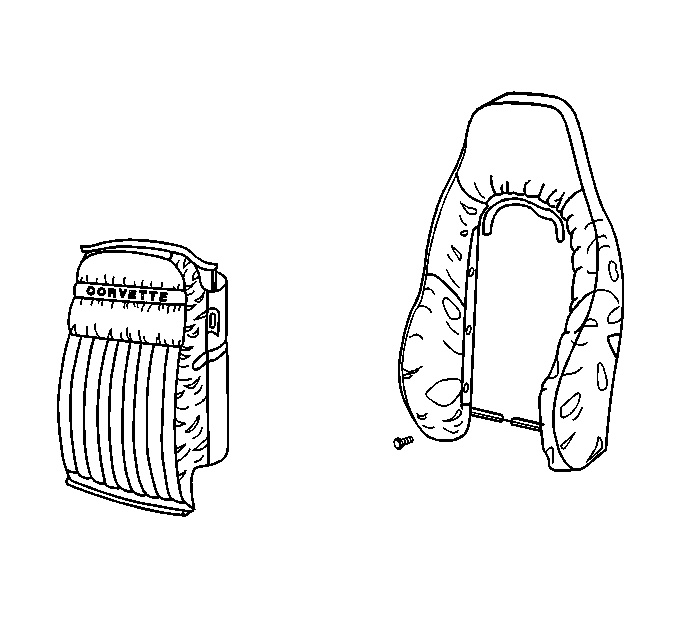

| 4.1. | Slide the upper bladder slightly up. |
| 4.2. | Tuck the mounting tab under the bladder sleeve. |
| 4.3. | Slide the bladder down over the tab. |
| 4.4. | Repeat this procedure with the lower bladder. |
Installation Procedure
- Install the lumbar bladder to the seatback.
- Tuck the hoses under the corner of the seatback cover foam.
- Connect the bladder hose connector to the pump.
- Install the seat cushion cover. Refer to Seat Cushion Trim Cover and Pad Replacement .
- Install the seatback insert pillow. Refer to Front Seat Back Cushion Cover and Cushion Pad Replacement .
- Install the seat. Refer to Seat Replacement - Power with Adjuster .

| 1.1. | Slide the lower bladder sleeve up over the mounting tab. |
| 1.2. | Pull the tab out over the bladder sleeve. |
| 1.3. | Slide the bladder slightly downward. |
| 1.4. | Repeat this procedure with the upper bladder. |
Lumbar Bladder Replacement Second Design
Removal Procedure
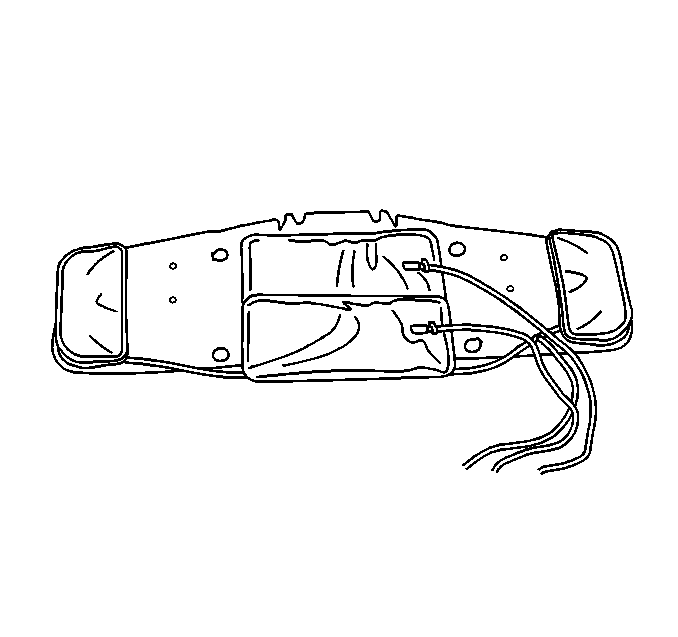
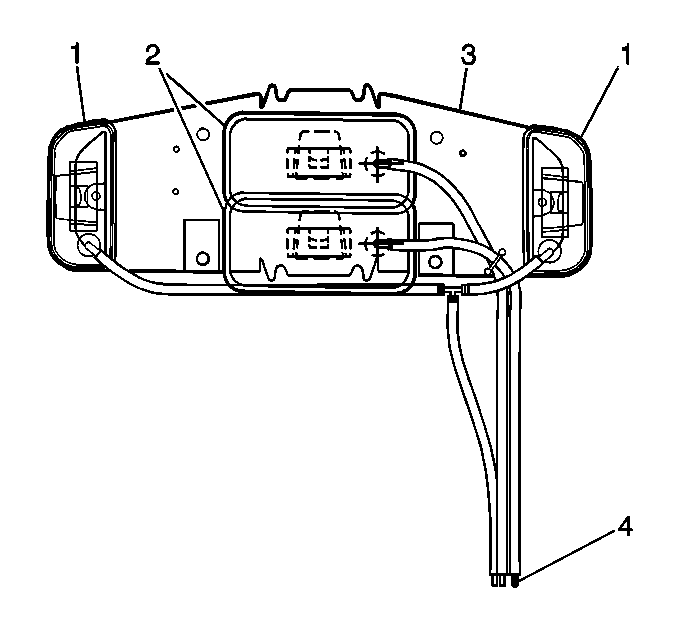
The second design lumbar bladders and bolster bladders are serviced as one lumbar/lateral bladder system. The bladder system is serviced separate from the module assembly. The bladder service part is supplied with the necessary connector fittings. The bladder to module hoses are labeled #3, #4, and #5 to aid in assembly.
- Raise the seat to the full up position.
- Remove the seat. Refer to Seat Replacement - Power with Adjuster .
- Remove the seat cushion cover and pad. Refer to Seat Cushion Trim Cover and Pad Replacement .
- Unhook the J strip attaching the bottom of the seatback insert pillow.
- Remove the two fir tree fasteners attaching the upper sides of the insert pillow.
- Unzip the upper insert pillow zipper.
- Remove the seatback insert pillow.
- Remove the four lower fir tree fasteners attaching the seatback cover.
- Peel the trim cover from the bolsters and reposition the trim up over the top of the seatback. (trim will be inside out).
- Peel the foam pad from the bolsters and reposition to expose the lumbar system.
- Remove the lumbar/lateral bladder system from the seatback.
- Remove the control module J strips from the seat support wires.
- Reposition the control module to the top of the seat support wires. (it is not necessary to remove the lumbar pump).
- Cut the three hoses (4) connecting the control module to the lumbar/lateral bladders 75 mm (3 in) from the control module.
- Remove the tie strap attaching the hoses to the seat frame.
- Remove the lumbar/lateral bladder assembly.

Installation Procedure
- Position the lumbar/lateral support bladders to the seatback inserting the tabs into the seatback.
- Route the hoses through the pivot area and tie strap them to the seat frame under the seatback adjuster.
- Connect the seat switch to the harness.
- Connect power to the seat.
- Operate the upper lumbar control and use the procedure in step eight to connect the hose that pressurized to the bladder hose labeled #3 .
- Operate the lower lumbar control and use the procedure in step eight to connect the hose that pressurized to the bladder hose labeled #4.
- Operate the bolster control and use the procedure in step eight to connect the hose that pressurized to the bladder hose labeled #5.
- Using Loctite™ 406, or equivalent, glue the module hoses to the fittings on the bladder hoses (4).
- Install the control module to the seat support wires with the J strips.
- Disconnect the seat electrical connector and remove the seat from the vehicle (if reposition inside the vehicle in step 4.
- Install the seat cushion cover. Refer to Seat Cushion Trim Cover and Pad Replacement .
- Install the seatback foam pad over the bolsters.
- Install the seatback cover over the bolsters.
- Attach the cover and the bladder assembly with the four lower fir tree fasteners.
- Zip the upper seatback zipper closed.
- Tuck the cover over the corners of the hinges.
- Install the insert pillow. Refer to Front Seat Back Trim Replacement .
- Install the seat. Refer to Seat Replacement - Power with Adjuster .
It may be necessary to position the seat in the vehicle.
| 8.1. | Position the hose so it is just over the edge of the barb on the attaching fitting. |
| 8.2. | Apply the adhesive completely around the fitting. |
| 8.3. | Quickly push the hose the rest of the way onto the fitting. |
