Steering Gear Replacement Saginaw - 710 Model
Removal Procedure
Caution: Replace the steering gear mounting bolts, the washers and the nuts every time you remove the steering gear from the vehicle. Failure to replace the bolts, the washers and the nuts may cause the steering gear to separate from the vehicle. This could cause a loss of steering control and personal injury.
- Position the front wheels and the steering wheel in the straight ahead position.
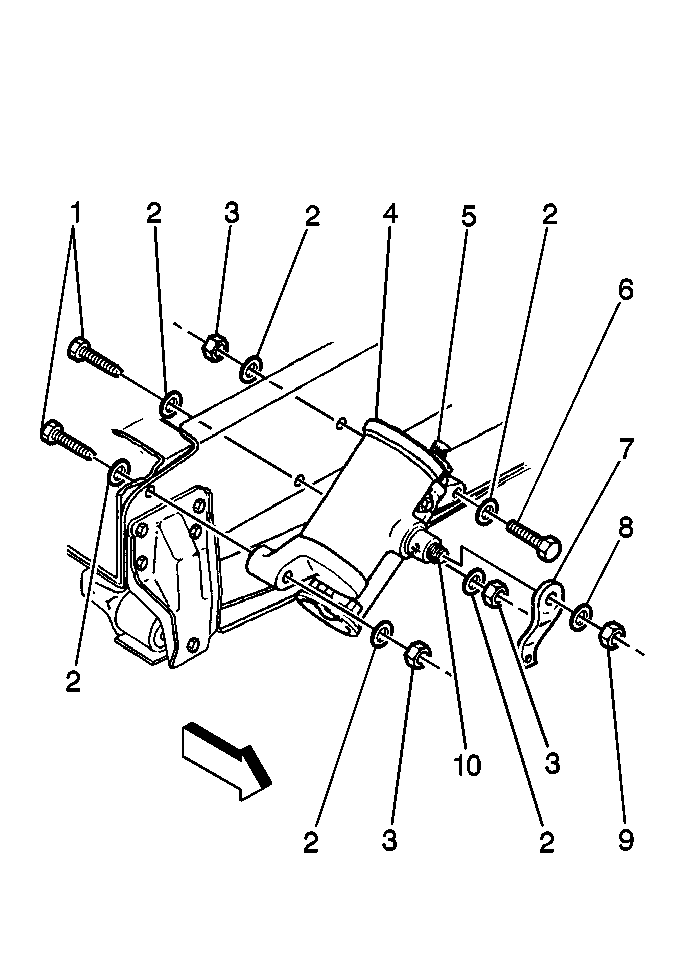
- Remove the pitman arm (7). Refer to Pitman Arm Replacement in Steering Linkage (Non-Rack and Pinion).
- Remove the power steering hoses from the steering gear (4).
- Remove the cardan joint pinch bolt.
- Remove the cardan joint from the steering gear stub shaft (5).
- Remove the steering gear mounting nuts (3) and washers (2).
- Remove the steering gear mounting bolts (1).
- Remove the steering gear (4).
Notice: Do not hammer on the pitman arm, pitman arm shaft, or puller. Damage to the pitman arm or steering gear may result.

| 3.1. | Cap the hoses and the ports in order to prevent any dirt from entering the system. |
| 3.2. | Tag the hose locations. |
Installation Procedure
- Install the steering gear (4) to the frame rail. Hold the gear in the vertical position (stub shaft (5) up).
- Install the new bolts (1). Ensure that the new washers are installed under the bolt heads.
- Install the new washers (2) on the bolts (1).
- Install the new nuts (3) on the bolts (1).
- Install the pitman arm (7).
- Install the pitman arm washer (8) and nut (9).
- Install the cardan joint to the steering gear stub shaft (5).
- Install the cardan joint pinch bolt.
- Adjust the cardan joint to the installed dimension. Refer to Intermediate Steering Shaft Replacement .
- Install the power steering hoses to the steering gear (4).
- Bleed the system. Refer to Power Steering System Bleeding .

Notice: Use the correct fastener in the correct location. Replacement fasteners must be the correct part number for that application. Fasteners requiring replacement or fasteners requiring the use of thread locking compound or sealant are identified in the service procedure. Do not use paints, lubricants, or corrosion inhibitors on fasteners or fastener joint surfaces unless specified. These coatings affect fastener torque and joint clamping force and may damage the fastener. Use the correct tightening sequence and specifications when installing fasteners in order to avoid damage to parts and systems.
Tighten
Tighten the steering gear mounting bolt nut to 450 N·m
(330 lb ft).
Tighten
Tighten the pitman arm nut to 370 N·m (275 lb ft).
Tighten
Tighten the cardan joint pinch bolt to 62 N·m (45 lb ft).
Tighten
Tighten the threaded power steering hoses to 38 N·m (28 lb ft).
Steering Gear Replacement TRW Ross
Removal Procedure
Caution: Replace the steering gear mounting bolts, the washers and the nuts every time you remove the steering gear from the vehicle. Failure to replace the bolts, the washers and the nuts may cause the steering gear to separate from the vehicle. This could cause a loss of steering control and personal injury.
- Position the front wheels and the steering wheel in the straight ahead position.
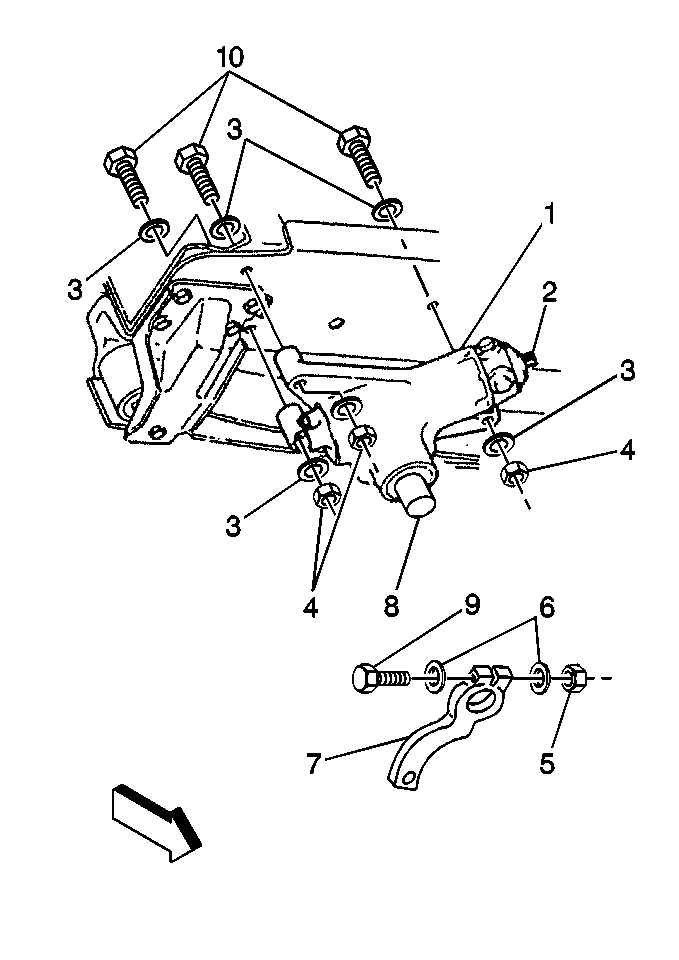
- Remove the pitman arm (7). Refer to Pitman Arm Replacement in Steering Linkage (Non-Rack and Pinion).
- Disconnect the power steering hoses from the steering gear.
- Cap the hoses and the ports in order to prevent dirt from entering the system.
- Tag the hose locations.
- Remove the cardan joint pinch bolt.
- Remove the cardan joint from the steering gear stub shaft (2).
- Slide up the intermediate shaft until the joint clears the steering gear stub shaft (2).
- Remove the steering gear mounting nuts (4) and the washers (3).
- Remove the steering gear mounting bolts (10) and the washers (3).
- Remove the steering gear (1).
Notice: Do not hammer on the pitman arm, pitman arm shaft, or puller. Damage to the pitman arm or steering gear may result.

Installation Procedure
- Install the steering gear (1) to the frame rail.
- Install the new steering gear mounting bolts (10) and the new washers (3).
- Install the new washers (3) and the new nuts (4).
- Install the pitman arm (7). Refer to Pitman Arm Replacement in Steering Linkage (Non rack and Pinion).
- Connect the power steering hoses.
- Install the cardan joint on the stub shaft (2).
- Install the cardan joint pinch bolt.
- Fill the power steering fluid.

Notice: Use the correct fastener in the correct location. Replacement fasteners must be the correct part number for that application. Fasteners requiring replacement or fasteners requiring the use of thread locking compound or sealant are identified in the service procedure. Do not use paints, lubricants, or corrosion inhibitors on fasteners or fastener joint surfaces unless specified. These coatings affect fastener torque and joint clamping force and may damage the fastener. Use the correct tightening sequence and specifications when installing fasteners in order to avoid damage to parts and systems.
Tighten
Tighten the steering gear mounting bolt to 450 N·m (330 lb ft).
Tighten
Tighten the cardan joint pinch bolt to 62 N·m (45 lb ft).
