Removal Procedure
- Unlatch and partially lower the folding top. Refer to Power Folding Top Operation .
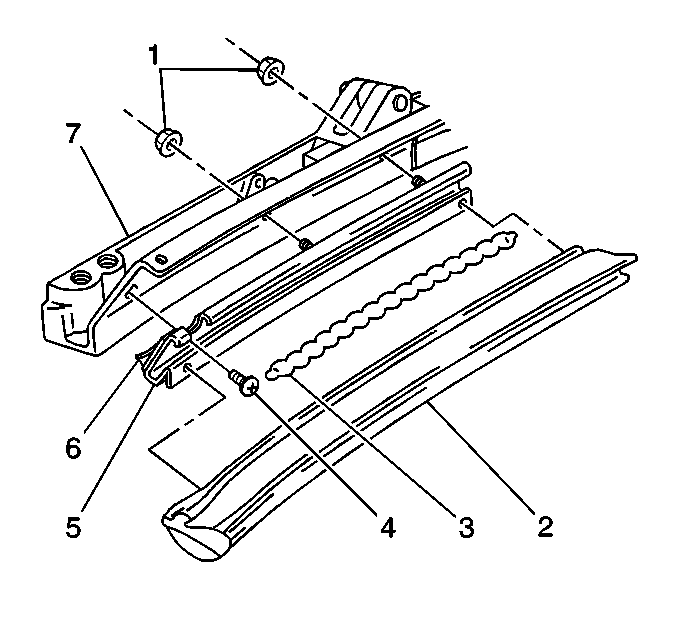
- Remove the front rail weatherstrip (2):
Important: It is not necessary to remove the weatherstrip retainer if only the weatherstrip needs service.

| 2.1. | Disengage the push pins. |
| 2.2. | Pull up the weatherstrip. |
| 2.3. | Insert a flat-blade tool between the weatherstrip and the retainer in order to break the cement bond. |
| 2.4. | Mark the inward location of the front weatherstrip retainer on the front rail. |
The mounting slot location controls forward and rearward.
| 2.5. | Remove the nutwashers (1) from the rail weatherstrip retainer (5). |
| 2.6. | Remove the screw (4) from the front rail weatherstrip retainer. |
| 2.7. | Gently pry and break the foam tape bond in order to remove the front rail weatherstrip retainer (5) from the front rail (7). |
Cleaning and Inspection Procedure
- Clean the adhesive from the front rail weatherstrip (2) if you are reusing the weatherstrip.
- Clean the weatherstrip adhesive from the front rail weatherstrip retainer (5).
- Clean the foam tape from the retainer, and the front rail.
- Inspect surface skin of the front rail weatherstrip (2) for holes, tears, and breaks.
- Replace the weatherstrip if any of the above conditions exist.

Installation Procedure
- Install the foam tape (6) to the back of the front rail weatherstrip retainer (5).
- Use a retaining screw (4) in order to install the front rail weatherstrip retainer (5) to the front rail 7).
- Install the nutwashers (1) to the front rail weatherstrip retainer (5).
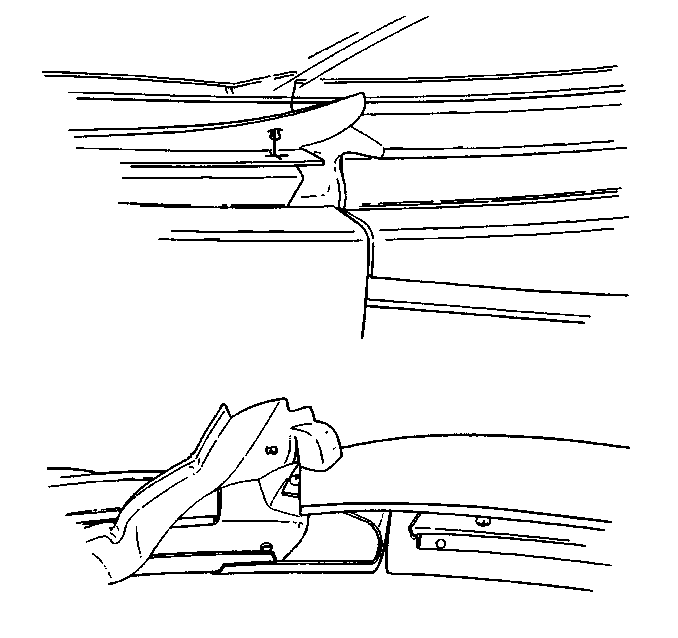
- Lift the corner of the header weatherstrip at the A-pillar.
- Remove the header weatherstrip push pin from the hole.
- Raise and latch the folding top.
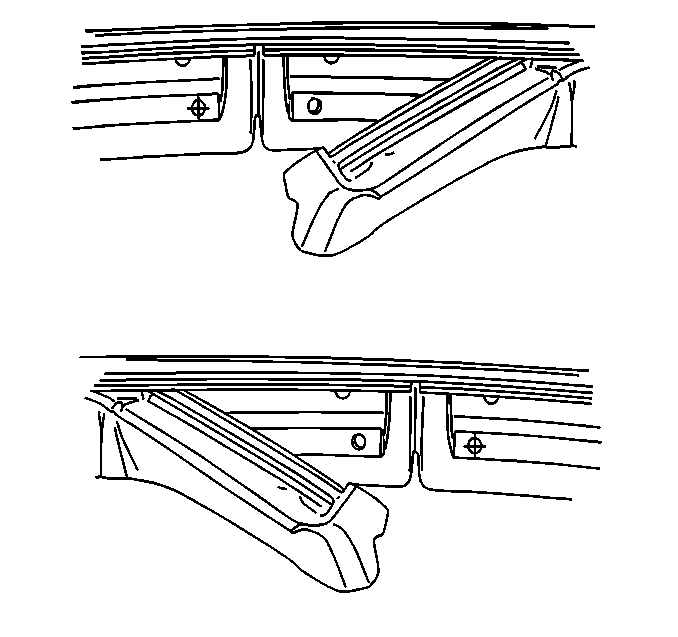
- Measure 89 mm (3.5 in) from the center of the A-pillar retainer hole to the front rail weatherstrip retainer.
- Mark the retainer at the above location.
- Release the front of the center rail weatherstrip from the center rail weatherstrip retainer.
- Mark the retainer at the above location.
- Use a 5 mm (0.20 in) drill bit in order to drill 2 holes as marked on the front rail weatherstrip retainer.
- Lower the folding top. Refer to Power Folding Top Operation .
- Install the header weatherstrip at the A-pillar.
- Install the center rail weatherstrip.
- Apply a continuous bead of weatherstrip adhesive (3) to the front rail weatherstrip retainer (5).
- Install the front rail weatherstrip (2) to the front rail weatherstrip retainer (5).
- Insert the weatherstrip push pins.
- Clean any weatherstrip adhesive from the front rail weatherstrip that may contact the front header weatherstrip, center rail weatherstrip, and the door glass.
- Raise and latch the folding top.
- Inspect the front rail weatherstrip alignment to the header weatherstrip, the center rail weatherstrip, and the door glass.

Notice: Use the correct fastener in the correct location. Replacement fasteners must be the correct part number for that application. Fasteners requiring replacement or fasteners requiring the use of thread locking compound or sealant are identified in the service procedure. Do not use paints, lubricants, or corrosion inhibitors on fasteners or fastener joint surfaces unless specified. These coatings affect fastener torque and joint clamping force and may damage the fastener. Use the correct tightening sequence and specifications when installing fasteners in order to avoid damage to parts and systems.
Tighten
Tighten the screw to 2 N·m (18 lb in).
Tighten
Tighten the nutwashers (1) to 4 N·m (35 lb in).


Measure 40 mm (1.6 in) from the center of the center rail weatherstrip retainer hole forward to the front rail weatherstrip retainer.
Caution: Eye protection must be worn when drilling rivets to reduce the chance of personal injury.

