Removal Procedure
- Unlatch the folding top from the windshield header.
- Remove the rear quarter trim panel. Refer to Rear Quarter Trim Panel Replacement in Interior Trim.
- Remove the headliner at the rear quarter trim panel area to access the folding top drive motor. Refer to Folding Top Headlining Trim Panel Replacement .
- Disconnect the electrical connector from the folding top motor.
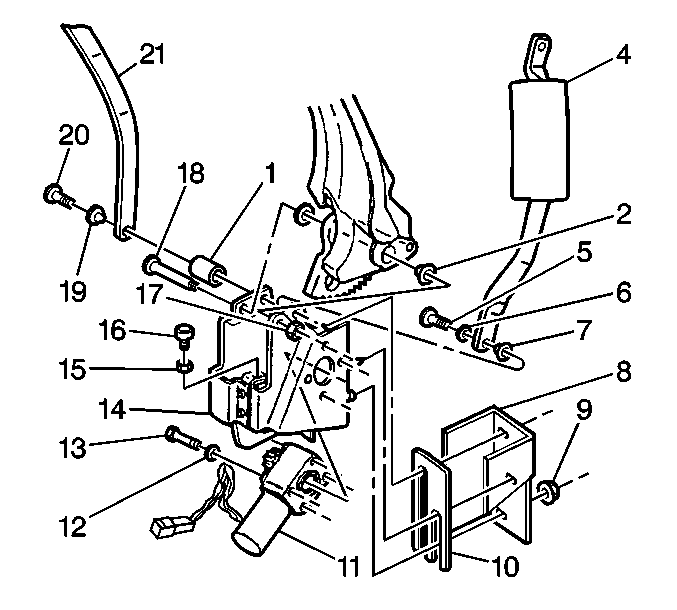
- Remove the number 4 bow slat pivot bolt (20), spacer (1) and bushing (19) from the bracket.
- Remove the pivot bolt (18) and nut (17) from the main pivot bracket.
- Lift the rear rail and spur gear off of the folding top drive motor gear. Raise the folding top to the closed position with help from an assistant.
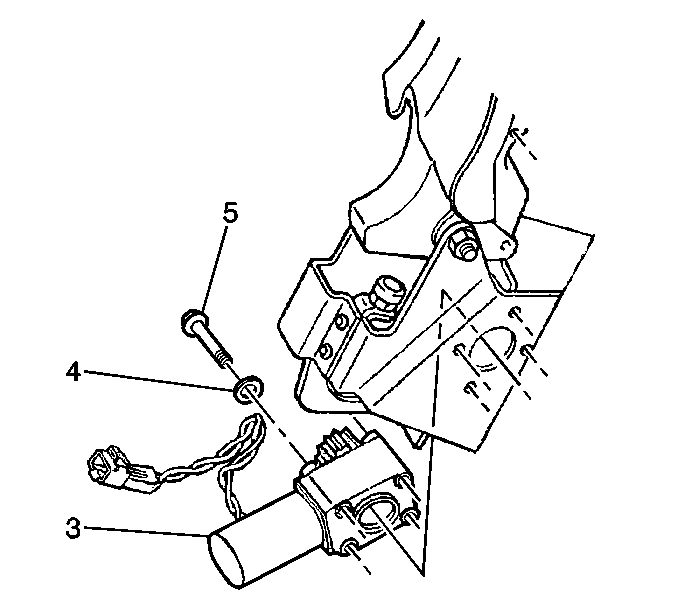
- Remove the folding top drive motor mounting bolts (5) from the main pivot bracket.
- Remove the folding top drive motor (3) with the bolts, by lowering the unit from the bottom of the main pivot bracket.
- Remove the folding top drive motor bolts (5) from the motor (3).
Important: The folding top must be in the raised position to replace the folding top drive motor.
If the folding top drive motor will not move electrically or is seized, use the template and drill instructions supplied with the new motor to drill holes in the structure to access to folding top drive motor bolts. If the template is not available, perform steps 5 through 7.

Important: Only perform steps 5 through 7 if the folding top is down, and the folding top motor is inoperative.
Important: The folding top drive motor mounting bolts must be installed in the same positions as removed.
Installation Procedure
- Apply Loctite™ GM P/N 12345382 (Canadian P/N 10953489) to the folding top drive motor bolts.
- Install the folding top drive motor bolts (5) to the motor (3).
- Position the folding top drive motor (3) to the bottom of the main pivot bracket.
- Apply Loctite™ GM P/N 12345382 (Canadian P/N 10953489) to the threads of the number 4 bow slat main pivot bolt (20).
- Install the number 4 bow slat main pivot bolt (20), bushing (19), and spacer (1) to the bracket.
- Apply Loctite™ GM P/N 12345382 (Canadian P/N 10953489) to the pivot bolt (18).
- Install the pivot bolt (18) and nut (17) to the main bracket.
- Route the folding top drive motor wire harness over the main pivot bracket.
- Connect the folding top drive motor electrical connector.
- Check the operation of the folding top drive motor.
- Install the headliner at the rear quarter panel. Refer to Folding Top Headlining Trim Panel Replacement .
- Install the rear quarter trim panel. Refer to Rear Quarter Trim Panel Replacement in Interior Trim.
- Raise and latch the folding top to the windshield header.

Notice: Use the correct fastener in the correct location. Replacement fasteners must be the correct part number for that application. Fasteners requiring replacement or fasteners requiring the use of thread locking compound or sealant are identified in the service procedure. Do not use paints, lubricants, or corrosion inhibitors on fasteners or fastener joint surfaces unless specified. These coatings affect fastener torque and joint clamping force and may damage the fastener. Use the correct tightening sequence and specifications when installing fasteners in order to avoid damage to parts and systems.
Tighten
Tighten the folding top drive motor mounting bolts to 12 N·m
(9 lb ft).
Important: Only perform steps 4 through 7 if the main pivot bolts had to be removed to raise the folding top.
Tighten
Tighten the bolt to 23 N·m (17 lb ft).
Tighten
Tighten the pivot bolt to 23 N·m (17 lb ft).
