Removal Procedure
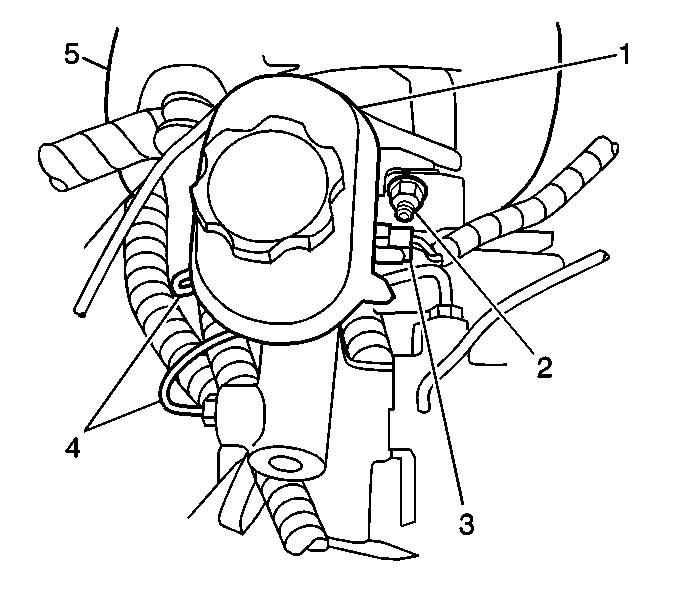
- Disconnect the electrical connector (3) from the low brake fluid level sensor switch.
- Disconnect the brake pipes (4) from the master cylinder (1).
- Plug the open brake pipes (4) in order to prevent brake fluid loss and contamination.
- Remove the master cylinder mounting nuts (2).
- Remove the master cylinder (1) from the booster (5).

Installation Procedure
- Install the master cylinder (1) to the booster (5).
- Install the master cylinder mounting nuts (2).
- Connect the brake pipes (4) to the master cylinder (1).
- Connect the electrical connector (3) to the low brake fluid level sensor switch.
- Fill the master cylinder to the proper level with clean brake fluid. Refer to Master Cylinder Reservoir Filling .
- Bleed the hydraulic brake system. Refer to Hydraulic Brake System Bleeding .

Notice: Use the correct fastener in the correct location. Replacement fasteners must be the correct part number for that application. Fasteners requiring replacement or fasteners requiring the use of thread locking compound or sealant are identified in the service procedure. Do not use paints, lubricants, or corrosion inhibitors on fasteners or fastener joint surfaces unless specified. These coatings affect fastener torque and joint clamping force and may damage the fastener. Use the correct tightening sequence and specifications when installing fasteners in order to avoid damage to parts and systems.
Tighten
Tighten the master cylinder mounting nuts (2) to 27 N·m(20 lb ft).
Tighten
Tighten the brake pipe tube nuts to 23 N·m(17 lb ft).
