Buzz or Rattle Sound from Speaker Locations (Add Foam Tape to Speaker Grilles or Door Panels)

| Subject: | Buzz or Rattle Sound from Speaker Locations (Add Foam Tape to Speaker Grilles or Door Panels) |
| Models: | 1997-2002 Chevrolet Camaro |
| 1997-2002 Pontiac Firebird |
| with Monsoon Audio System |
Condition
Some owners may comment on a buzz or rattle sound from the door panel or rear quarter panel trim speaker locations. Customers may also perceive this noise as distortion when the audio system is reproducing low bass.
Important: Vehicles built after June, 1999 were factory-equipped with the additional insulating materials called out in the Correction section of this bulletin. The 2000-02 model years are called out in this service bulletin because service parts sold for these vehicles do not have the additional sound insulating materials applied. If the vehicle in question has had door, door trim panel, rear quarter trim panel or rear quarter trim panel speaker grille replacement, this bulletin may apply.
Cause
In some vehicles, the rear quarter trim panel speaker grilles may not be retained with sufficient tension. When low bass tones are reproduced, the grilles may rattle against the rear quarter trim panel. In addition, low bass reproduction may cause the door panel to vibrate against the door structure causing a buzzing sound.
Correction
Diagnose the location or locations the buzz/rattle is coming from using the procedure below, then apply foam or flocked tape as instructed.
- Insert and play a CD or cassette. If available, use the customer's recording so you can identify what the exact customer concern is.
- Listen to the suggested track/song at a loud or high volume (but never at maximum volume).
- While the track/song is playing, touch and apply pressure to the door panel lower edges on each door. Next, apply pressure to the rear quarter panel speaker grilles. If the rattle or vibration stops when pressure is applied to one of these areas, you have located the source. Be sure to check all locations as more than one source is possible.
- If either location is identified as the source, refer to the proper procedure below for correction. If a front speaker is the source, you will be instructed to correct both door panels. Likewise, if a rear quarter panel speaker is the source, you will insulate both rear quarter trim speaker grilles.
- If the source could not be located you may have another cause not covered in this bulletin, such as other loose trim, a loose speaker or a damaged speaker. Refer to the Entertainment sub-section in the Service Manual for additional diagnostic information.
Important: Verify that the recording used to test the system is a "clean" recording. Some music contains passages that are intentionally recorded with distortion for effect (especially in the bass region). This type of recording is not an acceptable test source.
Front Door Panel Noise Correction
The following procedure is identical for the left and the right door. Use this procedure for the driver's side and then repeat on the passenger side.
- Remove the door panel accessory control switch by prying out of the door handle. Disconnect the electrical connector.
- Remove one screw from the door handle bezel. Remove the bezel and disconnect the lamp from the holder.
- Remove the outside rearview mirror bezel trim plate.
- Remove the door panel screws and the door panel.
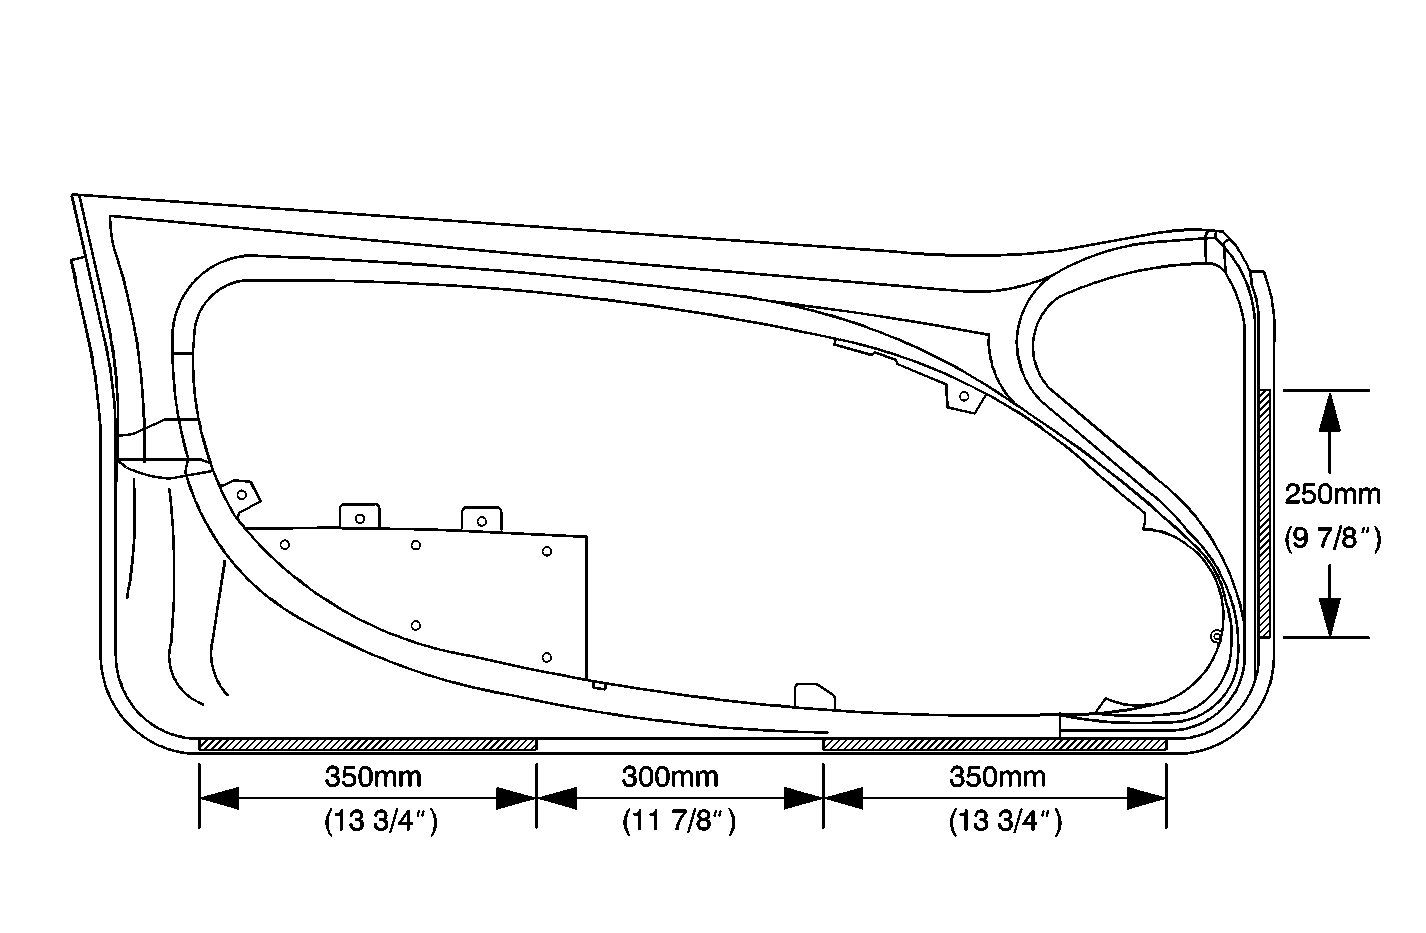
- Cut and apply three strips of adhesive flocked material, P/N 12378189, to the inner door as shown in the illustration.
- Install the door panel to the inner door and install the door panel screws.
- Install the outside rearview mirror bezel trim plate.
- Install the inside door handle bezel. Attach the light bulb and install one screw.
- Connect the electrical harness and install the door panel accessory control switch to the door panel by inserting into the door pull until fully seated.

Insulating the Rear Quarter Panel Trim Speaker Grilles
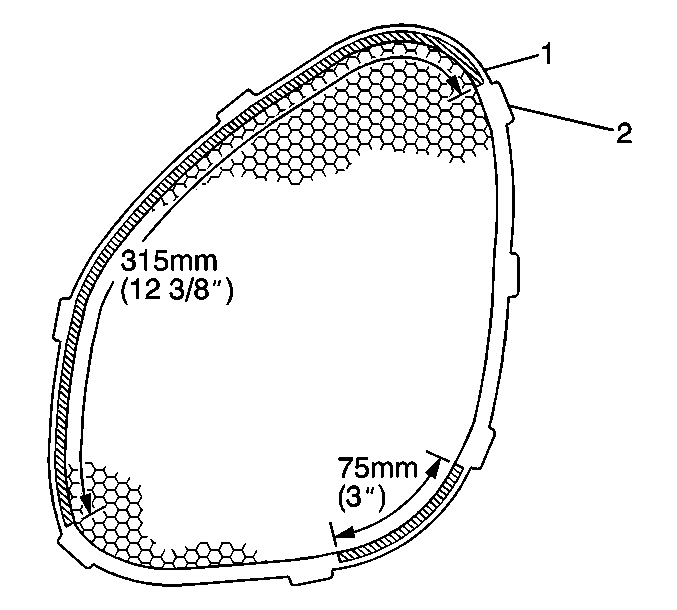
- Remove both rear quarter panel trim speaker grilles by gently prying the grilles out. The illustration indicates the locations of the retaining tabs (2).
- Cut a 254 mm (10 in) section of Kent E-V-R TITE #46480 Adhesive Backed Sponge Rubber Weatherstrip (or the equivalent) in half lengthwise for each grille.
- Following the illustration, apply the foam to the lip (1) on the back side of the grilles in the areas and length indicated.
- Install the speaker grilles to the quarter panel trim by seating the retaining tabs to the panel.

Parts Information
The Kent E-V-R TITE Sponge Rubber Weatherstrip is packaged in a 6 mm x 4 mm x 9 m (1/4 in x 5/32 in x 30 ft) roll which will accommodate the repair of approximately 15 vehicles. You may order the Kent product nationally at 1-800-654-6333 (in Canada, 1-800-654-6333). Ask for P/N 46480 (in Canada, P46480).
The GM flocked adhesive backed tape, P/N 12378189, contains two 305 mm x 216 mm (12 in x 8-1/2 in) sheets per order. Two vehicles can be corrected per order. See the chart below for a material allowance on this product.
Part Number | Description | Material Allowance |
|---|---|---|
12378189 | GM Adhesive Tape, Flocked | $12.17 |
Parts are currently available from GMSPO.
Warranty Information
For vehicles repaired under warranty, use:
Labor Operation | Description | Labor Time |
|---|---|---|
C3270 | Grille, Radio Speaker Rear -- R & R (Install Flock Tape - Both) | 0.3 hr |
C3348/58 | Trim Assembly, Front Door Insulate -- Right/Left | 0.4 hr |
Add | Install Flock Tape | 0.1 hr |
