Info - General Windnoise/Water Leak Diagnostic Guide

| Subject: | General Windnoise/Water Leak Diagnostic Guide |
| Models: | 1998-2001 Chevrolet Camaro |
| 1998-2000 Pontiac Firebird |
This bulletin contains information on various windnoise/water leak conditions. Refer to the following table for a quick reference to the various conditions and the corresponding illustrations.
Condition | Best Described in Figure |
|---|---|
Front Floor Carpet Wet | 1, 2, 3, 5, 6, 7, 10, 12, 13, 14, 15 |
Rear Floor Carpet Wet | 2, 3, 4, 8, 9, 11, 12, 13, 14, 15 |
Water Dripping From Roof | 14, 15 |
Rear Compartment Wet | 23, 24, 25, 26, 27, 28 |
Windnoise, Front | 10, 12, 13, 14, 15, 17, 18, 19, 20, 21, 22 |
Windnoise, Rear | 9, 11, 12, 13, 14, 15, 16, 17, 18 |
Glass Adjust | 29, 30 |
Mirror Patch Adjust | 31 |
Condition
Water drips from the door lock knob or the front floor carpet is wet (convertible, hard top, T-top models).
Cause
The water deflector may not be seated properly behind the door handle.
Correction
Figure 1
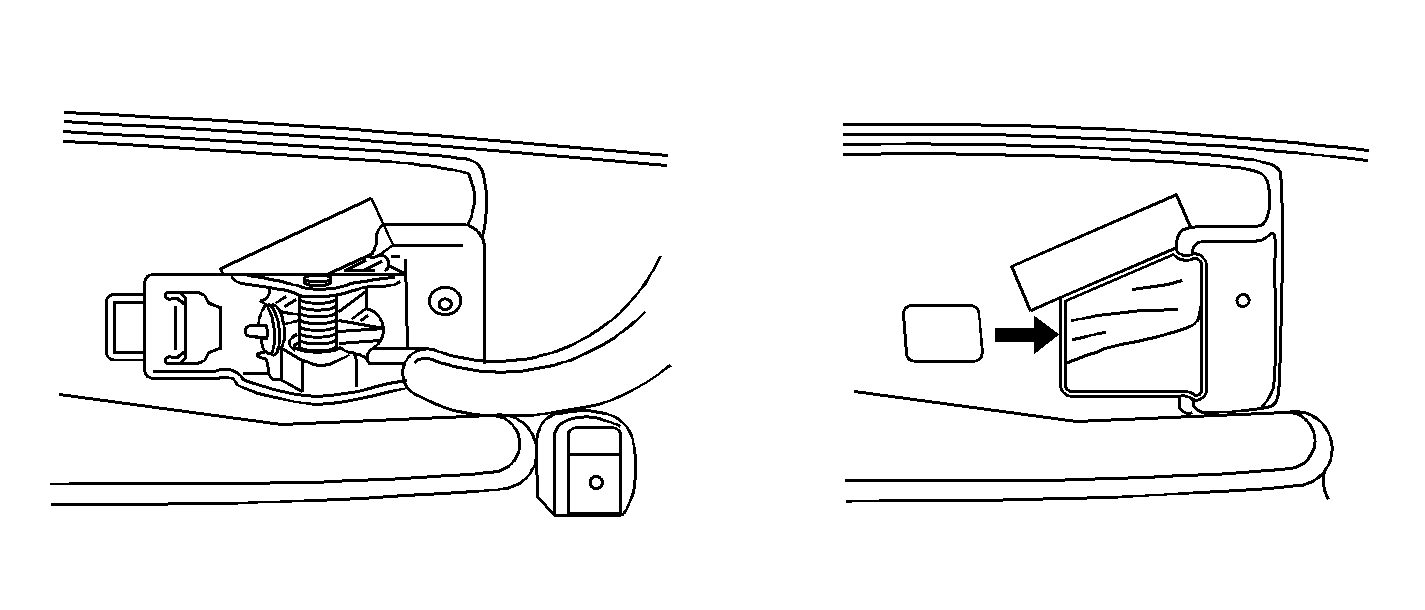
Seat the water deflector behind the door handle so that the bottom of the water deflector is inboard of the door. Refer to Figure 1.
Condition
The front or rear floor is wet (convertible, hard top, T-top models).
Cause
The small water deflectors may be mispositioned or improperly installed.
Correction
Figure 2
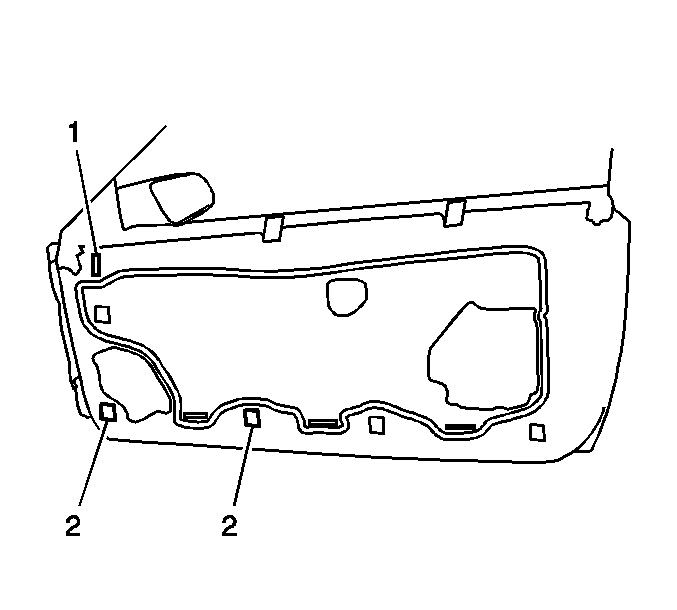
Make sure the rectangular slot is taped over with duct tape. Refer to item 1 in Figure 2.
Ensure the water deflector seals fully to the door inner panel surface. It may be necessary to make two small 76 mm x 76 mm (3 in x 3 in) water deflectors. Refer to item 2 in Figure 2 and install these to the inside of the door inner panel at the locations indicated. Use a piece of plastic from the shipping protective material for either the door trim panel or the seat assemblies (or similar material)
Condition
The front or rear floor is wet (convertible, hard top, T-top models).
Cause
The water deflector may not be seated properly to the door surface.
Correction
Figure 3
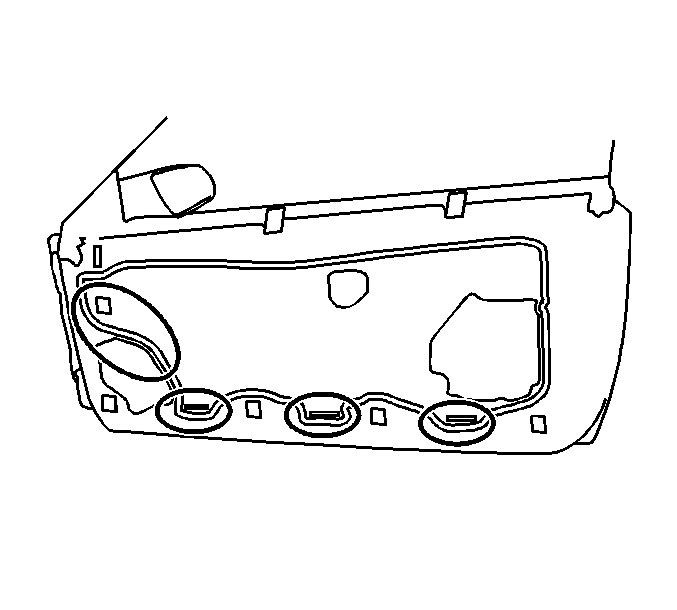
Seat the water deflector to the door surface at the primary locations. Refer to Figure 3. If the adhesive surface is dirty and the water deflector needs to be replaced, follow the service procedure listed below.
Service Procedure
- The adhesive surface must be clean, dry and free of dirt or contaminants. Clean the door surface (around the perimeter of the water deflector) with one of the cleaners listed below, or an equivalent.
- Install the water deflector to the inner panel.
- Pull the harness connectors through their respective holes or slits.
- Position the outer perimeter of the deflector to the door inner panel by working from the bottom center outboard. Make sure the butyl adhesive is below the drain holes.
- Using a 50.8 mm (2 in) wallpaper roller, roll out the butyl adhesive. Start at the bottom center and work outboard, up the right and left sides. A 50.8 mm (2 in) roller can be purchased at a hardware or wallpaper store.
| • | 3M® General Purpose Adhesive Cleaner, P/N 08984 |
| • | Dominion Sure Seal, Sure Solve Stock BSS |
| • | Kent Acrosol™ |
Condition
There is water in the rear floor foot well (T-top models).
Correction
Figure 4
The upper "B" detail can allow water to stand and fill the lower weatherstrip. This can be too much water for the drain holes to accommodate. The upper "B" drain must be clear of debris. With the door open and using a squeeze bottle to fill the weatherstrip with water, the water should flow from the bottom drain holes. Refer to Figure 4. If too much water is entering the rear "B" detail, the T-top may not be sealing against the rear sealing strip. If the rear is sealed properly and there is still too much water entering the drain, enlarging the drain holes at the bottom of the weatherstrip will help. DO NOT PUNCH A DRAIN HOLE IN THE SIDE OF THE WEATHERSTRIP AS THIS WILL PROVIDE A PATH FOR WINDNOISE.
Condition
The driver's floor is wet (convertible, hard top, T-top models).
Cause
Figure 5
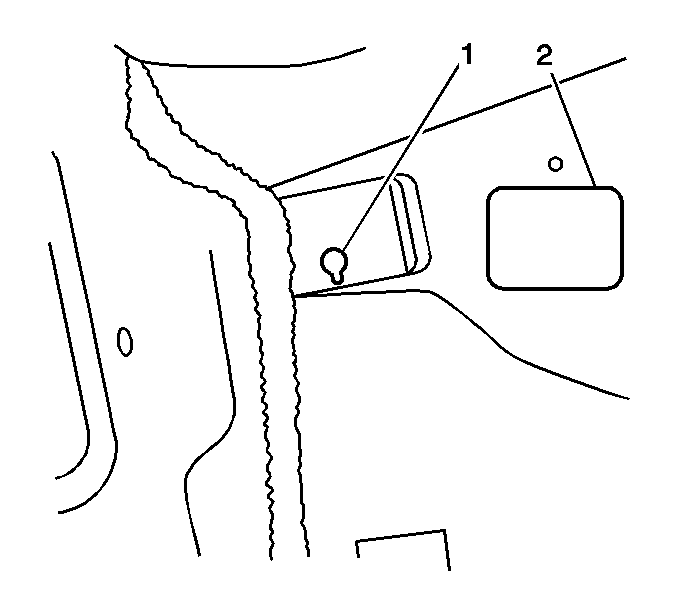
- The hood release cable may not be sealed at the front of dash. Refer to item 1 in Figure 5.
- The body harness grommet may not be sealed. Refer to item 2 in Figure 5.
Correction
Make sure both are SEATED properly. if necessary, seal with GM Weatherstrip Adhesive, P/N 12345097 (in Canada, use P/N 10953479).
Condition
The molded weatherstrip detail at the base of the windshield may not be properly sealed causing the front floor to be wet (hard top, T-top models).
Cause
The material sealing the weatherstrip detail to the body surface between the pillar retainer and the mounting flange on the hinge pillar may be mispositioned or missing.
Correction
Figure 6
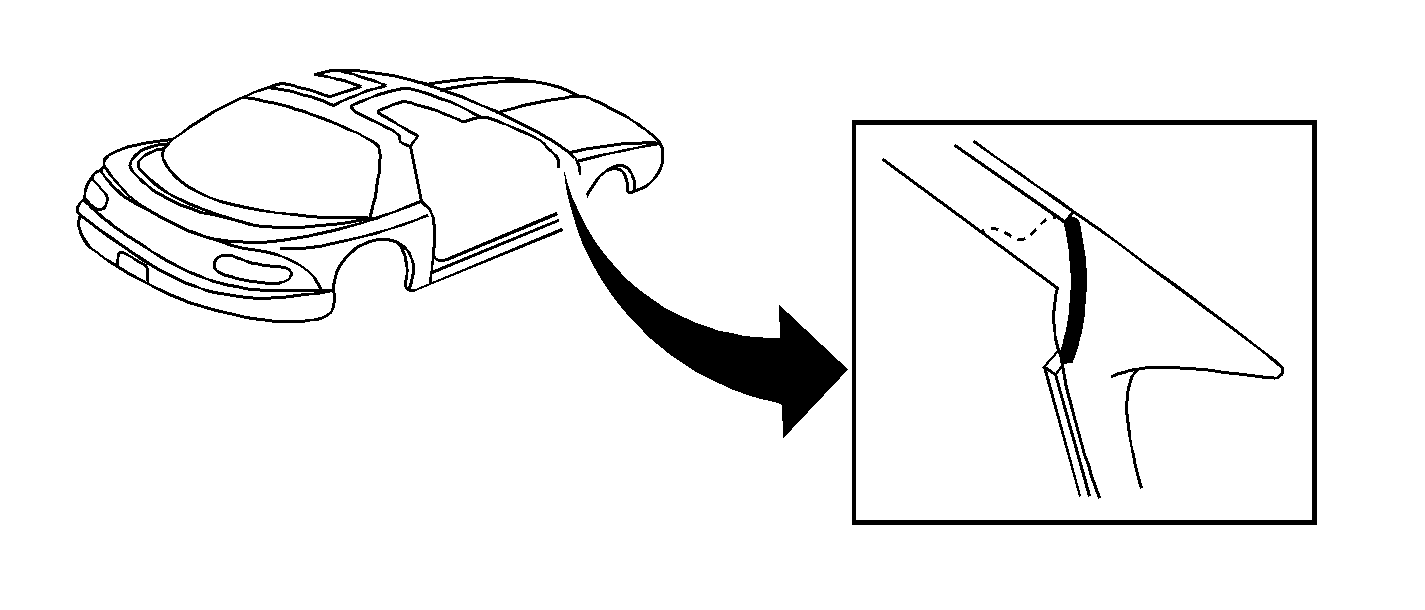
Apply a new seal using GM Silicone Sealant, P/N 12345739 (in Canada, use P/N 10953541), as shown in Figure 6 (almost a straight line from the outer edge of the pillar retainer to the inner hinge pillar flange should be used) and reinstall the weatherstrip to the flange retainer.
Condition
The front roof gutter molded weatherstrip detail to the roof sheet metal may not be sealed properly (T-top models). Water entering this area usually runs down the "A" pillar and ends up on the carpet below the instrument panel.
Cause
| • | The weatherstrip molded detail may not be sealed to the sheet metal gutter. |
| • | Small holes or tears may exist in the molded detail at the attaching insert. |
Correction
Figure 7
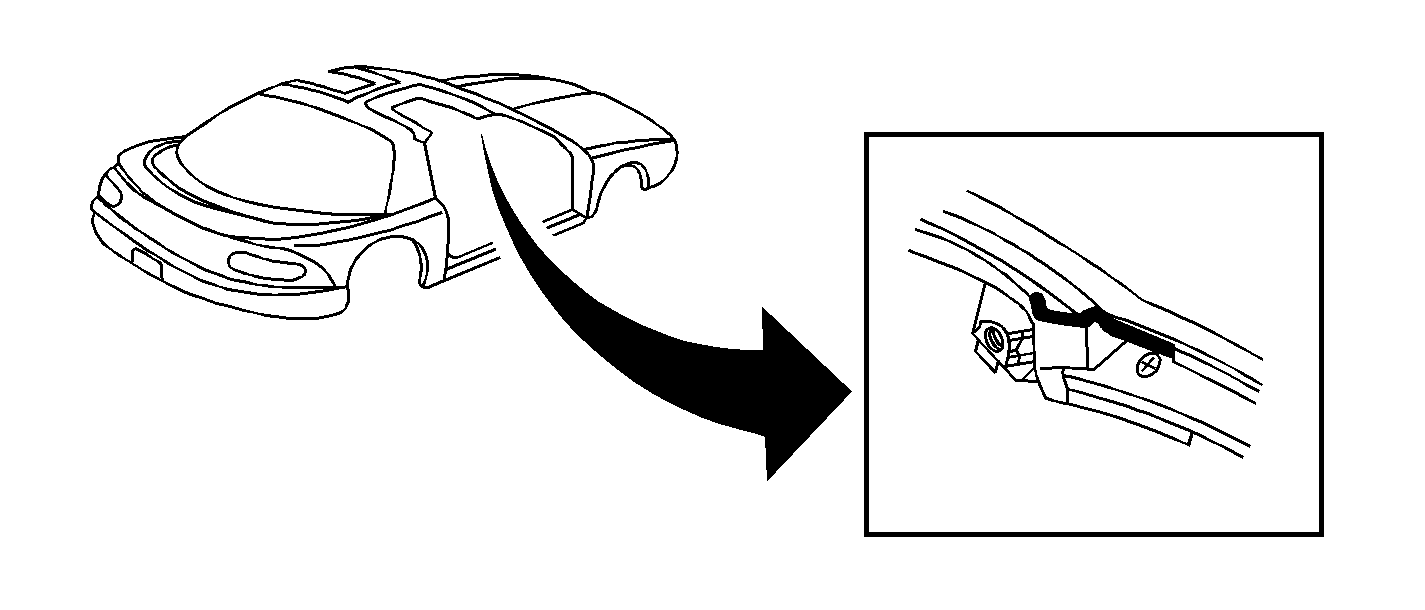
Apply a new seal using GM Silicone Sealant, P/N 12345739 (in Canada, use P/N 10953541), to the end of the roof gutter, under the molded weatherstrip detail, as shown in Figure 7.
Apply an even amount of GM P/N 12345097 (in Canada, use P/N 10953479) or 3M P/N 08011, or the equivalent, to the hole or tear for sealing.
Condition
The rear roof gutter molded weatherstrip detail to the roof sheet metal may not be sealed properly causing water leaks (T-top models).
Cause
| • | The weatherstrip molded detail may not be sealed to the sheet metal gutter. |
| • | Small holes or tears may exist in the molded detail at the attaching insert. |
Correction
Figure 8
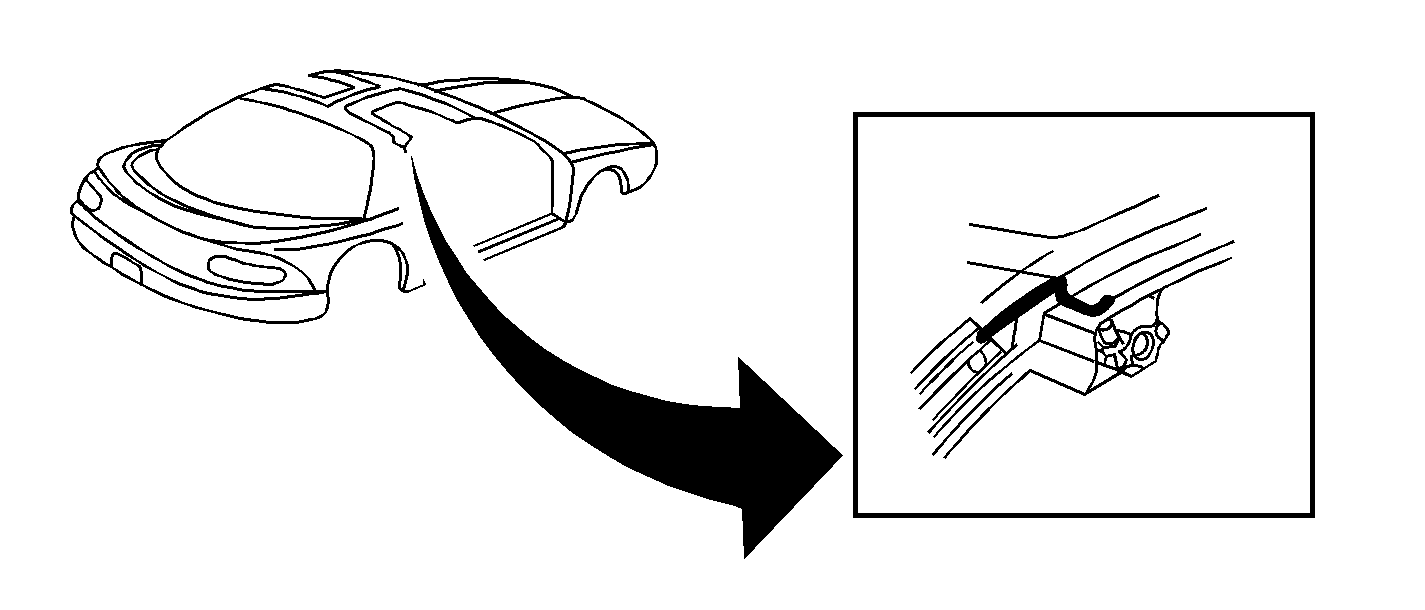
- Apply GM Silicone Sealant, P/N 12345739 (in Canada, use P/N 10953541), to the end of the roof gutter, under the molded weatherstrip detail, as shown in Figure 8.
- Apply an even amount of GM P/N 12345097 (in Canada, use P/N 10953479) or 3M P/N 08011, or the equivalent, to the hole or tear for sealing.
Condition
The molded weatherstrip detail at the base of the lock pillar may not be sealed properly causing windnoise and/or water leaks (hard top, T-top models).
Cause
The material sealing the weatherstrip detail to the body surface between the lock pillar retainer and the mounting flange on the quarter panel may be mispositioned or missing.
Correction
Figure 9
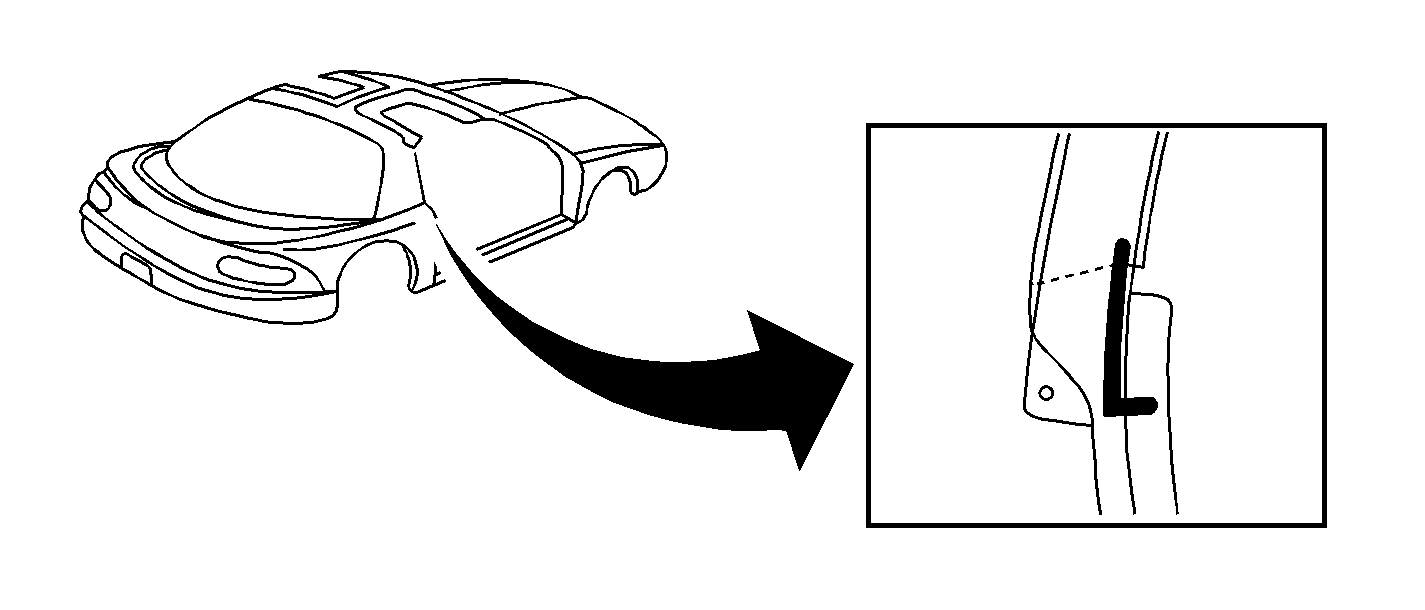
Apply a new seal using GM Silicone Sealant, P/N 12345739 (in Canada, use P/N 10953541), as shown in Figure 9 (apply in a straight line from the inner edge of the lock pillar retainer to the base of the mounting tab and then 90 degrees inboard to the lock pillar flange) and reinstall the weatherstrip to the flange and the retainer.
Condition
Water leaks through the front floor and/or windnoise through the door.
Cause
Figure 10
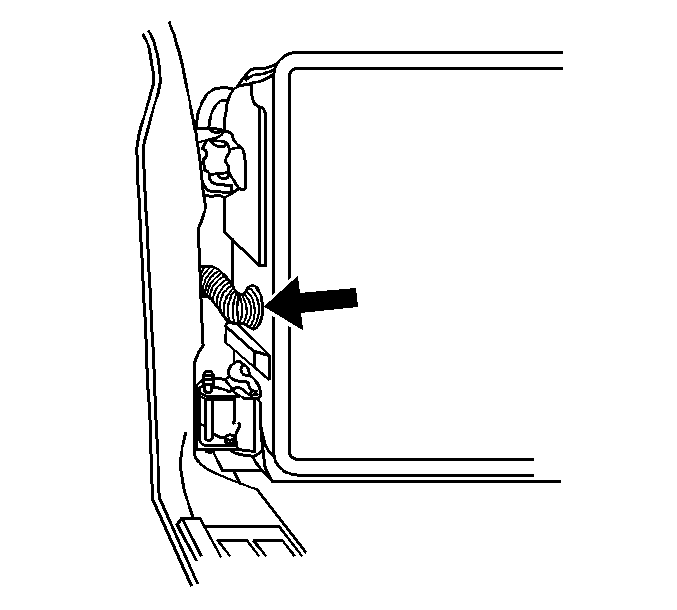
The door wiring harness rubber grommet may not be seated properly. Refer to Figure 10.
Correction
Make sure the grommet lip is seated properly to the door and the "A" pillar.
Condition
There is windnoise and/or water leaks in the rear of the vehicle (convertible, hard top, T-top).
Cause
Figure 11
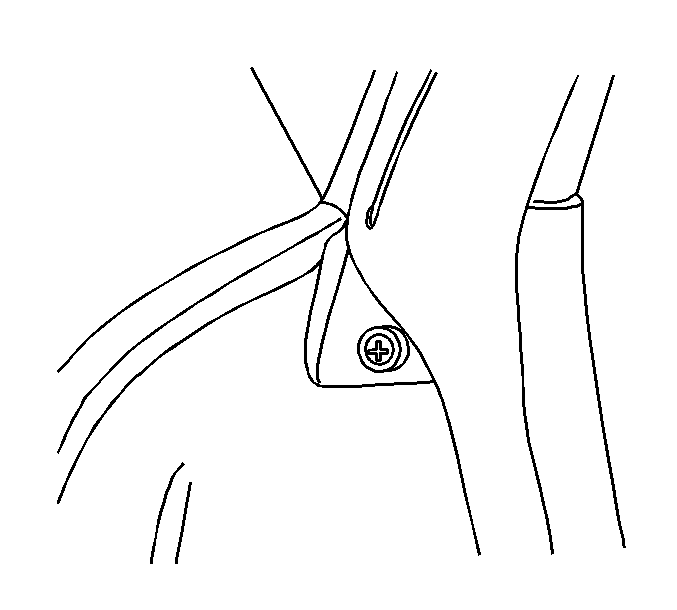
The weatherstrip in the area indicated shows where the weatherstrip relaxes and loses contact with the door glass. This generates windnoise. Refer to Figure 11.
Correction
Loosen the "B" pillar weatherstrip retaining screw and tighten the screw while holding the weatherstrip.
Condition
There is windnoise and/or water leaks in the front or rear at the door belt line (convertible, hard top, T-top models).
Correction
Figure 12
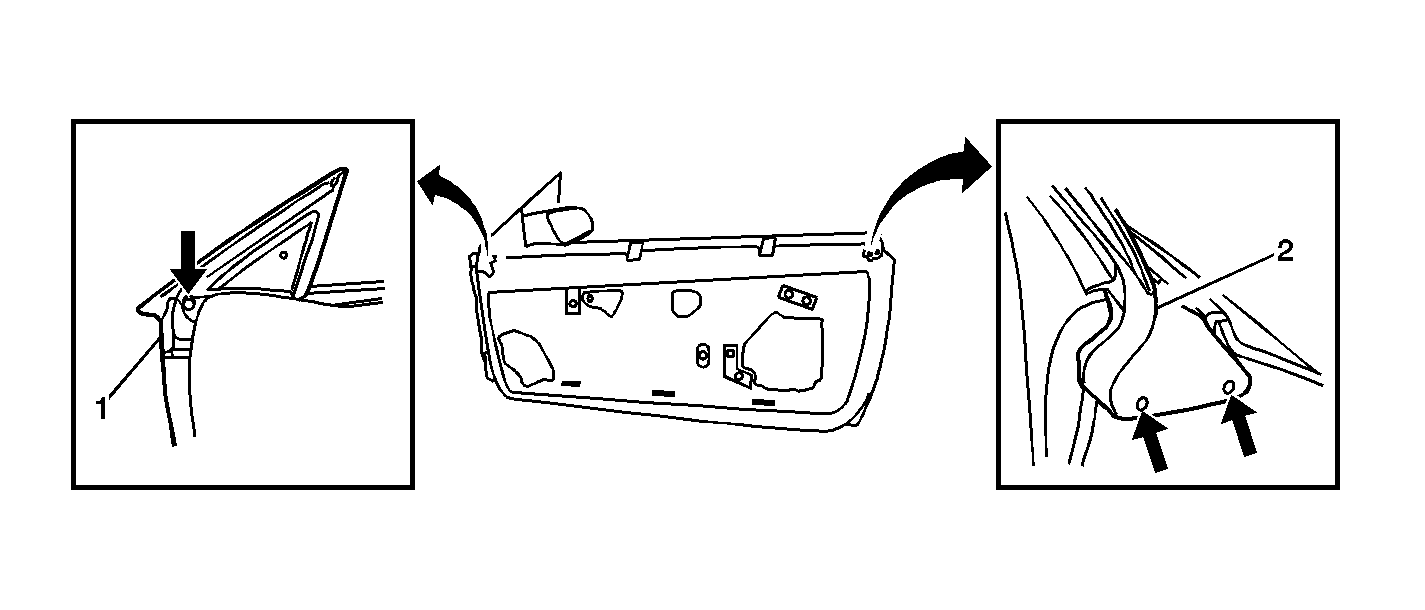
Insert the push-in retainers. Refer to Figure 12.
Ensure that the muket has no folds. Refer to item 1 in Figure 12.
Ensure that the muket is in contact with the side door glass when the door is closed. Refer to item 2 in Figure 12.
Condition
There is windnoise and/or water leaks at the T-top butt joints.
Cause
| • | The butt joint surfaces between the panel and the body details may have improper contact. |
| • | The door glass may not be adjusted properly for height or "tip in" contact. |
Correction
Figure 13
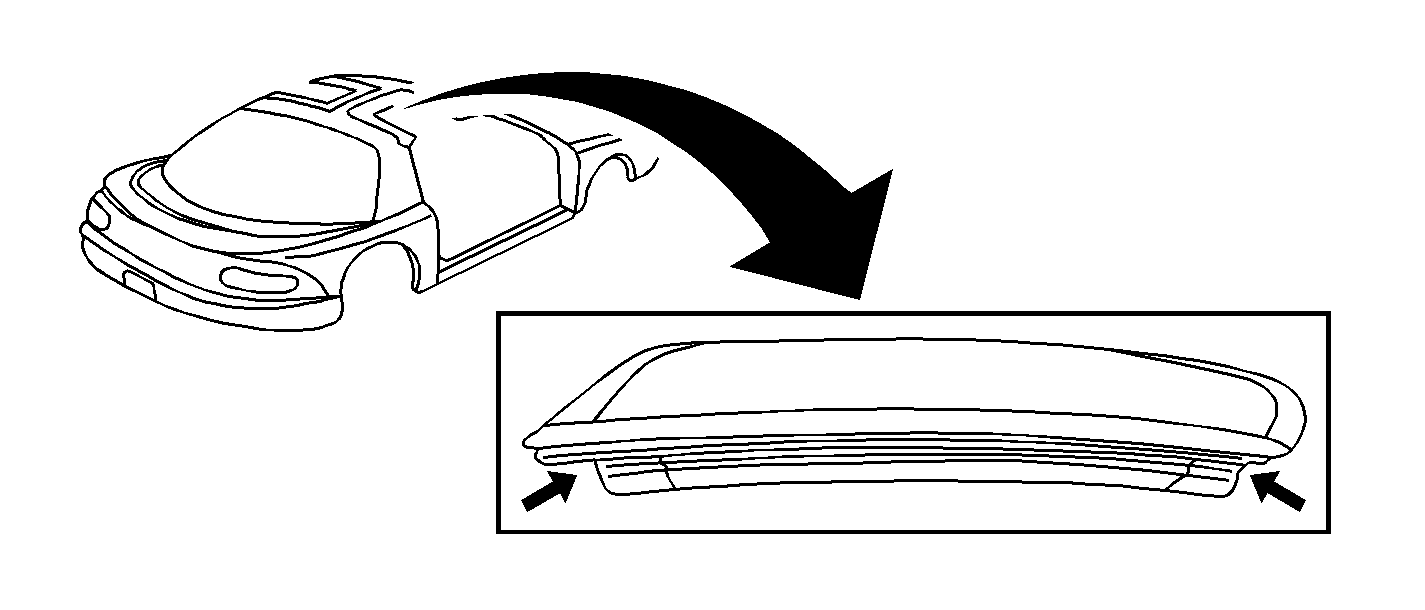
The T-top rail weatherstrip is movable in the retainer and should be adjusted to only slight interference on the front and rear edges. The pressure of the closed glass will increase pressure on the joint once the glass is closed. Too much interference will cause the butt joint to pucker and provide a water path. Refer to Figure 13.
Adjust the door glass to obtain sealing in the butt joints. Refer to General Information on Door Glass Adjustments later in this bulletin.
Condition
There is windnoise and/or water leaks from the front or rear "butt" joints (T-top models).
Cause
Figure 14
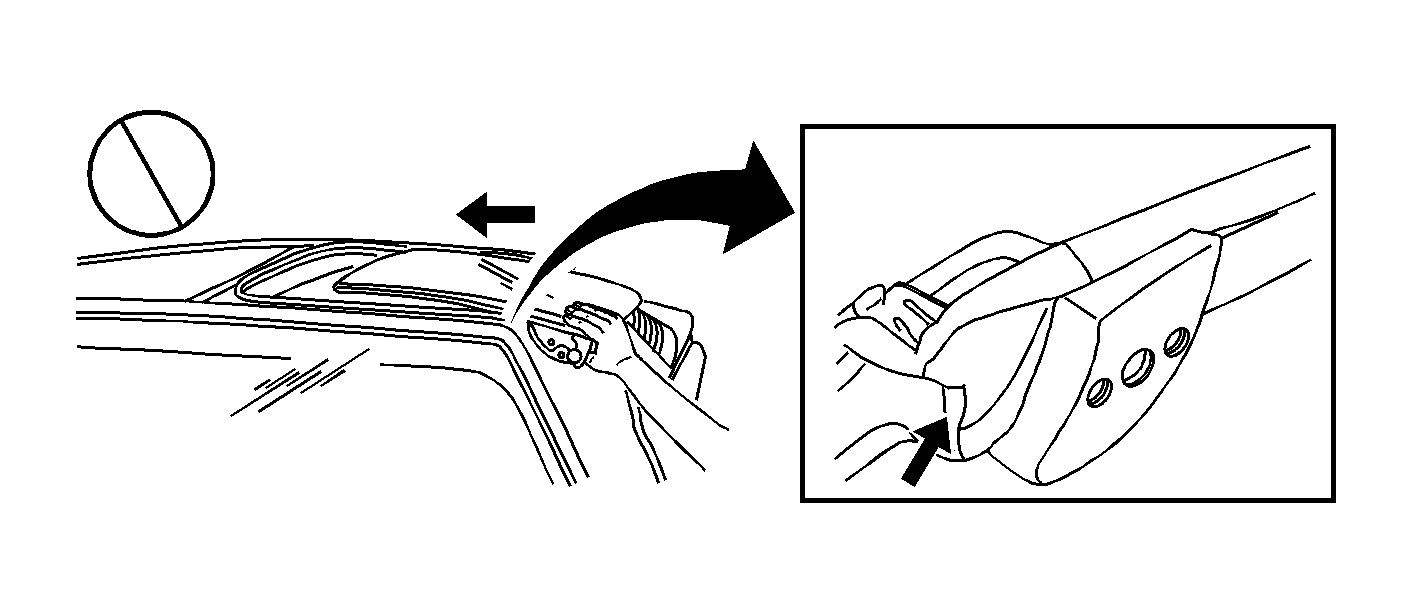
The T-top may have been installed improperly. Refer to Figure 14
T-Top Installation Procedure
When installing the T-top panels on the roof, keep the outboard edge of the panel raised about 8 cm (3 in) above the roof while placing the inboard edge of the panel under the center of the roof. After the inboard edge of the panel is in position under the center roof rail, lower the outboard edge of the panel into the weatherstrip on the body. Close the latch and lock the top. Refer to Figure 15.
Correction
Figure 15
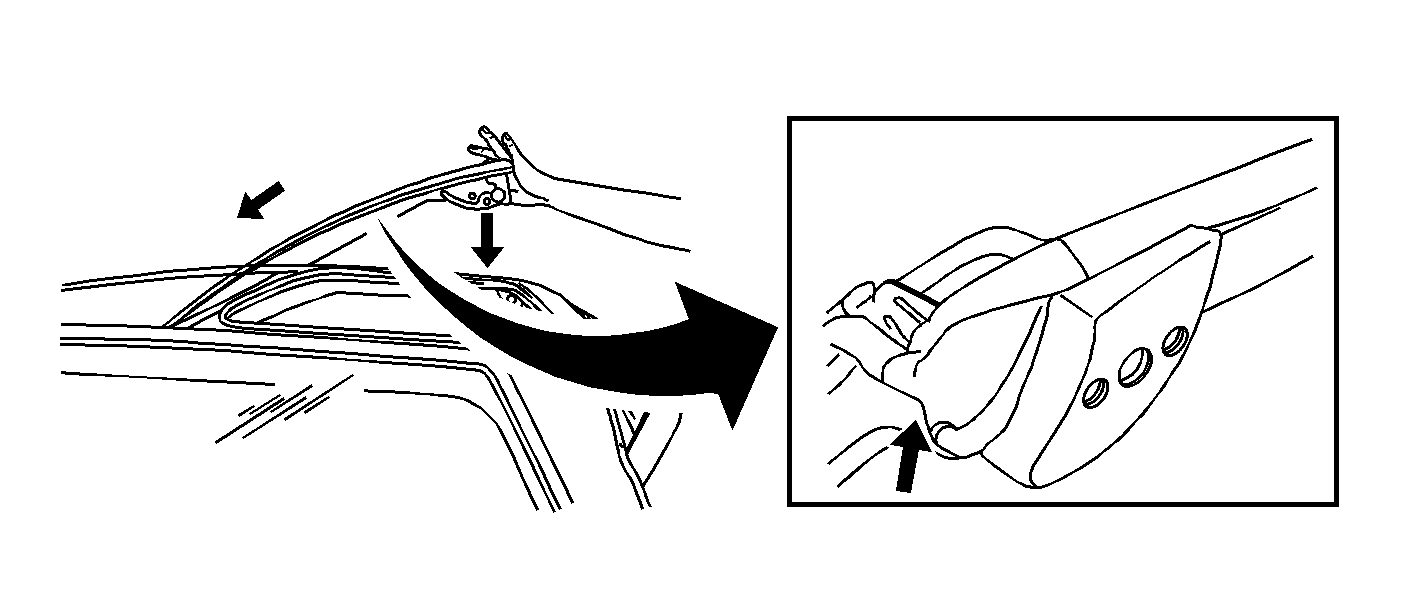
Make sure the customer is informed on the proper installation. Do not attempt to install the panels by sliding them horizontally toward the center roof rail. Doing so may cause the weatherstrip outer lip to fold under the removable top weatherstrip and may result in leaks and possible damage to the weatherstrip. Refer to Figure 14.
Condition
There is windnoise at the rear of the door glass (convertible, hard top, T-top models).
Cause
The door glass may not be adjusted forward/rearward for proper contact or you cannot obtain enough glass contact to the weatherstrip at the rear of the door glass.
Correction
Figure 16
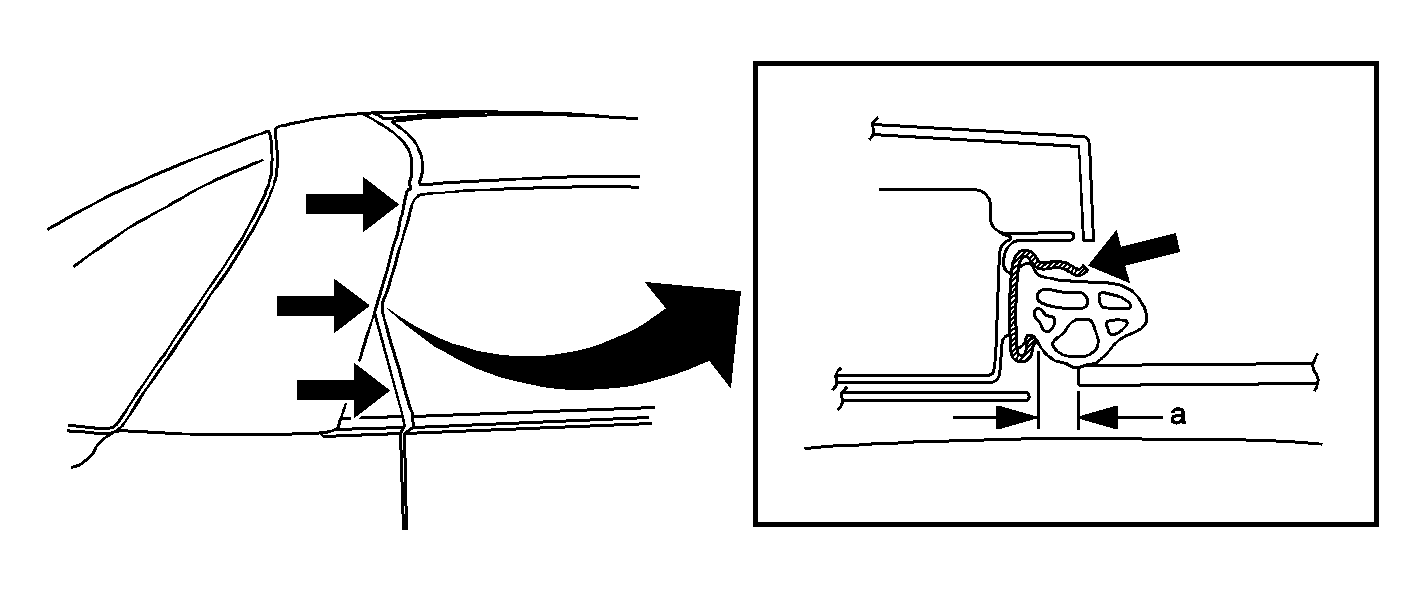
Adjust the door glass forward or rearward to obtain a standard dimension of no more than 12 mm (1/2 in) from the edge of the glass to the retainer surface. Refer to measurement A in Figure 16.
If you cannot obtain enough contact at the rear of the door glass after glass adjustments, adjust the weatherstrip retainer outboard for more contact.
Condition
There is windnoise at the rear of the door glass (convertible, hard top, T-top models).
Cause
The weatherstrip may not be seated properly in the retainer.
Correction
Figure 17
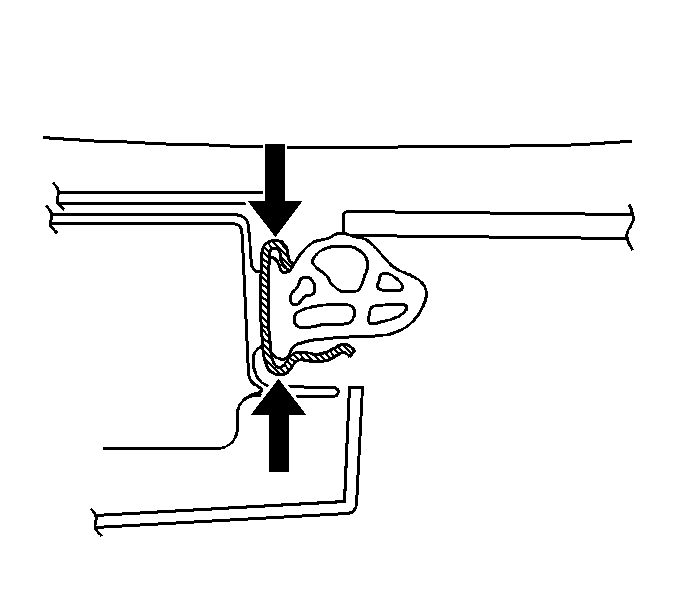
Make sure the weatherstrip is seated properly in the run channel. Refer to Figure 17.
Condition
There is windnoise from the T-top.
Cause
Figure 18
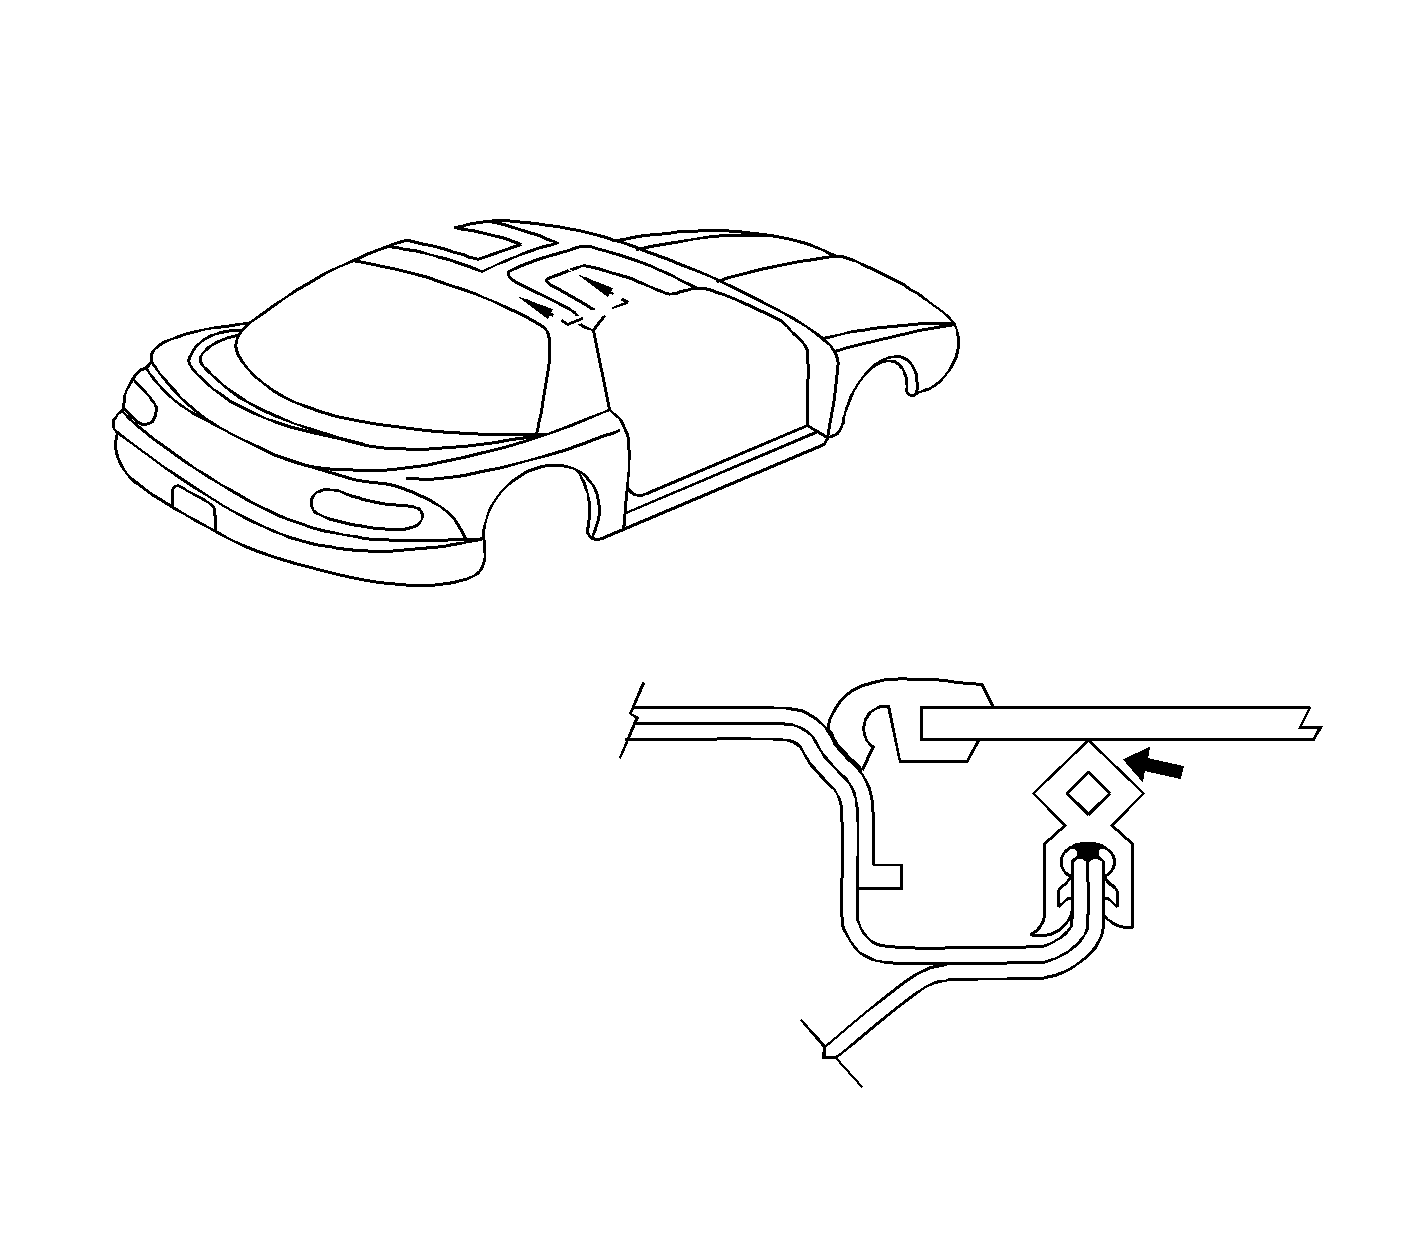
The T-top may not be seated against the roof seal. A business card should not be able to easily slip between the T-top and the seal.
Correction
Remove the shim under the striker.
Condition
There is windnoise around the mirror patch (convertible, hard top, T-top models).
Cause
The door glass or the mirror patch may need adjustment. Refer to Figures 19, 20 and 21.
Figure 19
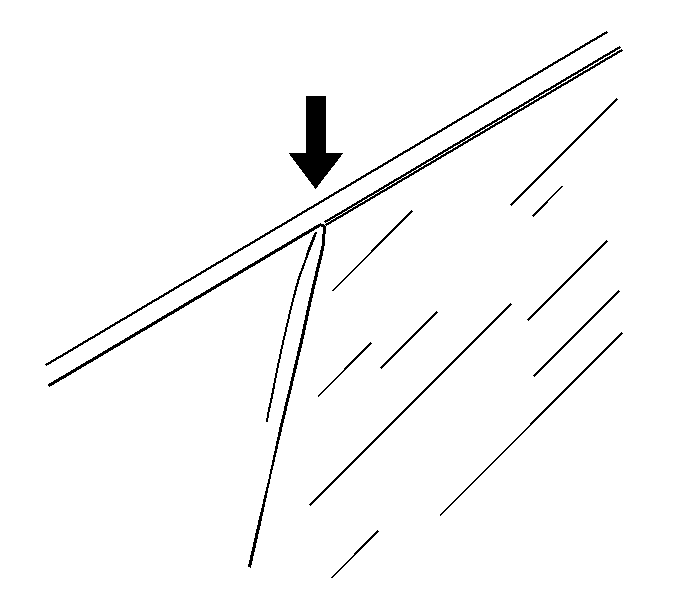
Align the mirror patch applique with the door open and the window up. The applique should be perfectly in line with the window or it should have a slight "bump" in the seal at the top of the mirror patch applique. Refer to Figure 19 for location.
Figure 20
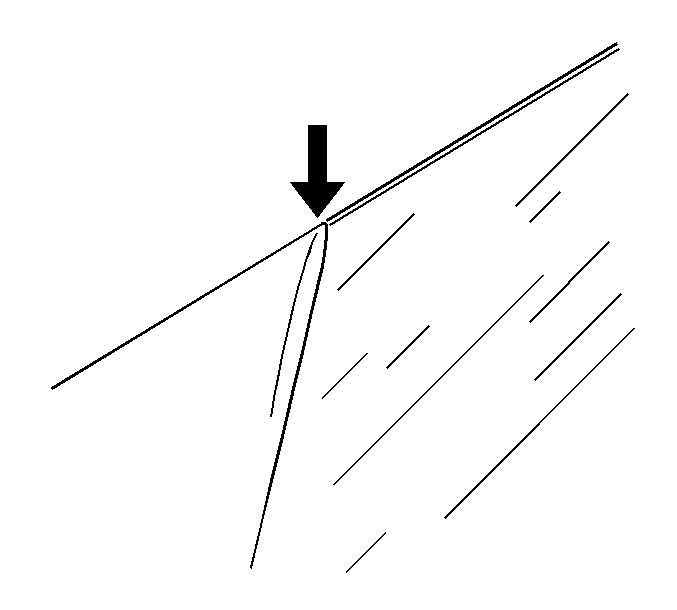
With the door open and the window up, apply pressure on the weatherstrip with a finger at the location shown by the arrow in Figure 20. The weatherstrip should not move.
Figure 21
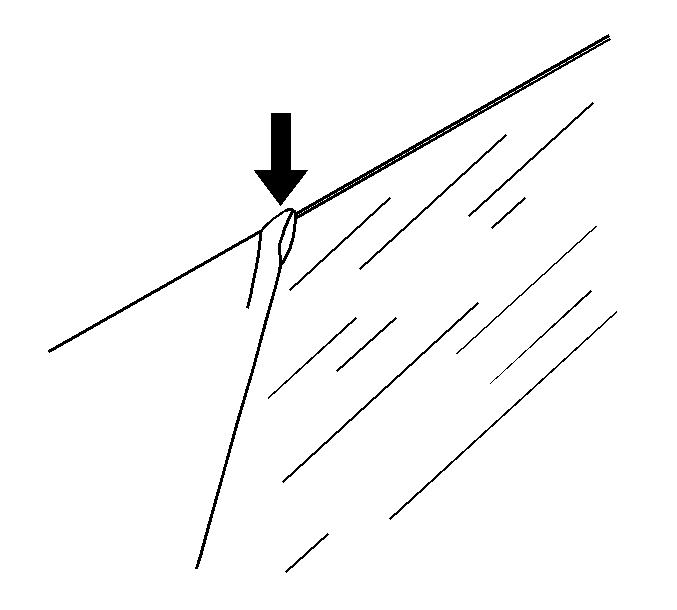
If the glass is not adjusted properly for height at the arrow, it will cause a bulge in the seal and create a windnoise. Refer to Figure 21.
Condition
There is road noise or windnoise around the mirror patch (convertible, hard top, T-top models).
Cause
The foam blocker may not be in place.
Correction
Figure 22
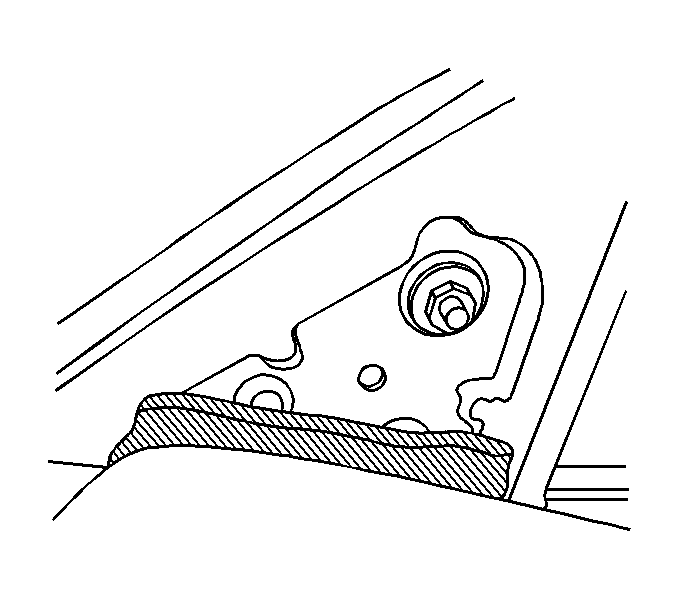
Remove the foam blocker and split the difference between the upper and the lower part of the trim pad. Refer to Figure 22.
Correction
Adjust the mirror patch or the door glass. Refer to General Information on Door Glass Adjustments later in this bulletin.
Condition
There is a water leak in the rear compartment.
Cause
The taillamp harness grommet may not be seated properly.
Correction
Figure 23
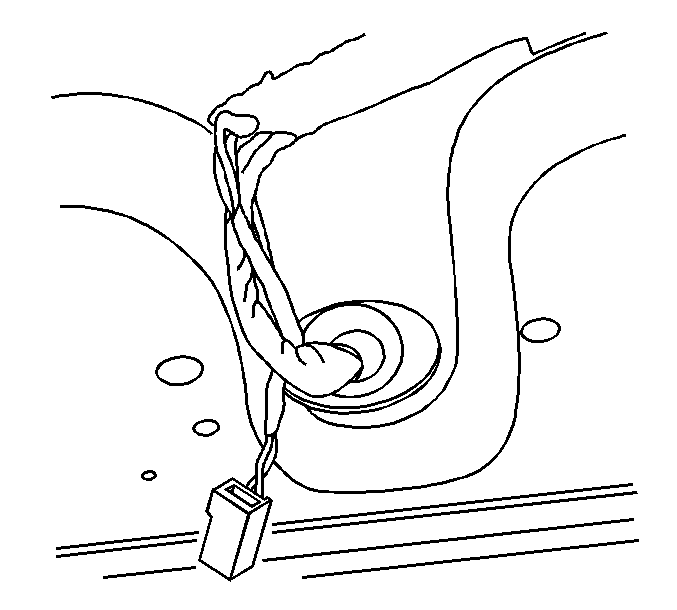
Make sure that the grommet lip is seated properly. Refer to Figure 23.
Condition
There is a water leak in the rear compartment (hard top, T-top models).
Cause
The rear compartment primary seal may not be seated properly.
Correction
Figure 24
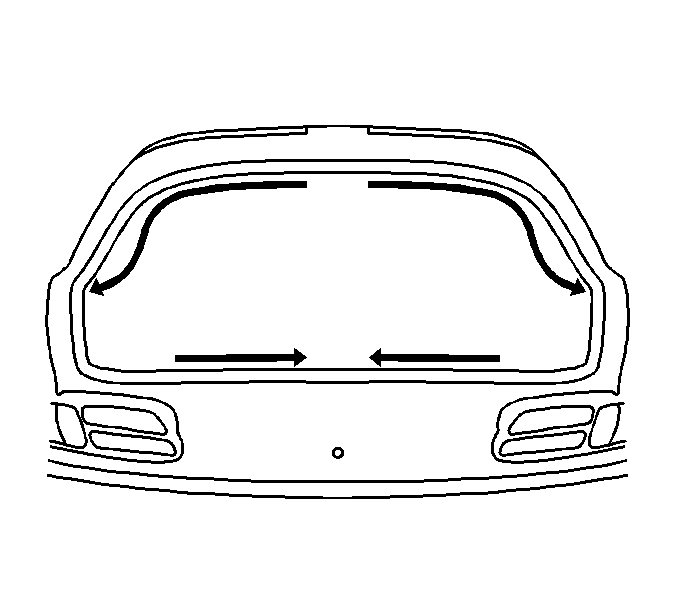
Center the weatherstrip in the opening and install the weatherstrip. Make sure the seal is fully seated to the hem flange. Refer to Figure 24.
Condition
There is a water leak in the rear compartment (convertible models).
Cause
The rear compartment primary seal may not be seated properly.
Correction
Figure 25
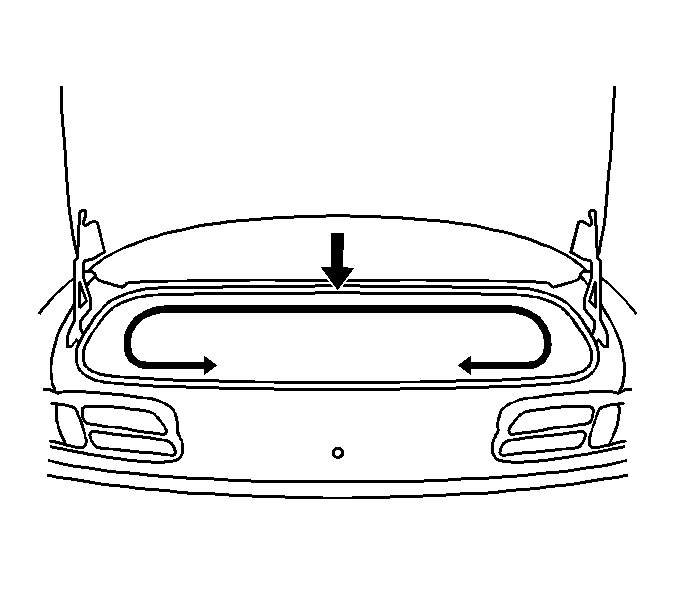
Center the weatherstrip in the opening and install the weatherstrip. Make sure the seal is fully seated to the hem flange. Refer to Figure 25.
Condition
Figure 26

There is a water leak in the rear hatch (hard top, T-top models). Some customers may comment that when the rear hatch is opened, water runs out of one or both front lower corners. Refer to Figure 26.
Cause
Sealing operations may have been missed at the two locations during assembly.
| • | The sealer may be missing at both of the lower front corners. |
| • | The sealer may be missing downward from the hinges. |
Correction
Figure 27
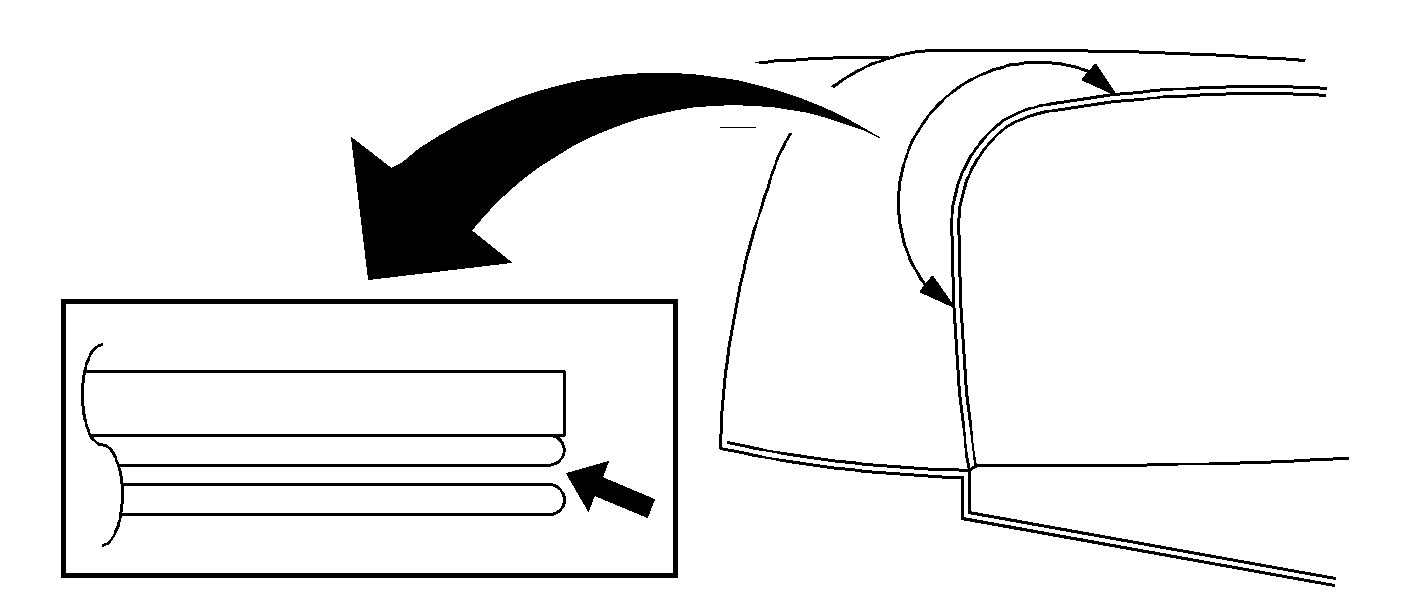
Open the rear hatch to make sure there is no trapped water.
Important: Wear safety glasses and use compressed air to dry the area.
Determine which area needs to be sealed. Refer to Figures 26 and 27.
Clean the surface to be sealed using one of the following, or an equivalent:
| • | 3M® General Purpose Adhesive Cleaner, P/N 08984 |
| • | Dominion Sure Seal, Sure Solve Stock BSS |
| • | Kent Acrosol™ |
Seal the flange(s) using one of the following, or an equivalent:
| • | 3M® Ultropro™ Autobody Sealant |
| • | Kent High Tech Seam Sealer Clear 10200 |
| • | Dominion Sure Seal Heavy Duty Drip Check LSC Item #9019 |
Condition
Water drips from the left hand side strut attachment on the deck lid (hard top, T-top models).
Cause
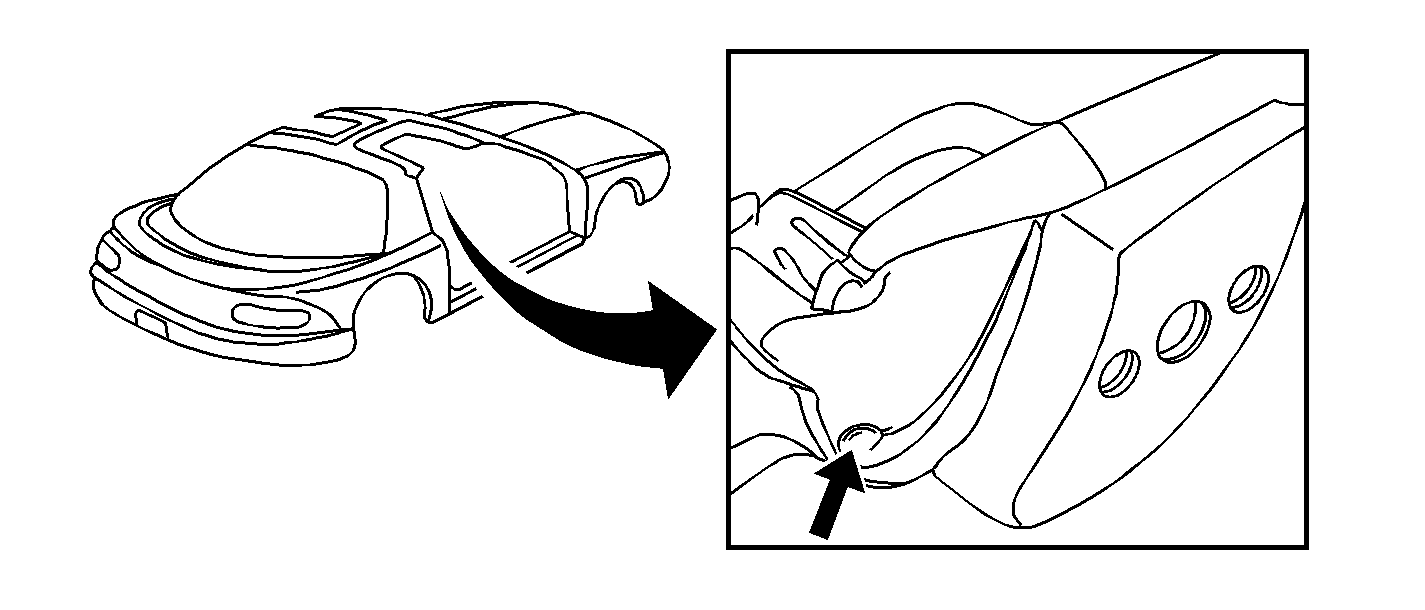
Figure 28
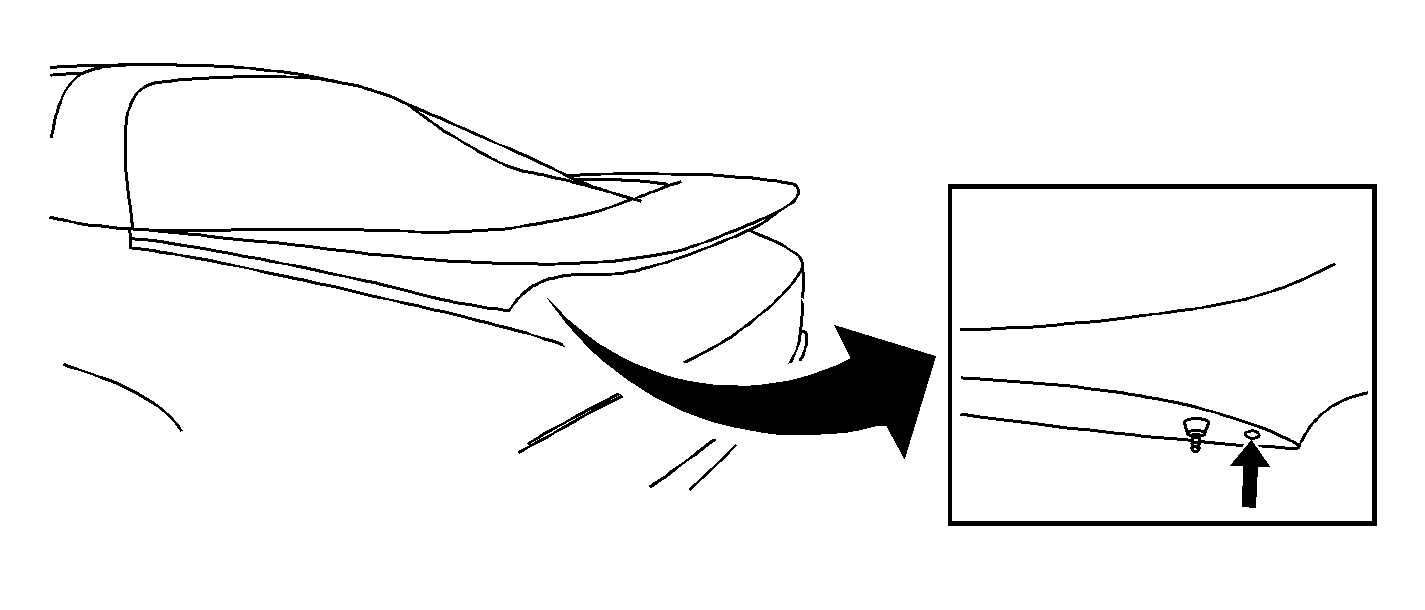
A plug may be missing from under the left side spoiler. Refer to Figure 28.
Correction
Remove the spoiler and install plug, P/N 10231979.
General Information on Door Glass Adjustments
Important: On frameless door glass, always check and verify door alignment to the body prior to adjusting the door glass. Some items may require that the door glass be adjusted. It is important that the door glass be able to contact and seal to the weatherstrip when operating the glass with the door closed ("reroll"). Always check the ability to "reroll the door glass" with the door in the closed position when door glass adjustments are made.
The glass is not parallel to the weatherstrip or is not contacting the up stops at the same time.
- Lower the glass part way and raise to within 25 mm (1 in) from the weatherstrip.
- Loosen the inner panel cam attachments. Refer to item 1 in Figure 29. The front attachment is slotted for adjustment
- Position the glass parallel to the weatherstrip and tighten the attachments.
Figure 29
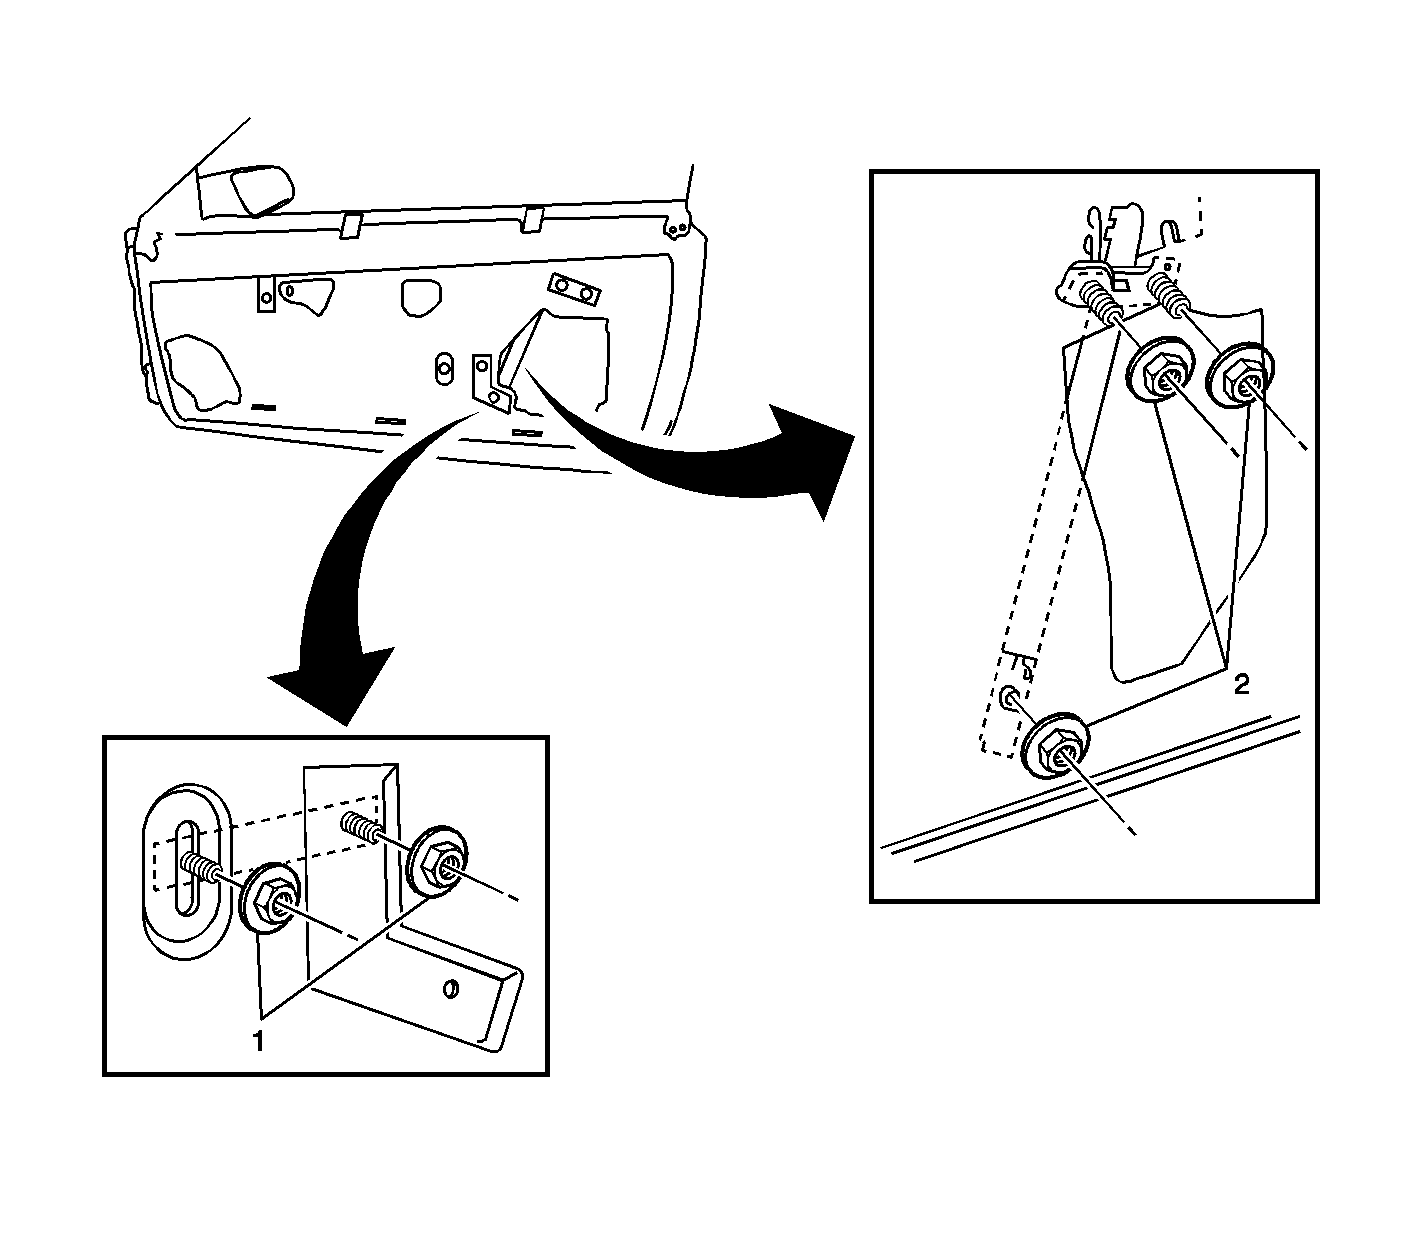
Tighten
Tighten the attachments to 10 N·m ( 89 lb in).
The glass is forward or rearward.
- Loosen the rear guide channel attachments. Refer to item 2 in Figure 29.
- Position the glass to the desired location and tighten the attachments.
Tighten
Tighten the attachments to 27 N·m (20 lb ft).
This glass is up or down at the front.
Figure 30
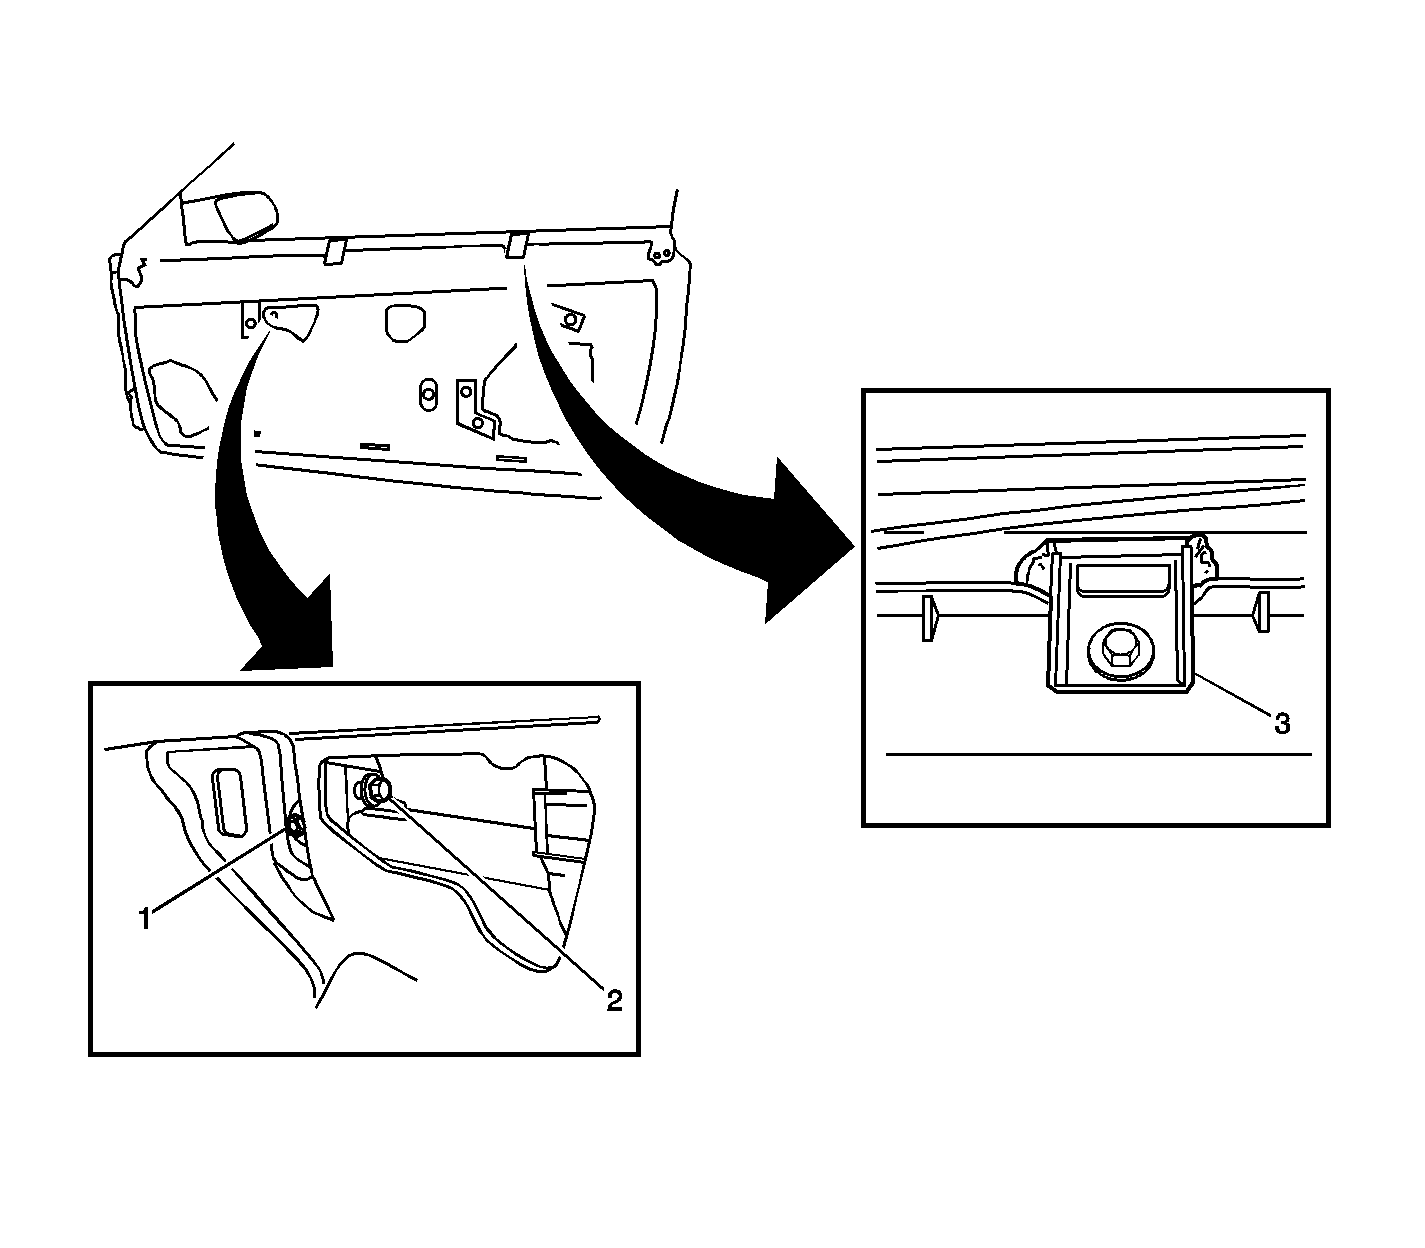
Loosen the front up stop attachment. Refer to item 1 in Figure 30.
Position the glass to the desired location and tighten the attachments.
Tighten
Tighten the attachments to 10 N·m (89 lb in).
The glass is up or down at the rear.
- Loosen the rear up stop attachment in the rear guide channel.
- Position the glass to the desired location and tighten the attachments.
Tighten
Tighten the attachments to 10 N·m (89 lb in).
The upper edge of the glass is inboard or outboard.
- Loosen the rear guide channel attachments
- Loosen the front up stop in/out attachment (access through the hole in inner panel rearward of the front up stop). Refer to item 2 in Figure 30.
- Adjust the rear guide channel jack screws in or out as desired.
Important: The front up stop will "float" in or out as the jack screws are adjusted in or out.
Tighten
| • | Tighten the rear guide channel attachments to 27 N·m (20 lb in). |
| • | Tighten the front up stop in/out attachment to 10 N·m (89 lb in). |
Belt stabilizers will reduce noise during glass travel or improve glass stability. Refer to item 3 in Figure 30.
- With the glass in the full up position, loosen the stabilizer attaching screw.
- Apply slight outboard pressure on the glass.
- Tighten the stabilizer attaching screw.
Important: If the glass binds or moans/squeaks during travel, loosen stabilizer and reposition it slightly inboard to reduce pressure on the door glass.
Figure 31
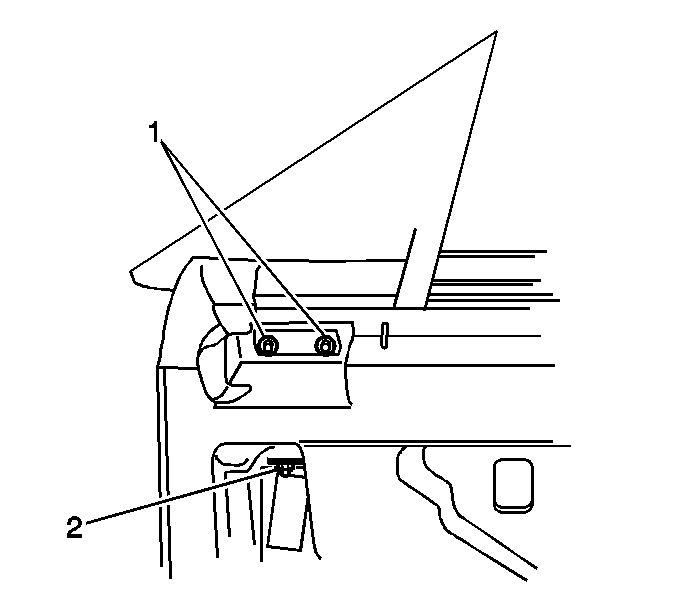
Adjust the window to the proper height to the roof weatherstrip. Then adjust the mirror patch to fit the door glass and the "A" pillar. Refer to item 1 in Figure 31 for up down and for and aft adjust. Refer to item 2 in Figure 31 for in and out adjustment.
Parts Information
Part Number | Description |
|---|---|
12345097 (U.S.) 10953479 (Canada) | Weatherstrip Adhesive Gel (Black) |
12345739 (U.S.) 10953541 (Canada) | RTV Silicone Rubber Sealant (Black) |
Parts are currently available from GMSPO.
Warranty Information
Dealers should use the closest labor operation code for each separate repair operation.
For individual repair operations that require labor time in excess of 0.5 hr, prior District Service Manager approval is required.
