Removal Procedure
- Relieve the fuel system pressure. Refer to Fuel Pressure Relief Procedure .
- Remove the negative battery cable.
- Loosen the air cleaner outlet duct clamp.
- Remove the air cleaner outlet duct from air cleaner resonator.
- Loosen the air cleaner resonator clamp at the throttle body.
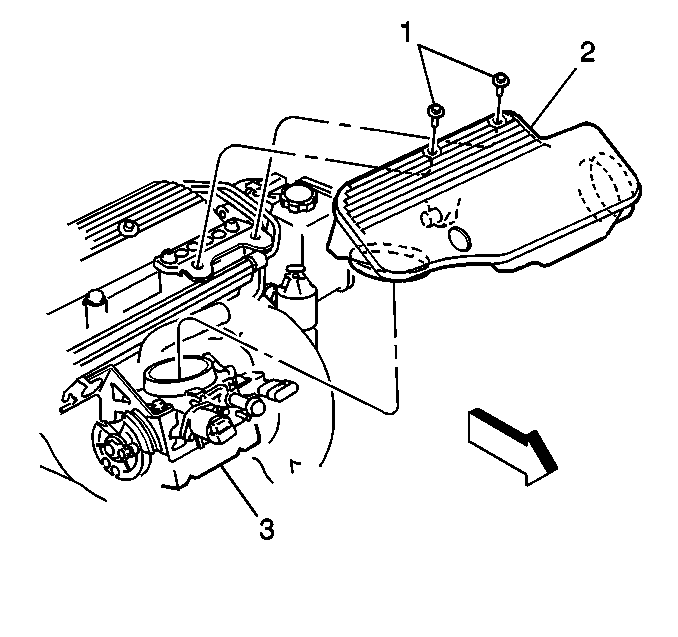
- Remove the bolts and nuts (1) attaching the resonator.
- Lift the air cleaner resonator (2) from the throttle body (3).
- Remove the crankcase vent hose to bottom of resonator, then remove the resonator.
- Remove the vacuum hose at the fuel pressure regulator.
- Remove the fuel rail attaching bolts.
- Remove the Camshaft Position sensor electrical connector.
- Remove the injector electrical connectors. Push in the wire connector clip, while pulling the electrical connector away from the fuel injector.
- Remove the fuel inlet pipe at the fuel rail. (Use a backup wrench on the fuel rail inlet fitting to prevent it from turning).
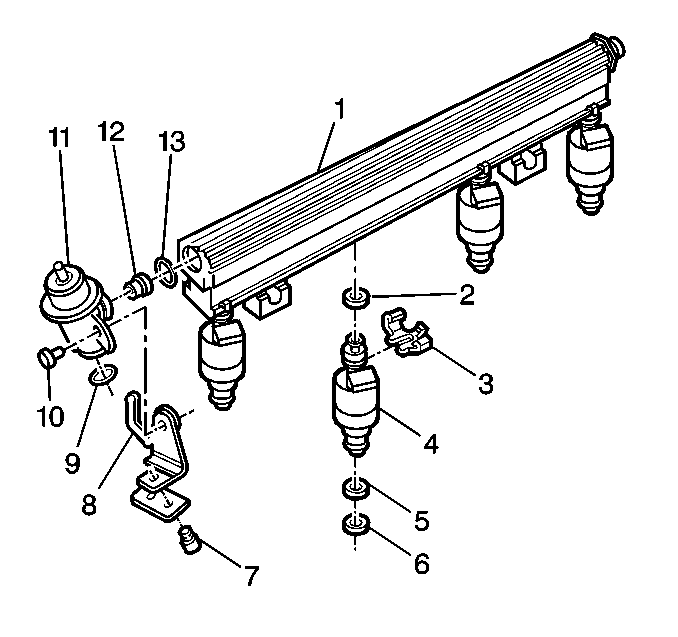
- Lift the fuel rail assembly (1) from the cylinder head.
- Loosen the fuel return pipe retaining bracket attaching screw (7). (Rotate the retaining bracket (8) to allow fuel pipe to be removed).
- Remove the fuel return pipe from the pressure regulator (11).
- Remove the inlet and return pipe to fuel feed and return line connections.
- Remove the inlet and the return pipe assemblies. Discard O-rings (9).
- Remove the fuel rail assembly.

Caution: Unless directed otherwise, the ignition and start switch must be in the OFF or LOCK position, and all electrical loads must be OFF before servicing any electrical component. Disconnect the negative battery cable to prevent an electrical spark should a tool or equipment come in contact with an exposed electrical terminal. Failure to follow these precautions may result in personal injury and/or damage to the vehicle or its components.

Installation Procedure
- Whenever the fuel rail is disconnected from the fuel pipes, reconnect the fuel pipes to rail at this time.
- Install the fuel return pipe into regulator (11). (Align bracket to retain return pipe).
- Position the fuel rail (1) over cylinder head and connect fuel injector electrical connectors.
- Install the fuel rail assembly into the cylinder head.
- Install the Camshaft Position sensor electrical connector.
- Install the fuel rail assembly attaching bolts.
- Install the vacuum hose to the fuel pressure regulator (11).
- If the front (engine) fuel pipes are being replaced, install new fuel pipe O-rings (9), coated with clean engine oil.
- Install the fuel inlet pipe connections.
- Install the crankcase vent hose to bottom of the air cleaner resonator.
- Install the air cleaner resonator (2) to throttle body (3).
- Install the air cleaner resonator attaching bolts and nuts (1).
- Air cleaner outlet duct to air cleaner resonator.
- Install the negative battery cable.
- Inspect for fuel leaks through the following steps:

Important: Apply a few drops of clean engine oil to the male end of the fuel pipes before installing.
Important: Whenever there is not enough thread-locking material on the threads of the fuel outlet pipe bracket screw, apply Loctite® 262 to insure proper locking.
Tighten
| • | Tighten the return pipe bracket screw (7) to 6.0 N·m (53 lb in). |
| Important: Use a backup wrench on the fuel rail inlet fitting to prevent it from turning. |
| • | Tighten fuel inlet pipe nut to 30 N·m (22 lb ft). |
Important: Rotate the fuel injector(s) as required to avoid stretching the wire harness.
Tighten
Tighten fuel rail attaching bolts to 26 N·m (19 lb
ft).
Important: Use a backup wrench to prevent female fitting from turning.
Tighten
Tighten the fuel pipe fittings to 27 N·m (20 lb
ft).

Important: Apply a few drops of clean engine oil to the vent hose before installing.
Important: Apply a few drops of clean engine oil to the air cleaner resonator before installing
Tighten
Tighten the air cleaner resonator clamp to throttle body 4-5 N·m
(35-44 lb in).
Tighten
Tighten the bolts and nuts to 10 N·m (89 lb in).
Tighten
Tighten the air cleaner outlet duct clamp 4-5 N·m (35-44 lb
in).
| 15.1. | Turn the ignition switch to the ON position for two seconds. |
| 15.2. | Turn the ignition switch to the OFF position for ten seconds. |
| 15.3. | Turn the ignition switch to the ON position. |
| 15.4. | Check for fuel leaks. |
