FUEL FILLER DOOR LOW OR NO SPRING FORCE

MODELS AFFECTED: 1989 RIVIERA
Some 1989 Rivieras may experience a condition of fuel filler doors that would not spring open when the release was activated. This condition is caused by insufficient force of the opening spring.
To correct this condition the fuel filler door must be replaced with a new door, part number 20726374, that contains dual opening springs and pins with Teflon coating. Painting of the fuel filler door to match body color is required before reassembly.
Parts are expected to be available on April 10, 1989. Until then, normal part orders will not be accepted by GMSPO. Only verifiable emergency VIP orders will be accepted. SPO will make every effort to obtain parts. All parts will be placed on 400 control to waive VIP surcharges. However, the part will be shipped premium transportation at dealer's expense. All other order types will be cancelled as incorrectly ordered while the 400 control is in place. The following service procedure should be followed when removing the fuel filler door:
1. Remove gas cap.
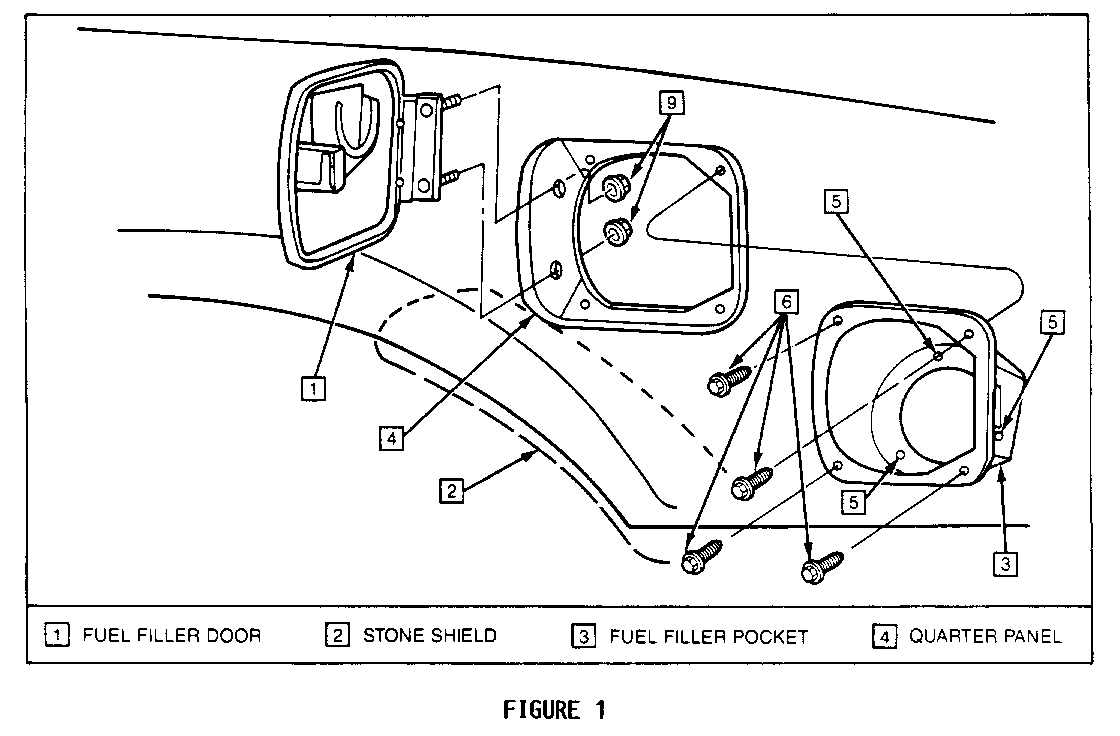
2. Remove three screws that hold the fuel filler pocket to fuel tank. Refer to Item 5, Figure 1.
3. Remove four screws that attach the fuel filler pocket to quarter panel. Refer to Item 6, Figure 1.
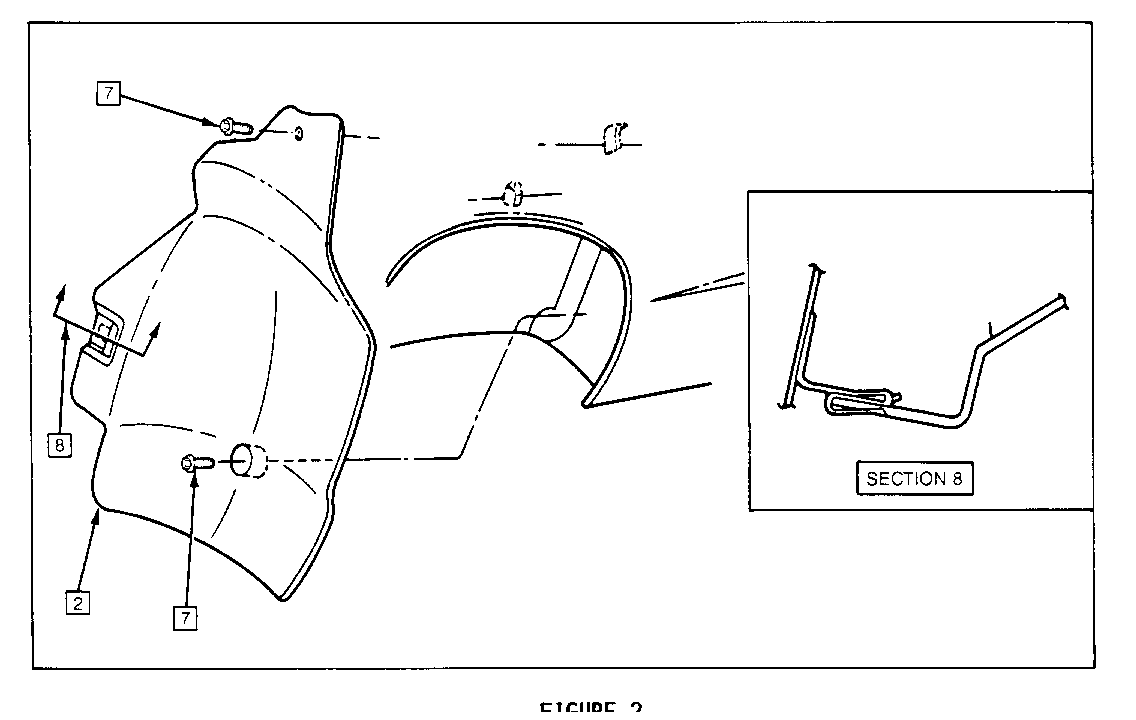
4. Remove two screws that join the stone shield to body at the wheelhouse (Refer to Item 7, Figure 2) and slide shield from clip (Refer to Item 8, Figure 2) at lower outboard support bracket.
5. Mark the location of the hinge to body sheet metal to assure proper alignment of the new door after reassembly then remove two screws. Refer to Item 9, Figure 1.
Reassembly of Fuel Filler Door:
1. Fuel filler door (Refer to Item 1, Figure 1):
Position hinge assembly aligning marks made during removal and secure with two screws previously removed. Refer to Item 9, Figure 1.
2. Pocket (Refer to Item 3, Figure 1):
Position pocket assembly to fuel filler opening in quarter panel, aligning four attaching holes and secure with screws previously removed. Refer to Item 6, Figure 1.
3. Fuel filler pipe to pocket (Refer to Item 3, Figure 1):
Position pipe aligning three attaching holes and secure with screws previously removed. Refer to Item 5, Figure 1.
4. Stone shield (Refer to Item 2, Figure 2): Slide component into clip at lower outboard support bracket (Refer to Item 8, Figure 2). Align holes in shield to support bracket on wheelhouse and secure with two screws previously removed. Refer to Item 7, Figure 2.
5. Reinstall gas cap.
WARRANTY INFORMATION
Labor Operation Number: B6000 for door replacement Labor Time: .2 hour Add Time: .3 for refinish Trouble Code: 92


General Motors bulletins are intended for use by professional technicians, not a "do-it-yourselfer". They are written to inform those technicians of conditions that may occur on some vehicles, or to provide information that could assist in the proper service of a vehicle. Properly trained technicians have the equipment, tools, safety instructions and know-how to do a job properly and safely. If a condition is described, do not assume that the bulletin applies to your vehicle, or that your vehicle will have that condition. See a General Motors dealer servicing your brand of General Motors vehicle for information on whether your vehicle may benefit from the information.
