POWERMASTER BRAKES (DIAGNOSTIC INFORMATION / INSTALL NEW KIT)

SUBJECT: POWERMASTER BRAKES (DIAGNOSTIC INFORMATION/INSTALL NEW KIT)
MODELS AFFECTED: 1986 LESABRE/ELECTRA ESTATE WAGON 1985-87 REGAL WITH 3.8 S.F.I. TURBO
This bulletin has been revised to include more diagnostics and introduces new repair kits for rebuilding the Powermaster unit. Please discard Bulletin 87-5-13A and replace it with this bulletin.
This bulletin provides brake diagnostic information that will help to correctly diagnose and resolve concerns with the Powermaster Brake System.
If, after following this procedure a technician still has a question, Delco Chassis Division has set up an 800 number for additional assistance.
Call: 1-800-523-0203
CONDITION:
--------- Some owners of 1986 LeSabre/Electra Estate wagons or 1985-87 Buick Regal Turbo vehicles equipped with the Powermaster Brake System may experience either "harder pedal feel" or "increased pedal travel". The red brake warning light may also be illuminated. This should normally coincide with the hard pedal feel or warn of impending hard pedal if a concern is not resolved. It may also momentarily or continuously illuminate in conjunction with the increase pedal travel problem.
CAUSE:
----- A. "Harder Pedal Feel" symptoms can be diagnosed from this bulletin. There are four likely causes to be aware of:
1. ACCUMULATOR WITH LOW GAS CHARGE: Symptoms - Pedal is momentarily hard and/or brake warning light flickers on normal to fast brake applies.
2. PRESSURE SWITCH FAILURE: Symptoms - Pedal remains hard on all applies and pump fails to run.
3. PUMP FAILURE: Symptoms - Pedal remains hard on all applies and pump fails to run or may run continuously (with or without brake application).
4. INTERNAL OR EXTERNAL LEAKAGE: Symptoms - Pedal remains hard on most or all applies. Brake fluid may be present on outside or rear of unit. Pump runs continuously or cycles frequently (with or without brake application).
B. "INCREASED PEDAL TRAVEL" symptoms can be diagnosed from this bulletin. If this symptom is recognized in conjunction with "HARDER PEDAL FEEL", follow the diagnostic procedures for "harder pedal feel".
NOTE: Replacement of the complete Powermaster assembly is not required to correct most customer concerns. Part kits are available that will resolve most concerns with this system, and eliminate unnecessary replacement of the complete Powermaster assembly.
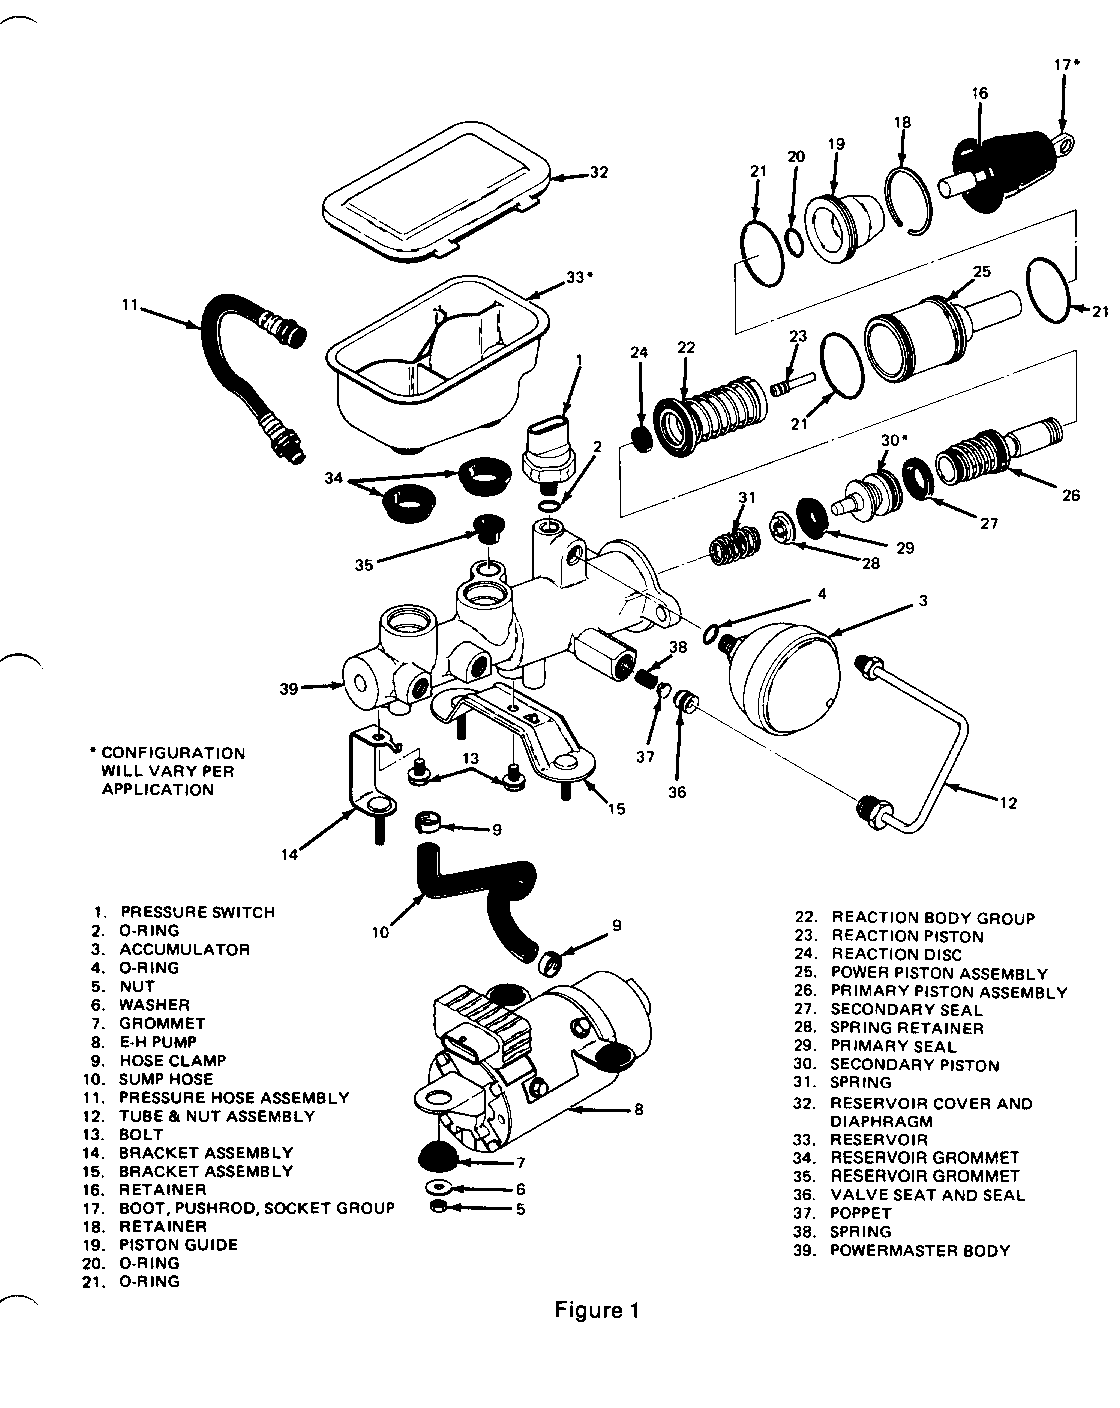
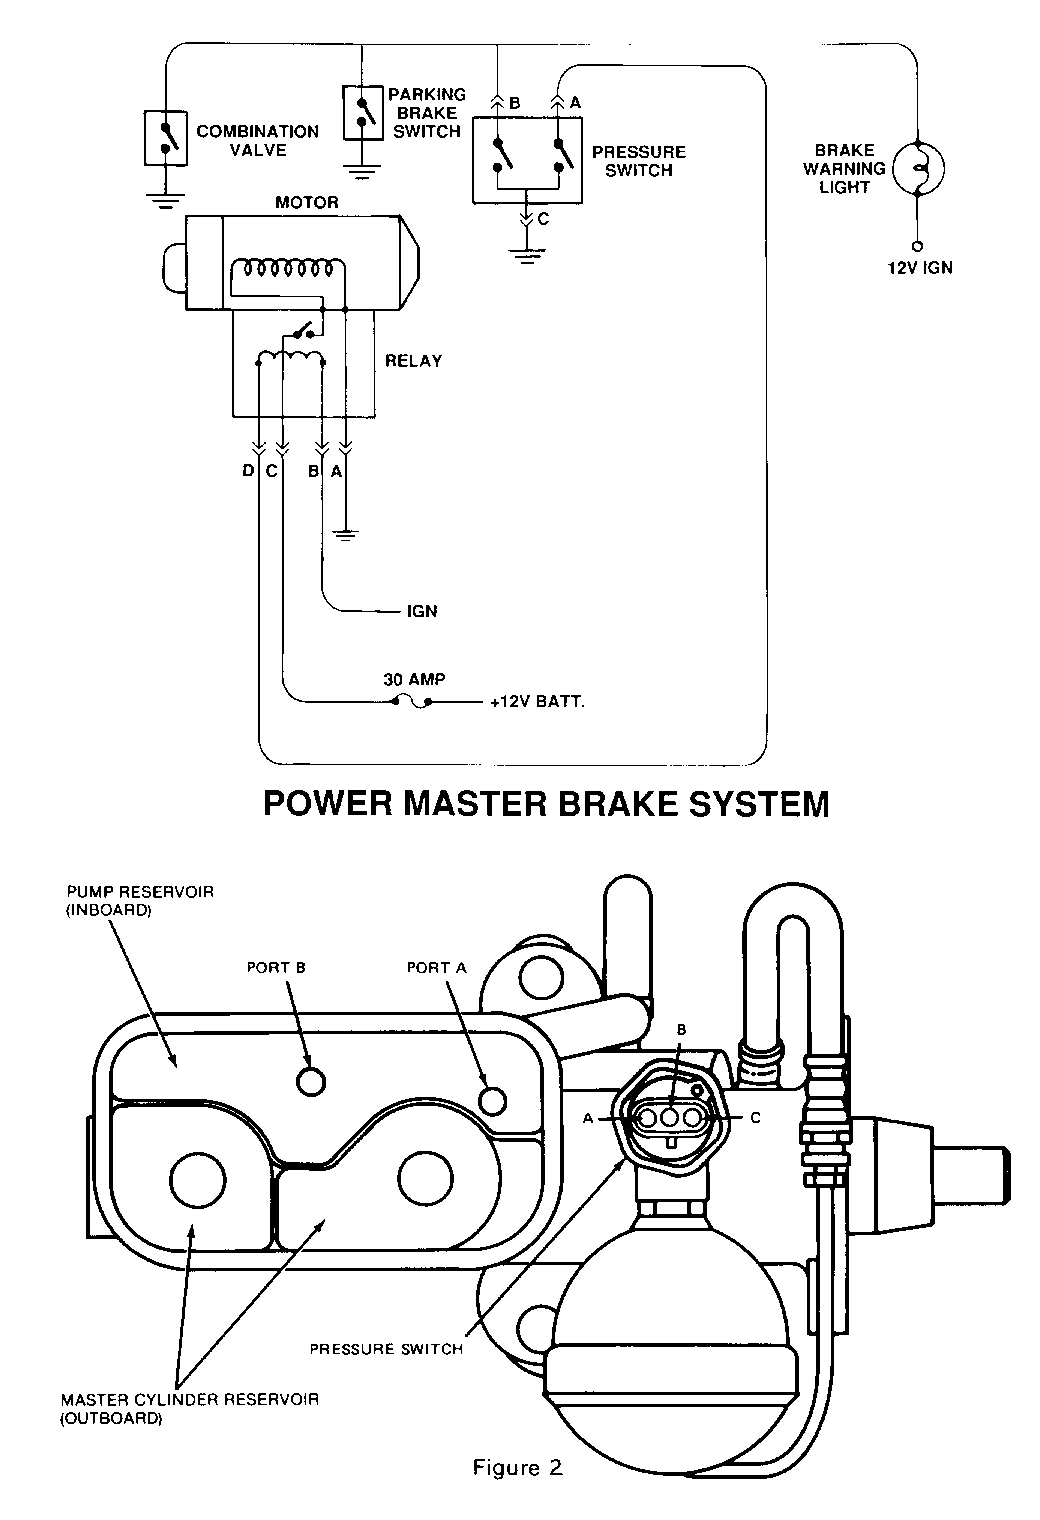
See Figures 1 and 2 for component identification.
HARDER PEDAL FEEL DIAGNOSTICS PROCEDURE
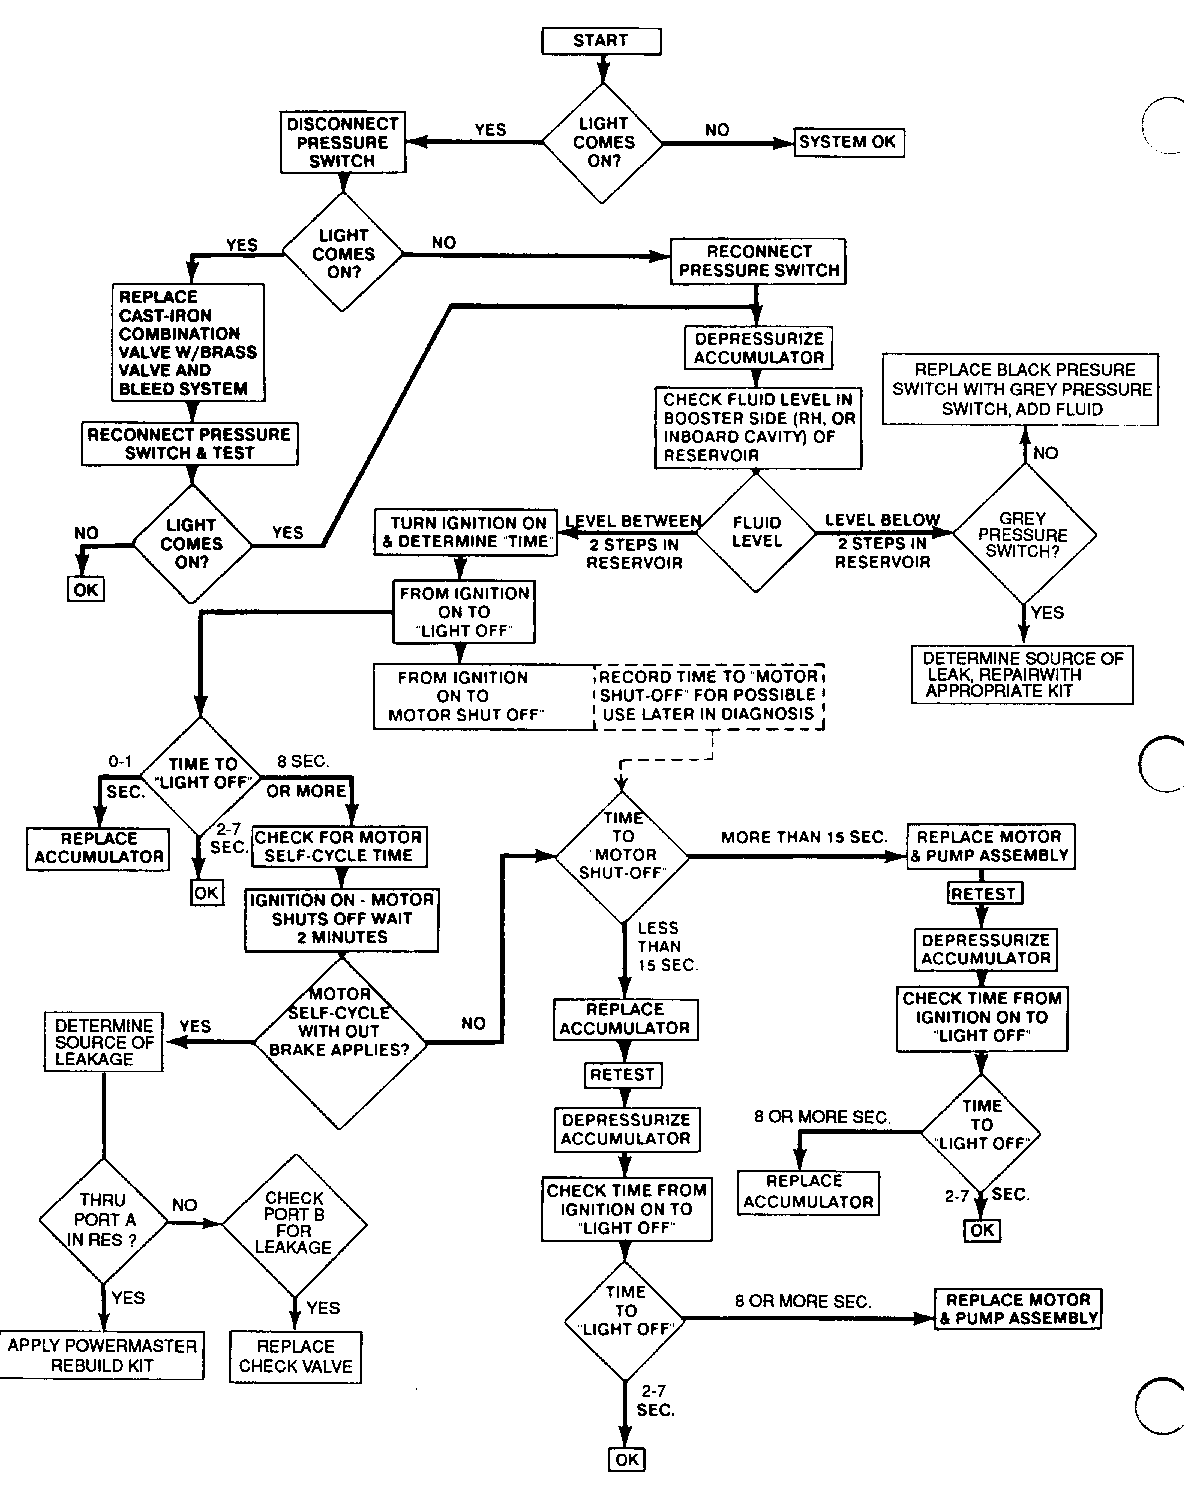
PROCEDURE/TEST RESULT CORRECTIVE ACTION -------------- ------ ----------------- FLUID LEVEL/EXTERNAL LEAKAGE: ---------------------------- Make 10 brake applies Below minimum Follow Corrective with ignition "off". mark Action Step #1. Check fluid level of pump reservoir (Fig. 2).
- or - Above gage Reservoir overfilled marks Remove excess fluid Continue diagnostic
- or - Within normal No action required. level gage marks Continue diagnostics
WARNING
LIGHT OPERATION: ----------------------- Check red brake warning Light does not No action required. light with normal braking illuminate Continue diagnostics (Ignition "ON").
- or - Light comes on See accumulator and goes off operation diagnostics
- or - Light comes on See booster operation and may stay on diagnostics.
Make a series of rapid Light comes on No action required. brake applies (one and goes off Normal operation. apply per second). Continue diagnostics
ACCUMULATOR OPERATION:
Make 10 brake applies 0-1 second Replace accumulator with ignition "off". P/N 18014978 or Turn ignition "on". 18018722) per Check time from motor instructions on "start" to red light off. installation sheet.
- or - 2-7 seconds No action required. Continue diagnostics
- or - 8 seconds or Follow Corrective greater Action Step #2
BOOSTER MOTOR OPERATION:
Turn ignition on and Motor does not Follow Corrective make normal brake run, no power Action Step #3 applies. assist, red warn- light illuminates.
- or - Motor does not Follow Corrective shut off within Action Step #4 15 seconds.
INTERNAL LEAKAGE:
Wait for pump to shut off Pump cycles Follow Corrective after normal run cycle. without a brake Action Step #2.B Keep ignition "on". application Wait for five minutes. being made.
INCREASED PEDAL TRAVEL DIAGNOSTICS PROCEDURE
(ALL MODELS)
Inspect for external Leakage Repair leak or leaks between master observed replace leaking cylinder outlets and part. Add fluid wheel brakes. to master cylinder reservoir per Figure 2.
- or - No leakage Proceed to next observed. step below.
(1986 STATION WAGONS ONLY)
Bleed left front Pedal Travel Replace combination caliper only. significantly valve with brass improves. valve (P/N 25509419) and rebleed total system.
- or - Pedal travel Bleed total system is still and check drum excessive. * brake adjustment.
Bleed entire brake Pedal Travel Repair Powermaster system and check is still unit with Seal drum brake adjustment. excessive. * Repair Kit 18020067
(1985-87 BUICK REGAL TURBO ONLY)
Bleed entire brake Pedal travel Repair Powermaster system and check is still unit with Seal drum brake adjustment. excessive. Repair Kit 18020067
*NOTE: To properly evaluate pedal travel, apply brakes with vehicle parked, ignition off, and without power assist (de-pressurize system with ten brake applies). Pedal travel on the vehicles should be a maximum of 2-1/4 inch with normally worn brake linings when checked at 100 pound pedal force using J-28662 tool.
CORRECTIVE ACTION STEPS
STEP #1 - LOW FLUID IN BOOSTER PUMP RESERVOIR DUE TO EXTERNAL LEAK. ------------------------------------------------------------------- A. Make ten medium to high effort brake applies with ignition off to de-pressurize the system. Check fluid level in booster pump reservoir by observing if level falls between the two gage marks located on the inside of the pump reservoir (Figure 2).
NOTE: If pressure switch has a black plastic body, the unit must be refitted with the updated pressure switch which has a gray plastic body (P/N 18018141).
B. Inspect the pressure switch and adjacent areas for external leaks. This may require wiping those areas dry and observing for fluid leakage during and after the pump motor run time. If fluid is observed, replace appropriate component.
C. With unit removed from vehicle, check for leakage at rear. Rubber boot should not have excess amounts of fluid inside. If fluid is observed, repair Powermaster with Seal Repair Kit 18020067.
D. Bleed and refill unit to proper gage level in reservoir with system in the de-pressurized state.
STEP #2: ACCUMULATOR OPERATION TEST: PUMP RUNS MORE THAN 8 SECONDS ------------------------------------------------------------------ A. Check for internal leakage in diagnostics procedure. If pump does not self-cycle within five minutes, proceed to Step C.
B. If pump self-cycles (ignition "on", no brakes applied), an internal pressure leak is present.
1. Place a short piece (6-12 inches) of flexible plastic tubing (approximately 1/4 inch-1/2 inch diameter) over Port A in the inboard pump reservoir (Figure 2). If leakage is occurring, fluid will rise in the tube. Repair this fault with Seal Repair Kit 18020067. If no leakage is found, examine Port B.
2. Place the same plastic tubing over Port B (Figure 2). If leakage is observed here, repair with Check Valve Repair Kit 18018552.
C. De-pressurize the system with ten brake applies and ignition off. Fluid level must be within gage marks in reservoir.
D. Install J35126 tool and test to determine if fault is in motor and pump assembly or if fault is in the accumulator. (See NOTE BELOW.)
E. Turn ignition on. Wait until pump motor shuts off. Turn ignition off. Slowly bleed off the accumulator pressure with J35126 bleed valve - returning fluid to the pump reservoir (inboard side, Figure 2). The gage pressure will suddenly drop to zero at the accumulator gas pre-charge point.
1. If the drop-off point occurs below 200 psi, replace the accumulator (P/N 18014978 or 18018722).
2. If the drop-off point occurs above 200 psi, replace the pump and motor assembly (P/N 18011279).
NOTE: J35126 per Step 2.D. above is the preferred method. However, if such a tool is not available, the alternative method listed below will provide the necessary diagnostic information to determine the fault.
1. De-pressurize the system per 2.C. Turn ignition on and check the time from motor start running to motor stop running.
2. If time to motor shut-off is less than 15 seconds, replace the accumulator.
3. If the time to motor shut-off is more than 15 seconds, replace motor and pump assembly and then retest accumulator per Accumulator Operation Test (Step #2 above). If run time on that test is still greater than 8 seconds, also replace the accumulator.
STEP #3: BOOSTER PUMP MOTOR DOES NOT RUN ---------------------------------------- Confirm that the 30 amp brake system fuse is not defective, otherwise replace. Next, disconnect the pressure switch and pump motor electrical connectors and conduct the following electrical circuit checks:
A. Pressure Switch (Ohmmeter Test) --------------------------------- 1. De-pressurize system by pumping brake pedal at least ten times with ignition switch off.
2. Using suitable ohmmeter, all terminals should have continuity with each other. If not, switch must be replaced.
B. Booster Motor (Ohmmeter Test) -------------------------------- 1. Meter should show resistance between motor terminals "B" and "D".
2. Meter should indicate open circuit between motor terminals "A" and "C".
3. Replace motor and pump assembly if above conditions are not met.
C. Pressure Switch Connector and Harness (Volt-Ohmmeter Test) ------------------------------------------------------------- 1. Make sure parking brake is released.
2. With ignition on, using a suitable ohmmeter, pressure switch terminal "A" should show continuity with motor terminal "D".
3. With ignition on, using a suitable voltmeter, pressure switch terminal "B" should be 12 volts relative to vehicle chassis ground.
4. If voltage at pressure switch terminal "B" is low or zero, disconnect electrical connector from combination valve. If voltage at "B" is now normal, combination valve wire harness or switch is at fault. If voltage at terminal "B" remains low or zero, red brake warning light circuit is defective.
5. If any of the above tests fail, wire harness and electrical connections must be replaced or repaired.
D. Pump Motor Connector and Harness (Volt-Ohmmeter Test) -------------------------------------------------------- 1. With ignition on, using suitable ohmmeter, motor terminal "A" should show continuity with vehicle chassis ground.
2. With ignition on, using suitable voltmeter, motor terminal "B" should show 12 volts relative to chassis ground.
3. With ignition on, using suitable voltmeter, motor terminal "C" should show 12 volts relative to chassis ground.
NOTE: This is the main electrical supply to the motor. If voltage is not present, check the 30 amp brake system fuse.
4. Recheck terminal "D" as per Step 3.C.1 above.
5. If any of the above tests fail, wire harness and electrical connections must be replaced or repaired.
STEP #4: MOTOR DOES NOT TURN OFF WITHIN 15 SECONDS (IGNITION "ON") ------------------------------------------------------------------ A. Check fluid level per Step 1.A.
B. Install J35126 Tool per Step 2.D. and test to determine if fault is in motor and pump assembly, pressure switch, or internal booster leakage.
C. Turn ignition on. Wait 20 seconds. Monitor booster pressure on J35126 gage.
1. If pressure exceeds 770 psi, replace pressure switch.
2. If pressure does not reach the 540 psi - 770 psi pump shutoff range, check Port A and Port B in the booster pump reservoir (Figure 2) per Step 2.B. above. If fluid is flowing in either port, the booster is leaking internally. Repair unit with Seal Repair Kit 18020067. If fluid is not flowing in either port, the motor and pump assembly is defective (unable to provide the required pressure) and should be replaced.
REFERENCES
1. Available Repair Kits: --------------------- The following repair kits are available to assist in servicing the Powermaster brake units. The labor times indicated include time for the functional system check and diagnostic procedures.
LABOR OP. LABOR TIME P/N DESCRIPTION NUMBER NUMBER --- ----------- --------- ---------- 18011279 Pump and Motor Asm. Package H0980 0.8 Hr. 18018141 Pressure Switch Asm. Package H0778 0.4 Hr. 18014978 Accumulator Asm. Package H0985 0.3 Hr. (Excludes '85 Turbo) 18018722 Accumulator Asm. Package H0985 0.3 Hr. ('85 Turbo Only) 18013293 Res. Cover Asm. (Exc. '85 Turbo) H0610 0.2 Hr. 18011388 Res. Cover Asm. ('85 Turbo) 18011412 Push Rod & Retainer (Sta. Wgn.) 18011544 Push Rod & Ret'nr. (Exc. Sta. Wgn.) 18020512 Res. & Grommet Pkg. (Sta. Wgn.) 18020513 Res. & Grommet Pkg. ('85 Turbo) 18020514 Res. & Grommet Pkg. ('86-87 Turbo) 18011398 Boot Package T1377 0.4 Hr. 18010875 Bracket Package (Sta. Wgn.) T1378 1.1 Hr. 18010877 Bracket Package (Exc. Sta. Wgn.) 18011403 Sump Hose Package H0745 0.3 Hr. 25509419 Brake Combination Valve H0780 0.7 Hr. 18018552 Check Valve Asm. Package 18020067 PM-1 Repair Kit H1300 2.0 Hr. 18020511 High Pressure Hose Package.
2. Pump Operating Pressure Ranges: ------------------------------ Pump Off 540-770 psi Pump On 490-610 psi Light On 340-500 psi
NOTES: During normal operation the pump will run every 2-4 brake applies.
Pump on pressure level must always be at least 100 psi less than pump off pressure level.
3. System Bleeding: --------------- A problem may be encountered in bleeding the Powermaster unit if for any reason the pump has not been properly filled with brake fluid. If after any service or new installation the pump does not circulate fluid within 20 seconds motor run time, it may be necessary to reprime the pump. In order to reprime the system, the following steps should be followed:
A. Turn ignition off.
B. Apply the brake pedal with medium to firm pressure 10-15 times to de-pressurize the system. Check reservoir level and fill if required.
C. Clean and remove the reservoir cover.
D. Disconnect the booster tube and nut assembly from the casting boss at the pump outlet located adjacent to the pressure switch assembly (Figure 1).
E. Wait for brake fluid to appear from the disconnected outlet normal gravity bleeding.
F. When brake fluid begins to flow, reconnect the tube nut and torque to 17 N.m (13 lb.ft.).
G. Recheck the fluid level in the reservoir and add new brake fluid as needed. Reinstall the reservoir cover.
H. Turn ignition on. The pump should now fill the accumulator properly and shut off within 15 seconds. The fluid level on the inboard pump reservoir should diminish. (DO Not refill. Gage marks are only to be used with de-pressurized system.)
I. Continue with Service Manual bleed and fill procedures.
Part Availability:
Parts are currently available from GMSPO except for part number 18011279 expected to be available on 2/8/93.


General Motors bulletins are intended for use by professional technicians, not a "do-it-yourselfer". They are written to inform those technicians of conditions that may occur on some vehicles, or to provide information that could assist in the proper service of a vehicle. Properly trained technicians have the equipment, tools, safety instructions and know-how to do a job properly and safely. If a condition is described, do not assume that the bulletin applies to your vehicle, or that your vehicle will have that condition. See a General Motors dealer servicing your brand of General Motors vehicle for information on whether your vehicle may benefit from the information.
